Showing posts with label pineapple. Show all posts

Monday, January 26, 2015

Jerk Salmon Salad with Spicy Pineapple Dressing

Jerk Salmon Salad with Spicy Pineapple Dressing 2

It's been a little while since I shared a Secret Recipe Club (**) post with you.  We've been on a brief hiatus over Christmas, but I'm excited that my group is back to posting this week.

*  So what's this Secret Recipe Club you may ask?  The club has over a hundred members, divided into four groups, and each month one member is assigned (in secret) to another member from their group.  That person then selects a recipe (or more) to make, photograph, and prepare a blog post - all in secret.  Then everyone in the group posts their recipe on the same day, and of course the secret is then out.  It's a always a thrill to find out who has posted something from your own blog, and to meet and discover some new blogs.   If you are a food blogger and interested in joining the Secret Recipe Club, be sure to check out the Join SRC page.

Because we've been on a bit of a break, I've had an extra long time to explore and get to know my assigned blog, which this month is Sew You Think You Can Cook, hosted by Lauren who lives in Ohio with her husband and son.  Lauren is an aerospace engineer, and hopes to one day realise her food dream and become a caterer.  As well as her obvious passion for food and blogging, Lauren also loves quilting and cross stitching, which is evident in the quilt-block tutorials you will find on her blog along with all her great recipes.

There were several recipes from Lauren's blog I bookmarked to try:  Cranberry Cinnamon Rolls, Cinnamon Raisin Energy Balls, Coconut Shrimp with Bloody Mary Dip, and Lemony Shrimp Scampy with Orzo.  In the end, I decided Lauren's Spinach Salad with Spicy Pineapple Dressing was the best fit with the healthy eating plan I'm trying to follow this month.

Jerk Salmon Salad with Spicy Pineapple Dressing 3

I did make a couple of changes to fit my current food habits and available ingredients.  Firstly I replaced chicken with salmon, since I'm not eating any meat at the moment and, as a clean out of my fridge revealed a jar of jerk paste needing to be used up, I marinated my salmon with some of that instead of the ancho chilli powder which is not readily available here.  I couldn't get any spinach at the market this week, so I've used cos lettuce instead;  I replaced coriander (cilantro) with mint because that's what I had in the garden;  and I replaced apple cider vinegar with fresh lime juice, again because that's what I had on hand.  I increased the amount of chilli in the dressing as well, and let me tell you that this dressing is so good I could just drink it on it's own.  The combination of sweet pineapple, hot chilli, fresh mint and sour lime is positively irresistible, and was the perfect foil to the oily, spicy salmon.  Thanks for a great recipe, Lauren - this is definitely one I will be repeating.

Jerk Salmon Salad with Spicy Pineapple Dressing 1

Jerk Salmon Salad with Spicy Pineapple Dressing Recipe
adapted from this recipe
at Sew You Think You Can Cook
Serves 2 as a main meal

2x fillets of salmon, pin bones removed
2 teaspoons of jerk paste
olive oil

1/2 a fresh pineapple, core & skin removed and discarded
generous handful of fresh mint leaves
1x clove garlic
1x green chilli, roughly chopped (remove seeds if you prefer)
juice of 1/2 an orange
2 tablespoons lime juice
flaky sea salt & freshly ground black pepper
extra virgin olive oil

salad leaves of your choice
thinly sliced red & yellow peppers

Rub jerk paste all over salmon fillets, and set aside in the fridge to marinate for at least two hours.

Preheat oven to 180 degrees C (350 degrees F).

Meanwhile, make the spicy pineapple dressing.  Cut the fresh pineapple into chunks, and put half of the chunks into a blender - reserve the rest of the pineapple chunks for the salad.  Add the mint leaves, garlic, chilli, orange juice, lime juice, salt and pepper to the blender and blitz until smooth.  Then with the blender running, add extra virgin olive oil in a thin stream, until dressing is smooth and emulsified.  Taste and adjust seasoning to your liking.

Place salmon in a lightly greased ovenproof dish, drizzle with a little olive oil, and place in the preheated oven until cooked through - about 8 to 10 minutes depending on the size of your fillets.

While the salmon is cooking, toss salad leaves, red & yellow peppers, and chunks of pineapple together.  Arrange on a serving platter, and drizzle over the dressing.   Remove salmon from the oven, place on top of the salad and drizzle with a little more dressing.  Serve immediately.

I hope you enjoy this dish as much as I did, and visit the links below to check out all the other great dishes my Secret Recipe Club friends made.


Monday, December 1, 2014

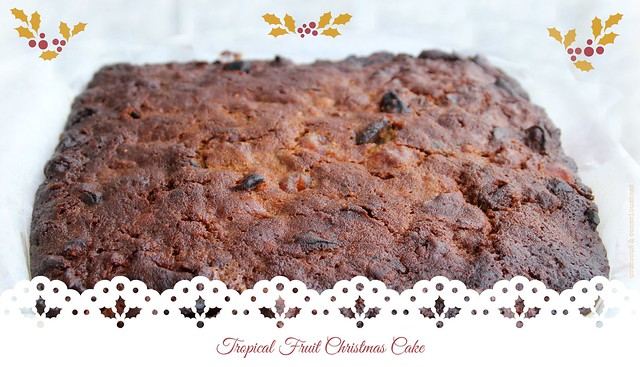
Tropical Fruit Christmas Cake

Tropical Fruit Christmas Cake

Every year since I started this blog it's been on my mind to post a Christmas cake recipe but, best laid plans and all of that, some years I just didn't get around to making a cake, other years the cake got made but planning for a blog post was off and somehow posting a Christmas cake recipe in the middle of January just didn't make sense.

This year, with family coming (from near and far) to stay over the Christmas holidays, it's an even bet that my hostessing skills will be called into serious question if I don't produce said cake.  Serendipitously, it's our monthly Pot Luck week at I Heart Cooking Clubs, and I felt sure that at least one of our IHCC chefs would have a Christmas cake recipe I could try.  I was pretty certain that if I looked hard enough Nigella Lawson, Donna Hay, Nigel Slater, Jamie Oliver and our current chef, Diana Henry, would probably all offer something suitable.

As it turned out, the first place I searched was Donna Hay's website, and on finding her Christmas cake recipe, I needed look no further.  Because we celebrate Christmas here in New Zealand in the height of summer, I decided to give my cake more of a tropical vibe than the traditional, rich, dark cake.  I used Donna's recipe as a basic template for quantities of eggs, butter, sugar, flour, etc, but I replaced most of the fruit with more tropically inspired dried fruit.  In keeping with my tropical theme I soaked the fruit in ginger beer instead of sherry, and replaced almonds with macadamia nuts.  I also added some rose water, orange flower water, and almond extract to the soaking liquid, as well as adding some ground ginger and nutmeg in with the spices.

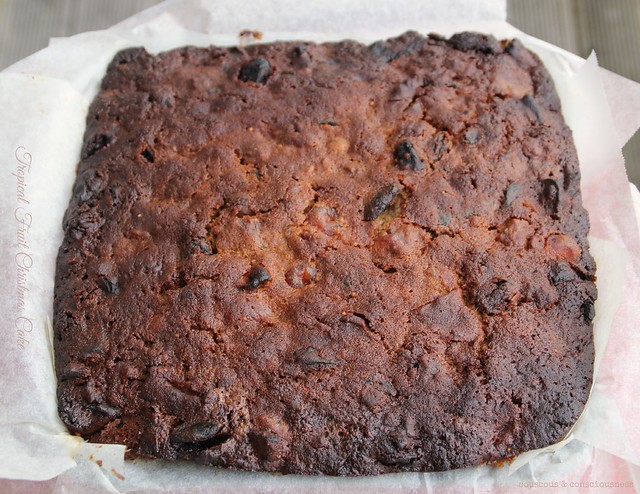
I'd love to show you a slice of this cake and tell you how it tastes, but what you see in the picture is the cake straight out of the oven.  It has several hours of cooling in the tin ahead of it, before it could be sliced, and anyway, you know that it's bad luck to cut the cake before Christmas.  Of course, there's always a few spoonfuls of the mixture that don't make it into the cake tin, and if what I tasted out of the bowl is anything to go by we are in for a wonderful cake.

I think this cake will be delightful as it is, without any further adornment, but if you like to go the whole marzipan and royal icing route that would be great too.  Personally, I'm thinking that Christmas Eve this cake will get a liberal blanket of a white chocolate, ginger and cream cheese frosting - what do you think?

Tropical Fruit Christmas Cake 2

Tropical Fruit Christmas Cake Recipe
Inspired by this recipe from Donna Hay

1.1 kg (2-1/2 lb) mixed dried fruit
(I used a combination of jumbo raisins, cherries, mixed peel, apricots, pineapple, figs, prunes and rock melon)
100g (3-1/2 oz) macadamia nuts
300 ml (1-1/4 cups) ginger beer
2 tablespoons rose water
2 tablespoons orange flower water
1 tablespoon almond extract
300g (10-1/2 oz) butter, room temperature
220g (7-3/4 oz) soft brown sugar
2x vanilla beans
4x eggs
375g (13 oz) plain flour
1/4 teaspoon baking soda
1 teaspoon each ground cinnamon, ground ginger, mixed spice & nutmeg
1/4 cup ginger beer, extra

Place all the mixed fruit and nuts into a large bowl, cutting larger pieces of fruit as you go - I cut everything into pieces about the size of the cherries.  Pour the first measure of ginger beer over the fruit, along with the rose water, orange flower water and almond extract.  Mix everything together well, cover bowl with a clean tea towel, and place in a cool, dark place to soak for 24 hours.  Give it a stir occasionally if you think of it.

Preheat oven to 140 degrees C (275 degrees F).  Grease a 20cm (8 inch) square cake tin, and line with two layers of non-stick baking paper, greasing each layer of paper as you go.

Place butter and brown sugar in the bowl of a stand mixer.  Split the vanilla beans lengthwise down the middle and scrape out the seeds, adding the seeds to the butter and brown sugar.  Set the machine running, and beat the mixture for 5 to 8 minutes, until light and creamy.  Add the eggs to the mixture, one at a time, beating well after each addition.

Sift together flour, baking soda and spices.  Add to the soaked fruit, and stir well to ensure that all the fruit is well coated with the flour.  Lastly add the butter and sugar mixture, and stir until everything is well combined.

Spoon the mixture into the tin (reserving a couple of good spoonfuls for the cook), smooth the top, and place in the preheated oven.  Bake for 2 hours 25 minutes to 2 hours 35 minutes, or until a skewer inserted into the centre of the cake comes out clean - I'd suggest you start testing after 2 hours 15 minutes.

Remove from the oven, and brush the top of the cake liberally with the extra ginger beer while still warm.  Allow to cool in the tin completely before removing and wrapping well in plastic wrap to store.  Should keep for at least four weeks.

If you would like to get to know Donna Hay a little better, or any of our other IHCC chefs, and to see what everyone else has cooked up this week, then do go and visit my friends at I Heart Cooking Clubs and check out the links (who knows, you might even want to join the journey and cook along with us) ...

Diana Henry badge 1A


Monday, October 27, 2014

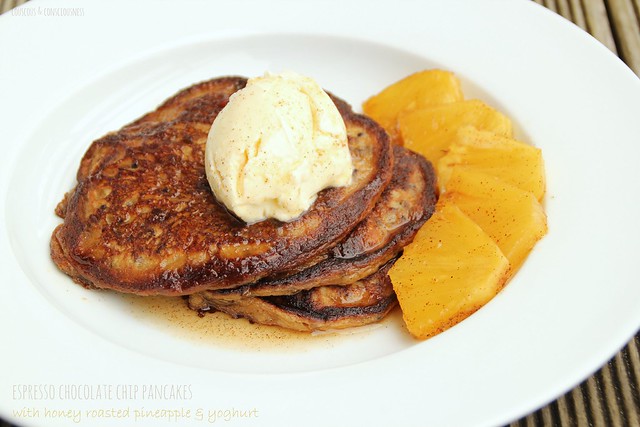
Espresso Chocolate Chip Pancakes

Espresso Chocolate Chip Pancakes 2

Today is a public holiday in New Zealand.  Not only does Labour Day commemorate the struggle for an eight-hour working day, but here it's also the day that really kicks off summer.  We are normally blessed with a hot sunny day on which everyone flocks to the beach and gets a nasty dose of sunburn, because somehow in our collective winter stupor we've forgotten about the great big hole in the ozone layer over New Zealand.  It's the day on which it is usually considered any risk of frost has passed and it is safe to plant tomatoes - we threw caution to the wind and planted ours last weekend.  No frost came, the sky didn't fall, the tomatoes appear to be thriving.

Unlike Labour Days passed, today is cool and breezy, low cloud is clinging to the hills around us, and rather than feeling the urge to flock to the beach, it felt more like a day for a late sleep-in, curl up on the sofa with a couple of movies, and enjoy a leisurely brunch.  A leisurely brunch in fact of espresso, chocolate chip pancakes, with a side of honey-roasted pineapple and yoghurt, and extra coffee.  Now I've got your attention, haven't I?!

It's Secret Recipe Club reveal day, and I can now tell you that my assigned blogger this month was the lovely Emily at Life on Food.  Having been born in Iowa, grown up in Georgia and Maine, Emily now lives in Connecticut with her husband, who also shares her passion for food and cooking.  Emily has a major in economics and works as a building consultant with colleges and universities.

Until this morning I wasn't hundred percent sure which one of Emily's many dishes I was going to make.  Emily has been blogging since 2009, and churning out on average around 300 posts a year, she gives new meaning to the word prolific.  That's a whole lot of dishes to choose from - just settling on a short list was pretty hard, let alone choosing just one.  My short list included New England Clam Chowder (although I'm not sharing that with you today, I will definitely be making this sometime soon), Lamb Meatballs with Toasted Orzo (this just reminds me of sunshine and Greek holidays), Cinnamon Rolls, and Shrimp Thai Noodles with Spicy Peanut Sauce.

But in the end, today is unquestionably a day for pancakes, and I love the "grown-up-ness" of Emily's Coffee Chocolate Chip Pancakes.  These are pancakes you make for a couple of lazy adults who just want to swan around for the day, not the ones you whip up for the kids before they rush out the door to sports day.  Emily's pancakes used instant coffee powder, but as we never have instant coffee around here, I brewed a double shot of espresso instead.  I didn't have any chocolate chips on hand either, so I subbed in some cacao nibs.  I think the slightly "bitter" flavour is another element that elevates these pancakes to grown up status. The main "liquid" ingredient in the batter is yoghurt, but I found, once I'd mixed up my batter, that it was very thick - I think this was probably because I only have very thick Greek-style yoghurt rather than a more "runny" variety, so I ended up having to add about 1/2 to 3/4 cup of milk to loosen the batter to the right consistency.  Use what you have and adjust accordingly.  The coffee flavour in these pancakes is not overt - it just adds that certain "je ne sais quoi" that gives a depth of flavour and leaves you wondering what it is.  Someone around here who hates coffee with a passion, thought they tasted pretty good - when he asked me what was in them, I said it was zucchini - never, ever would I let on that it was coffee.  Hopefully my secret is safe with all of you out there.

I served these pancakes with a side of this Honey Roasted Pineapple and a dollop of natural yoghurt.  It only takes a moment to prepare, and it takes care of itself in the oven while you cook the pancakes.  The vanilla and cinnamon perfumed honey and pineapple sauce hit just the right flavour notes drizzled over the pancakes, but if you just want the pancakes straight up maple syrup, or even just a generous knob of butter, would be perfect.

Espresso Chocolate Chip Pancakes 1

Espresso Chocolate Chip Pancakes Recipe
Adapted slightly from this recipe
from Life on Food

1 cup plain flour
1 teaspoon baking powder
1 teaspoon baking soda
2 tablespoons sugar
pinch of salt
double shot of freshly brewed espresso, cooled
1 tablespoon butter, melted and cooled
1 egg
1 cup natural yoghurt
1/2 to 3/4 cup milk, as necessary
1/3 cup cacao nibs (or chocolate chips)
extra butter for frying

Sift together flour, baking powder, and baking soda into a medium-sized bowl.  Add sugar and salt and mix to combine.

In a small bowl, whisk together espresso, melted butter, egg and yoghurt, until everything is well combined.

Make a well in the centre of the dry ingredients.  Add the yoghurt mixture, and mix until only just combined.  Thin with milk if necessary.  Fold in the cacao nibs.

Place a non-stick frypan over medium heat and add a small knob of butter.  As soon as butter is sizzling, add spoonfuls of the batter to the pan.  Cook for two to three minutes before flipping, and cook for a further two to three minutes on the other side.  Remove to a warm place and continue until all the batter has been cooked.

Serve immediately.

Hope you enjoy this dish as much as I did, and visit the links below to check out all the other great dishes my Secret Recipe Club friends made.


Secret Recipe Club is a way to not only find, but share new blogs.  Each month, one member is assigned to another member from their group "secretly" (hence the name).  That person selects a recipe (or more) to make, photograph, and then will draft up a blog post.  Everyone in the group posts on the same Monday together and gets to see who had their blog and what recipe(s) they chose.  It's such a fun experience and it's a great way to get new followers, too.  There are always new blogs to discover and our club has plenty to offer!  If you are a food blogger and interested in joining the Secret Recipe Club, be sure to check out the Join SRC page.


Sunday, August 17, 2014

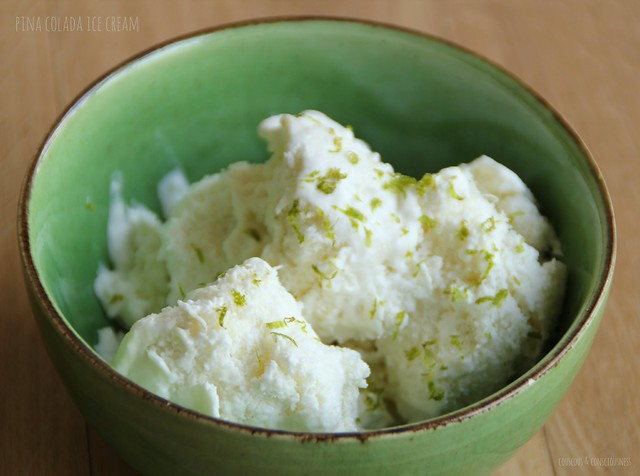
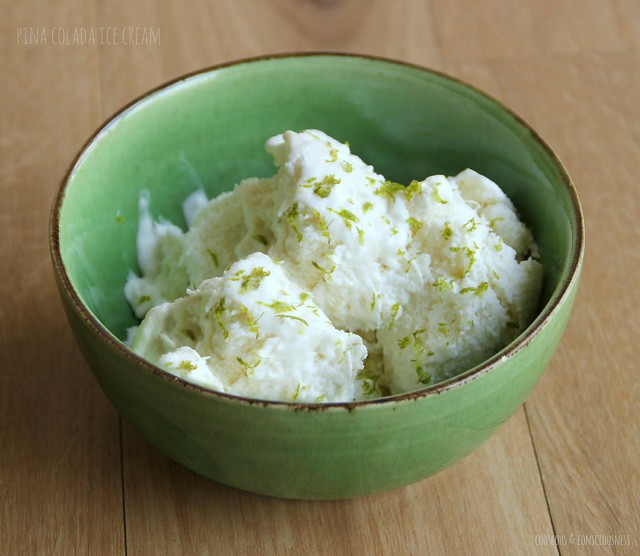
Pina Colada Ice Cream

Pina Colada Ice  Cream 2

I don't wish to whine, but it's not been the best of times around here the last couple of weeks.  Long story short, and I'm sure I've mentioned this here before, our house got flooded in a big storm a couple of months ago.  I arrived home from work to find the dining room and kitchen floors resembling a lake and, as water is wont to work its way downwards, the water had filled up the ceilings and floor of the two bedrooms below.  Not a pretty sight.  Anyway, after several weeks of not much happening, the insurance company finally realised that the problem was way more serious than they had originally anticipated, launched themselves into "emergency action" as a result, and sent in a team of people to start ripping the house apart.  Walls and ceilings have been removed downstairs, and big machines brought in to try and dry the place out.  The kitchen and dining room ceiling will have to be removed, likewise the floor, and there is even talk of the possibility of the whole kitchen having to be pulled out.  Needless to say, there is plenty of chaos around here and not too much cooking going on, so please bear with me if I'm not posting as regularly here as I'd like to over the next couple of months.

Still, life isn't all grim ... the magnolias and daffodils are out, and the tui which always comes to our garden at the start of spring, and enchants us throughout the summer, has arrived.  A wonderful reminder that spring is officially only 14 days away.  For those of you who don't know, the tui is a native New Zealand bird, notable for its vibrant green plumage and the two white feathers at its throat.  As a child I was always delighted by this Maori legend as to how the kiwi became a flightless bird and the tui got its white feathers.

Tui Collage

The other great thing about this time of year is the abundance of citrus fruit in season.  I always have huge bowls of lemons, oranges and mandarins on my kitchen bench right now, and it's the time when I launch into production of preserved lemons and lemon curd.  Marmalade making is just around the corner.

The fact, therefore, that this week we are Zesting It Up with Nigel Slater at I Heart Cooking Clubs, really brightened my week, and with days warming up a little it definitely seemed like ice cream was the way to go.  Though, in truth, I eat ice cream all year round - no excuse of warmer days ahead needed.   Trawling around on the internet I came across Nigel's Lime Mascarpone Sorbet.  I really liked the sound of that, and in fact I had a couple of limes in the house.  I didn't, however, have any mascarpone, wasn't feeling inclined to head to the supermarket to buy some, and easy enough though it is to make time wasn't on my side.  Poking around in the pantry, I came across a tin of coconut milk and figured I could do something with that.  I also stumbled across a tin of pineapple chunks that had been sitting in the pantry for goodness knows how long, and for the life of me I can't imagine how I ever came to be in possession of a tin of pineapple in the first place.  Then I remembered half a tin of condensed milk that had been sitting in the fridge for probably at least as long as the pineapple had been around, and thus this ice cream was born.  It's a simple as blitzing up the coconut milk, pineapple chunks, condensed milk, and lime zest in a blender, and then churning in an ice cream maker.

The resulting ice cream is light and refreshing, and a beautiful combination of flavours.  This is definitely one I will be repeating a lot this summer.  Thanks for the inspiration, Nigel.

Pina Colada Ice Cream

Pina Colada Ice Cream Recipe
Click here for a printable copy of this recipe

1x 400ml (13.5 fl oz) can Trade Aid coconut milk
1x 450g (16 oz) can pineapple chunks in natural juice
1/2 can condensed milk
grated zest of 1x lime

Place all ingredients in blender, and blitz until the pineapple is completely crushed and everything is well combined.

Pour everything into an ice cream maker and churn according to manufacturer's instructions.

Turn ice cream into freezer proof container, and place a piece of baking paper directly over the surface of the ice cream (helps to stop it turning icy).

Remove from freezer 10 to 15 minutes before serving to soften slightly.

If you would like to get to know Nigel Slater a little better, and to see what everyone else has cooked up this week, then do go and visit my friends at I Heart Cooking Clubs and check out the links ...


I will also be submitting this post to Sweet New Zealand.  Inspired by Alessandra Zecchini, and hosted this month by Michelle at Munch Cooking, Sweet New Zealand is an event for all Kiwi bloggers (whether living at home or abroad), or all foreign bloggers living in New Zealand, to link up their sweet treats.

Sweet New Zealand Badge A

I'll also be sharing this post this week at See Ya In the Gumbo hosted by the delightful Michelle at Ms. enPlace, at Weekend Cooking hosted by Beth Fish Reads, and at Foodie Fridays hosted by Designs by Gollum.

See Ya in The Gumbo Badge     Weekend Cooking Badge     Foodie Friday Badge

Saturday, September 1, 2012

Upside Down Pineapple & Kawakawa Cake and NZFBA Conference Day 1

Upside Down Pineapple & Kawakawa Cake 1

Last weekend I was lucky enough to go to Wellington for the second NZ Food Bloggers Association conference, and the opportunity to participate in a few of the Wellington on a Plate events.  Food bloggers, wherever in the world you live, know only too well about community, and connecting and making friends with strangers from all corners of the world.  So it was wonderful to come together again with blogging friends we had met at last year's conference;  to meet for the first time bloggers we had previously only connected with online;  and to meet and discover new bloggers.  Now I would not be overstating things if I just told you that it was a positively amazing weekend and left it at that, but I'm sure you all want to know more, and there are also a lot of people who deserve a great deal of credit for their part in such a wonderful event, so keep reading.  And as a reward, if you keep reading, I will give you cake ... not just any old cake, but an Upside Down Pineapple and Kawakawa Cake - now doesn't that sound worth waiting for.

My weekend began on Thursday night, along with several other bloggers, at a hosted dinner at Portlander restaurant in the Rydges hotel.  It would be an over-simplification, and would not do it justice, to call Portlander a steak house;  however, their steaks are definitely their specialty, and meat dishes make up the majority of their menu.  For my starter I chose chargrilled baby paua served with panko crumbed calamari, cauliflower puree and lemon.  This was beautifully presented, and although the paua was slightly chewy - which really is the nature of paua - the smoky flavour from the chargrilling was wonderful, and the cauliflower puree was a great accompaniment.  Although I'm not a huge meat eater, "when in Rome" I figured so I chose the lamb rack wrapped in chicken, spinach & pistachio mousse served with whipped garlic mash on bacon & mushroom ragout.  Again, this was spectacularly presented, and there was more than a little "menu envy" around the table when it came out.  However, looks aren't everything, and some of the best looking dishes fail to deliver on the palate - such was not the case here.  The lamb was sublimely tender and succulent;  the mousse was delicate in flavour and clearly helped to keep the lamb moist and juicy;  and the ragout was rich and flavourful.  This was a dish that tasted every bit as good as it looked.  With still just enough room left for dessert (seriously when is there ever not room for dessert), I chose the trio of ice creams - vanilla, triple chocolate, and fig and honey.  The service was exemplary - knowledgeable and attentive - and our waiter went out of his way to make sure that even the vegetarian in our midst was satisfied ... no mean feat in a restaurant which doesn't for the most part cater for vegetarians.  All in all, a great dining experience and I would definitely return.

Portlander Dinner 1

After a good night's sleep, we all eagerly gathered on Friday morning at the InterContinental Hotel for a special preview and the official mayoral opening of the New Zealand Chocolate Festival.  Is there any better way to start the day than with chocolate?  Our visit to the chocolate festival began with a demonstration from Chef Juan Balsani of Kermadec restaurant in Auckland, who made a chocolate balloon using liquid nitrogen (he says that "as long as you can still feel your fingers, it's ok") filled with chocolate mousse, and decorated with caramelised white chocolate spaghetti and chocolate pink pepper sauce - simply stunning.  Then, following the mayoral opening of the festival, we were free to visit the various exhibitors and indulge in chocolate to our hearts' content.   The highlight for me - discovering Bohemian Chocolates salted caramels.

Chocolate Festival 1

Once we were all filled to bursting with chocolate, we were whisked away to the brand spanking new Le Cordon Bleu culinary arts institute - so new it was not due to open to the public until the day after our conference and we were the very first to use this amazing state-of-the-art facility.  All of the staff we engaged with were warm and welcoming;  Le Cordon Bleu pastry chefs served us beautiful morning and afternoon teas; and I find it hard to describe what an extraordinary privilege it was for us to be able to use these facilities.

With formalities out of the way, our first speaker of the day was Jared Gulian, who writes the wonderful blog Moon Over Martinborough.  Jared told us about his journey, from being dragged kicking and screaming from life in the city to life on an olive grove in the country, and his journey from storyteller to olive oil producer.  It struck me, as I listened to Jared, that here in New Zealand we read books like Peter Mayle's A Year in Provence and Frances Mayes Under the Tuscan Sun and fantasise about living such a dream.  Yet, here is someone who has come to New Zealand and is living exactly that dream right here in our own country ... food for thought, isn't it?!

Our next speaker was Alison Brook, Head of Publishing for HarperCollins NZ, with some sound advice for those bloggers interested in getting a cookbook published.  She had some surprising information with regard to the high proportion of non-fiction book sales in New Zealand, with a high percentage of those being cookbooks.  It was also a revelation to learn that publishers are actually out there looking for food bloggers to publish.  Some of her best advice if you want that to be you - originality, good writing, good photography, good styling, and most of all authenticity.

And now it was time for lunch, and excitement was high.  Ten restaurants participating in Wellington on a Plate, were each sponsoring a table of four conference goers for a lunch.  Along with Vicki from Nourish Magazine, Emma from Make Do Mum, and Asher from NZ Heart Foundation, I had the good fortune to go to Maginnity's.  Located in the Wellesley Boutique Hotel, and with a kitchen ruled by head chef Marc Soper (an award-winning chef with an impressive background that includes working at the Langham and Mollies in Auckland, as well as the French Laundry in the Napa Valley), this was bound to be a good lunch and it certainly did not disappoint.  I started with an entree of a beetroot & caramelised onion tart with blue cheese, roasted walnuts, wild rocket, and apple & port syrup, followed by a main of pan-fried tarakihi on roast potato hash, with rosemary sauce vierge, roast lemon chutney and baby rocket.  Judging by all the ooh-ing and aah-ing around the table I think everyone was as happy with their lunch as I was.

Lunch at Maginnity's 1

Well sated, it was back to Le Cordon Bleu for our next speaker - Lucy Corry.  Lucy writes the fabulous blog The Kitchen Maid, and is also a journalist by profession.  Lucy raised the question is blogging "real writing"?  A controversial question indeed, and I am sure there are food writers out there who will never agree that it is.  That aside, Lucy's advice if you want your blog to be read (and really why else would you blog?) - get to know who your audience is and engage with them;  learn to craft a good sentence;  practice, practice, practice;  leave the cat photos out of your blog;  and keep your finger off the exclamation mark!!  Lucy also talked a lot about how cooking, and the writing and exchanging of recipes, connects us to each other and to our past.  This is exactly why I love to cook and to blog, so her words really resonated with me.  If you'd like to know more about what Lucy had to say, check out this post on her blog.

Our next speaker was Sarah Miekle, GM Marketing for Positively Wellington Tourism.  Sarah talked to us about digital marketing and social media, and though most of us use Twitter and Facebook to one degree or another, it was quite a revelation to discover the power of these social media and the important role they now play in the modern marketing mix.

After a gorgeous afternoon tea prepared by Le Cordon Bleu pastry chefs, we headed for the first of our breakout workshops.

I was torn between doing the food photography workshop with Viviane Perenyi (of the gorgeous blog At Down Under) or attending the Skype discussion with Emma Galloway from the very successful blog My Darling Lemon Thyme.  Since my photography is still the aspect of my blog that I think needs the most work, I decided on Viviane's workshop, but thankfully Emma has posted her fodd blogging 101 here.  After Viviane talked to us about the basics of light, frame and balance, textures, colours, and patterns.  Then we split into small groups to take some photos - a great workshop - would have loved another couple of hours.

From there, was our second breakout session and, in my quest to try and become a gardener, I chose to attend a discussion of organic urban food growing by Kaye Reardon of Grow From Here.  I think I still have a long way to go in the gardening department, but Kaye was an engaging speaker and had plenty of great advice and answers to everyone's questions.

That brought to an end the day's events and it was time to move on to dinner - a pop-up dining experience in a secret location.  Keep watching this space for our dining experience and day two of the conference.  And now I promised you cake ...

One of the first recipes to catch my eye when I purchased Tessa Kiros' Falling Cloudberries was her recipe for a pineapple upside down cake, and it's been on my mind ever since.  When I dipped into my conference goodie bag and found a selection of teas from t leaf T, including some Kawakawa Fire (a flavourful blend of ginger, kawakawa and lemon grass), I knew it was time to make this cake.  The original recipe called for a spice mix of cinnamon, cloves and allspice, which I swapped out for the Kawakawa Fire tea, and I replaced orange juice in the syrup with lemon juice and lemon zest to play up the lemon grass flavours in the tea.  This is a beautifully moist and quite dense cake - definitely one I would make again.  To play on the bright, tropical flavours of this cake I think coconut could be a nice addition too ... what do you think?

tleafT 2

Upside Down Pineapple & Kawakawa Tea
Adapted from a recipe by Tessa Kiros from
Click here for a printable copy of this recipe

spice mix:
zest of 1x lemon
2 teaspoons Kawakawa Fire tea from t leaf T
OR
2 teaspoons of spices of your choice (cinnamon, ginger, allspice, cloves)

syrup:
juice of 1x lemon
60g (2-1/4 oz) butter
70g (2-1/2 oz) brown sugar

430g (15 oz) tin sliced pineapple

cake batter:
250g (9 oz) softened butter
200g (7 oz) brown sugar
3x eggs
250g (9 oz) plain flour
2 teaspoons baking powder
3/4 cup milk

Preheat your oven to 200 degrees C (400 degrees F).  Rub tea mixture between your fingers to break the leaves up a bit.

To make the syrup, put the lemon juice, butter, and brown sugar, along with 1/2 teaspoon of the tea, into a small saucepan and bring to the boil.  Reduce the heat and simmer until you have a thick caramel syrup - about 8 to 10 minutes.

Grease and line the base and sides of a 23cm springform tin with non-stick baking paper.  Pour syrup into the tin, and spread to evenly coat the bottom of the tin.  Then fit pineapple rings into a single layer in the base of the tin.  Set aside while you prepare the cake batter.

Using an electric beater, cream the butter and sugar until light and fluffy.  Add the eggs one at a time, beating well after each addition.  Then sift in the flour and baking powder, and mix to combine.  Add the milk and beat it in well.  Then add the remaining tea or spice mixture and the grated lemon zest.  Mix again to make sure everything is well combined.

Spoon the batter into the tin over the pineapple and syrup, smoothing the top and making sure that the batter is evenly spread.

Bake for 10 minutes, then reduce the oven temperature to 180 degrees C (350 degrees F).  Bake a further 50 minutes, then cover with foil to stop it browning any further.  Bake another 15 to 20 minutes until cake is deeply golden and a skewer inserted into the centre of the cake comes out clean.

Remove from the oven and allow to cool a little before turning the cake out onto a plate.

Remove the bottom of the tin, peel away the parchment paper, and serve.

Delicious on its own, or even better with cream, creme fraiche, yoghurt or ice cream.

This will be my submission this month to Sweet New Zealand, inspired and hosted by Alessandra Zecchini.

Sweet New Zealand Badge A

Monday, January 31, 2011

Grilled Pineapple with Nutella

Grilled Pineapple with Nuttella 1

Our theme this week at I Heart Cooking Clubs, where we continue to cook with Giada de Laurentiis, is Pot Luck.  Our monthly Pot Luck always seems to be one of the favourite themes amongst group members, and I guess I'm no exception.  If you've been around here over the last week or two you will have noticed that I've been dishing up plenty of the healthy stuff lately, so I felt a little bit of indulgence was called for.  My mind immediately turned, of course, to one of Giada's favourite ingredients - chocolate, and more specifically Nutella.  Since Nutella is also our special ingredient this week at Make it with ..... Mondays, it seemed like a natural choice.

At the same time, I didn't want to go all-out decadence here, so this recipe for Grilled Pineapple with Nutella seemed like the perfect choice.  With fresh fruit, nuts, and fresh cream, I think there is more than enough good stuff going on in here to offset any potential indulgence in the Nutella and creme fraiche (Giada uses mascarpone, but I subbed creme fraiche instead).  Besides, I'm pretty sure that Nutella and creme fraiche are actually health foods - okay, look don't all write to me setting the record straight, I know they're not really health foods, but permit me the fantasy.

Grilled Pineapple with Nutella Recipe
Makes 2 generous servings
Click here for a printable copy of this recipe

4 slices fresh pineapple, cut about 1.5 cm (1/2 in) thick, skin removed
2 heaped tablespoons creme fraiche
1/2 teaspoon vanilla extract
2 heaped tablespoons Nutella
2 tablespoons fresh cream
neutral-flavoured vegetable oil
large handful hazelnuts, toasted and coarsely chopped

Heat a ridged grill pan over heat.  Use the vegetable oil to lightly grease the pan, and then grill the pineapple slices until beginning to soften and grill marks appear - about 4 minutes each side.

Grilled Pineapple with Nuttella 3

Meanwhile, put the creme fraiche into a small bowl, add the vanilla, mix together and set aside.

Put the Nutella and cream into another small bowl, and mix together.  Microwave on high for 60-80 seconds, stirring every 20 seconds, until well-blended, smooth and pourable.

Grilled Pineapple with Nuttella 4

Arrange the pineapple slices on a serving platter, and drizzle with the warm chocolate sauce.  Dollop around some of the creme fraiche mixture and sprinkle the toasted hazelnuts over the top.

Grilled Pineapple with Nuttella 2

Now you might look at this and imagine tooth-tingling sweetness and richness - I know I certainly did.  However, that was certainly not the case.  There is more than enough piquancy in the creme fraiche to cut through any sweetness from the deliciously "fudgy" Nutella sauce.  The toasty hazelnut pieces also add a layer of texture, and in their own way offset some sweetness too.  Overall, after eating this (and yes, just in case you're interested, I did eat that whole serving that you can see in the picture) was not of having eaten a big, rich, sweet dessert and that weighed down feeling that goes with it.  It was definitely a feeling of having eaten a fresh fruit dessert that had been "tarted up" a little.

This would make a spectacular dessert to serve for a crowd - served on a large platter, it would look stunning, and I guarantee there would be no left-overs.  This one is definitely on my list the next time I need to serve dessert for company.

Interested in getting to know Giada a bit better?  Then do go and visit my friends at I Heart Cooking Clubs and see what they've all been cooking up ....

IHCC

.... or check out Giada's Kitchen and many of her other titles, available from Amazon, Book Depository UK and Fishpond NZ

Giada's Kitchen: New Italian Favorites    Giada at Home: Family Recipes from Italy and California    Everyday Italian: 125 Simple and Delicious Recipes


This post is a contribution to Make it with ... Mondays challenge Nutella - the linky will be open until Monday 14 February, so start those Nutella posts coming, and don't forget to keep your paprika posts coming too - the paprika linky is open here and will remain open until Monday 7 February.

Make it with ..... Mondays

This post is also linked to the Decidedly Healthy or Horribly Decadent Blog Hop.

Saturday, January 22, 2011

Honey-Roasted Pineapple with Pistachios & Coconut Yoghurt Recipe

Honey Roasted Pineapple with Pistachios and Coconut Yoghurt 2

Funny how things creep up on you.  When I started this blog, a bit over 18 months ago, I had no idea where it would lead to - I certainly never for a moment imagined the friendships and connections that would develop with wonderful people all over the globe.  Likewise, back when it used to take me a whole week (sometimes longer) to be able to actually create a post, I couldn't imagine ever getting to my 100th post - and yet, here we now are - this folks is my 100th post.

Such an occasion of course calls for a celebration of some sort, and this dish seems like a great way to do just that.  Let's face it, there is always something rather celebratory about dessert (even if you eat it every night of the week - which, incidentally, I don't), and exotic ingredients like pineapple, vanilla and pistachio definitely add a touch of decadence and luxury.  At the same time, given that there is absolutely nothing here but fresh fruit, honey, nuts, coconut and yoghurt, this adds up to a totally healthy and guilt-free dessert in my estimation.

Now, before I move on to sharing this recipe with you, I want to tell you something about the honey I used.  Just before Christmas, the Airborne Honey people sent me a couple of samples of their product to review - this little jar of Tawari honey, and also one of Manuka honey.  So, yes I did receive free samples, but let me assure you that I have not been paid for my opinion on this product.  My mother always subscribed to the belief that if you couldn't find anything good to say about someone or something, it was better to say nothing at all.  That was well and truly drummed into me as a children, and to this day I live by that.  So you can be sure that if I had found this product in any way unsatisfactory you wouldn't be reading about it here - I would simply have politely let the people at Airborne know my opinion and refrained from reviewing it.  The fact that you're reading about it here, means that I genuinely thought it was great and no-one has paid me to tell you that.

Honey Roasted Pineapple with Pistachios and Coconut Yoghurt 1

Airborne Honey has been produced in New Zealand for over 100 years, and they make three substantial claims about their honey - firstly that it is honest (it is labelled as to its floral source, and the packaging details the exact percentage of the pollen source in your jar);  secondly that it is undamaged (unique processing methods and rigorous testing take place to ensure the least amount of heat damage occurs);  and thirdly that it is traceable (every jar contains a batch number which enables the product to be traced back to the hive it came from).  You can read more about this on their website.  Also on the website you can find details of their stockists in New Zealand and importers worldwide, so even though these are uniquely New Zealand in origin you don't have to be living here to get your hands on some of this deliciousness.

I haven't used the Manuka one too much yet, so I'll tell you more about that another day, but I am definitely having a love affair with the Tawari.  I'm personally not fussed on strong honey flavours, but found that, as promised, this has a delicate butterscotch flavour and strikes just the right note drizzled over my yoghurt and granola.  However, in this dish, by the time it had spent 20 or so minutes in the oven with the pineapple it turned into something that tasted more like liquified barley sugars - it was thick and syrupy, and it tasted so insanely good, I kid you not, I truly licked my plate clean (and the dish the pineapple had been roasted in) so as not to miss a single drop of this liquid heaven. I - AM - NOT - EXAGGERATING!

Anyway, I'm sure you've heard enough about honey, so on with the recipe.

Honey-Roasted Pineapple with Pistachios & Coconut Yoghurt Recipe
Makes 2 heavenly servings
Click here for a printable copy of this recipe

2 slices fresh pineapple, cut about 1cm (1/3 inch) thick
1 vanilla bean
1/2 cup warm honey
1/4 teaspoon ground cinnamon

1/4 cup dessicated coconut, lightly toasted
1/2 cup plain Greek-style yoghurt
2 teaspoons palm sugar (or soft brown sugar)
1 teaspoon vanilla extract

handful shelled pistachios, roasted and roughly chopped

Preheat oven to 180 degrees C (355 degrees F).  Remove skin from pineapple and cut each slice in half crosswise.  Place in a shallow ovenproof dish in a single layer.  Split the vanilla bean in half lengthwise and scrape the seeds into the warmed honey;  add in the scraped-out vanilla pod and cinnamon;  then pour all of the honey mixture over the pineapple.

Honey Roasted Pineapple with Pistachios and Coconut Yoghurt 5

Roast in the pre-heated oven for 10 minutes;  turn the pineapple slices over and baste with the juices;  then roast for a further 10-15 minutes or until the pineapple is soft.  The juice will be thick, and syrupy.  Leave to cool in the juice.

Honey Roasted Pineapple with Pistachios and Coconut Yoghurt 4

To make the coconut yoghurt, combine the toasted coconut, yoghurt, palm sugar and vanilla extract in a small bowl and mix well.  Taste and adjust the sweetness or vanilla to suit your tastes.  Refrigerate, covered, until you are ready to serve.

Serve pineapple slices on a plate, and drizzle some of the syrupy roasting juices over the top.  Serve a dollop of the coconut yoghurt on the side;  sprinkle on some of the roasted pistachios;  and lastly drizzle more of the juices over everything.

Honey Roasted Pineapple with Pistachios and Coconut Yoghurt 3

Eat, enjoy, and when you think no-one's watching go ahead and lick the plate!

This post is a contribution to Make it with ... Mondays challenge vanilla - the linky is still open until Monday 24 January, so keep your vanilla posts coming, and don't forget to check out this week's special ingredient which is quinoa.

Make it with ..... Mondays

I'm also linking this to the Decidedly Healthy or Horridly Decadent Blog Hop - which category do you think it would fit into - I think it could go either way.