Monday, December 8, 2014

Boozy Peaches (aka Peaches in Sticky Wine)

Peaches in Sticky Wine

According to Shakespeare, "brevity is the soul of wit".  That being said, I fear this post may be rather long on the brevity (is that really possible), and short on the wit.

The long and short of it is that this has been a week that really got away from me, and if I don't get this post out in the space of a very short lunch break today, it isn't going to happen.

So getting straight to the point, this week at I Heart Cooking Clubs, where we continue our journey with the gorgeous Diana Henry, we are creating Gifts From the Heart.  With Christmas just around the corner, it's a great opportunity to explore some of those edible gifts that we cooks like to give to family and friends over the holiday season.

I knew I would find something in my copy of "Salt Sugar Smoke" - in fact I found many things which will make wonderful festive gifts, but I decided that nothing could be as simple to make, nor impressive to receive as a jar of these Boozy Peaches.

Diana's original recipe uses apricots soaked in muscat, but I used what I had - a bag of dried peaches and a bottle of dessert wine.  Really the variables are limitless.  It's just dried fruit packed into a sterilised jar, covered with booze, and then left in a cool, dark place for the fruit to plump up in the alcohol.  According to Diana, these will keep for a very long time, though I defy you to actually do that, and are just perfect for an instant and luxurious dessert.  I'm thinking that chilling these before using them would be a nice touch, and a couple of these with a generous dollop of thick Greek yoghurt would be heavenly.

Not sure yet who is going to be the lucky recipient of this jar as a Christmas prezzie, but I'm willing to take offers.

Boozy Peaches (Peaches in Sticky Wine) Recipe
Ever so slightly adapted from recipe by Diana Henry
from Salt Sugar Smoke

Take a large sterilised jar

Fill jar to approximately 2/3 full with dried peaches
(apricots, plums or pears would all be good alternatives)

 Add one bottle of a sticky dessert wine

Ensure that you have left enough room in the jar for the fruit to plump up.  After a few days add more wine if all the fruit is no longer covered.

Store in a cool, dark place until you are ready to use.

If you would like to get to know Diana Henry a little better, and to see what everyone else has cooked up this week, then do go and visit my friends at I Heart Cooking Clubs and check out the links (who knows, you might even want to join the journey and cook along with us) ...

Diana Henry badge 1A


Monday, December 1, 2014

Tropical Fruit Christmas Cake

Tropical Fruit Christmas Cake

Every year since I started this blog it's been on my mind to post a Christmas cake recipe but, best laid plans and all of that, some years I just didn't get around to making a cake, other years the cake got made but planning for a blog post was off and somehow posting a Christmas cake recipe in the middle of January just didn't make sense.

This year, with family coming (from near and far) to stay over the Christmas holidays, it's an even bet that my hostessing skills will be called into serious question if I don't produce said cake.  Serendipitously, it's our monthly Pot Luck week at I Heart Cooking Clubs, and I felt sure that at least one of our IHCC chefs would have a Christmas cake recipe I could try.  I was pretty certain that if I looked hard enough Nigella Lawson, Donna Hay, Nigel Slater, Jamie Oliver and our current chef, Diana Henry, would probably all offer something suitable.

As it turned out, the first place I searched was Donna Hay's website, and on finding her Christmas cake recipe, I needed look no further.  Because we celebrate Christmas here in New Zealand in the height of summer, I decided to give my cake more of a tropical vibe than the traditional, rich, dark cake.  I used Donna's recipe as a basic template for quantities of eggs, butter, sugar, flour, etc, but I replaced most of the fruit with more tropically inspired dried fruit.  In keeping with my tropical theme I soaked the fruit in ginger beer instead of sherry, and replaced almonds with macadamia nuts.  I also added some rose water, orange flower water, and almond extract to the soaking liquid, as well as adding some ground ginger and nutmeg in with the spices.

I'd love to show you a slice of this cake and tell you how it tastes, but what you see in the picture is the cake straight out of the oven.  It has several hours of cooling in the tin ahead of it, before it could be sliced, and anyway, you know that it's bad luck to cut the cake before Christmas.  Of course, there's always a few spoonfuls of the mixture that don't make it into the cake tin, and if what I tasted out of the bowl is anything to go by we are in for a wonderful cake.

I think this cake will be delightful as it is, without any further adornment, but if you like to go the whole marzipan and royal icing route that would be great too.  Personally, I'm thinking that Christmas Eve this cake will get a liberal blanket of a white chocolate, ginger and cream cheese frosting - what do you think?

Tropical Fruit Christmas Cake 2

Tropical Fruit Christmas Cake Recipe
Inspired by this recipe from Donna Hay

1.1 kg (2-1/2 lb) mixed dried fruit
(I used a combination of jumbo raisins, cherries, mixed peel, apricots, pineapple, figs, prunes and rock melon)
100g (3-1/2 oz) macadamia nuts
300 ml (1-1/4 cups) ginger beer
2 tablespoons rose water
2 tablespoons orange flower water
1 tablespoon almond extract
300g (10-1/2 oz) butter, room temperature
220g (7-3/4 oz) soft brown sugar
2x vanilla beans
4x eggs
375g (13 oz) plain flour
1/4 teaspoon baking soda
1 teaspoon each ground cinnamon, ground ginger, mixed spice & nutmeg
1/4 cup ginger beer, extra

Place all the mixed fruit and nuts into a large bowl, cutting larger pieces of fruit as you go - I cut everything into pieces about the size of the cherries.  Pour the first measure of ginger beer over the fruit, along with the rose water, orange flower water and almond extract.  Mix everything together well, cover bowl with a clean tea towel, and place in a cool, dark place to soak for 24 hours.  Give it a stir occasionally if you think of it.

Preheat oven to 140 degrees C (275 degrees F).  Grease a 20cm (8 inch) square cake tin, and line with two layers of non-stick baking paper, greasing each layer of paper as you go.

Place butter and brown sugar in the bowl of a stand mixer.  Split the vanilla beans lengthwise down the middle and scrape out the seeds, adding the seeds to the butter and brown sugar.  Set the machine running, and beat the mixture for 5 to 8 minutes, until light and creamy.  Add the eggs to the mixture, one at a time, beating well after each addition.

Sift together flour, baking soda and spices.  Add to the soaked fruit, and stir well to ensure that all the fruit is well coated with the flour.  Lastly add the butter and sugar mixture, and stir until everything is well combined.

Spoon the mixture into the tin (reserving a couple of good spoonfuls for the cook), smooth the top, and place in the preheated oven.  Bake for 2 hours 25 minutes to 2 hours 35 minutes, or until a skewer inserted into the centre of the cake comes out clean - I'd suggest you start testing after 2 hours 15 minutes.

Remove from the oven, and brush the top of the cake liberally with the extra ginger beer while still warm.  Allow to cool in the tin completely before removing and wrapping well in plastic wrap to store.  Should keep for at least four weeks.

If you would like to get to know Donna Hay a little better, or any of our other IHCC chefs, and to see what everyone else has cooked up this week, then do go and visit my friends at I Heart Cooking Clubs and check out the links (who knows, you might even want to join the journey and cook along with us) ...

Diana Henry badge 1A


Monday, November 24, 2014

Kalamata Olive & Oregano Loaf

Kalamata Olive & Oregano Loaf 3

Since becoming a member of Secret Recipe Club*, I've discovered some great, previously unknown to me blogs, and one blog which became a firm favourite right from the start was Karen's Kitchen Stories.

Karen lives in Southern California;  works in recruitment and teaches part time;  has two grown children and two grandchildren;  and has an obsession with baking bread - sourdough in particular - which is immediately obvious when you visit her blog.

Karen's recipe index (and hats off that she actually has one, which in itself elevates her blog to "favourite" status in my books) boasts no less than 182 recipes under the heading "Bread, Flatbread, Yeasted Crackers, and Rolls" - yes, I did actually count them, which may or may not speak volumes about my own obsessiveness.  Put together the recipes under the headings of "Cakes & Cheesecakes", "Cookies, Brownies & Bars",  and "Cupcakes & Muffins", and I'm pretty sure you would find another 180 recipes.  Clearly this woman is a baking Goliath.

Since I am most definitely not, as I have told you before many times, a proficient baker, when I was assigned to Karen's blog for this month's SRC reveal I was both thrilled (a challenge is always exciting) and terrified in equal measure.

Although I don't have a particularly deft touch for making bread, having a go at making sourdough is one of those things which has been on my cooking challenge bucket list for a long time.  There's no question that if making sourdough bread (or any kind of bread) is on your path, Karen's blog would be a fantastic place to start, and within a couple of hours of getting my assignment I'd bookmarked several recipes that I thought would make the shortlist:  No Knead Chocolate Cherry Pecan Bread, Golden Raisin and Fennel Sourdough Pocket Bread, San Francisco Sourdough Bread, and Sourdough Rosemary Bread with Olive Oil.

The only problem is that making sourdough bread requires a certain amount of planning, and with a whole lot of other life stuff getting in the way around our house at the moment, the requisite planning to produce these wonderful breads just hasn't been there.  And then salvation presented itself under the heading of "Quickbreads" - definitely a little better suited to my lifestyle at the moment, although I'm still promising myself that when life slows down a little I will be trying my hand at one of those sourdough loaves.

Kalamata Olive & Oregano Loaf 1

The recipe for Kalamata Olive & Oregano Mini Loaves just about leapt out of the screen at me.  I didn't have any of the cute little mini loaf tins that Karen does, but the recipe did provide for preparing one large loaf as an alternative.  I could do that.  I also happened to have all the ingredients required on hand - except for buttermilk, which can easily enough be made at home by mixing one cup of milk with a tablespoon of lemon juice and letting it stand for 10 minutes.

Karen's original recipe included an onion, lightly sauteed in olive oil before mixing into the batter, which I omitted as I'm just not a huge fan of onions and especially not in baked goods.  Other than that I pretty much followed the recipe exactly.

This loaf has a wonderfully light and moist texture, and the brininess of the olives really shines here.  This is definitely a loaf I would make again.  It is so bursting with flavour that it actually needs no accompaniment, but it would nevertheless be a great "bread" to include with an antipasto platter, or to serve alongside your favourite soup.  I would definitely make this again, and I think a sprinkling of Parmesan over the top might be a nice change-up too.

Kalamata Olive & Oregano Loaf 2

Kalamata Olive & Oregano Loaf Recipe
from Karen's Kitchen Stories

198g (7 oz) all-purpose flour
1 tsp baking soda
½ tsp salt
1 cup buttermilk
30g (1 oz) butter, melted
2x large eggs
1 cup pitted and chopped kalamata olives
large handful fresh oregano leaves, finely chopped plus extra for sprinkling on loaves

Preheat the oven to 175 degrees C (350 degrees F).  Grease and flour a 22cm x 12cm (9 in x 5in) loaf tin.

Sift together flour and baking soda into a large bowl, and mix in the salt.

In a separate bowl, whisk together the buttermilk, melted butter and eggs.

Make a well in the centre of the dry ingredients.  Pour the buttermilk mixture into the well and stir until only just combined.  Fold in the olives and oregano.

Pour the mixture into the prepared loaf tin and sprinkle the tops with more chopped oregano.

Bake for 25 to 30 minutes, or until a skewer inserted into the centre comes out clean.  Allow to cool for at least 15 minutes in the tin before transferring to a cooling rack and serving.

*  So what's this Secret Recipe Club I've been talking about?  The club has over a hundred members, divided into four groups, and each month one member is assigned (in secret) to another member from their group.  That person then selects a recipe (or more) to make, photograph, and prepare a blog post - all in secret.  Then everyone in the group posts their recipe on the same day, and of course the secret is then out.  It's a always a thrill to find out who has posted something from your own blog, and to meet and discover some new blogs.   If you are a food blogger and interested in joining the Secret Recipe Club, be sure to check out the Join SRC page.

I hope you enjoy this dish as much as I did, and visit the links below to check out all the other great dishes my Secret Recipe Club friends made.


Sunday, November 23, 2014

Spiced Feta with Preserved Lemon

Spiced Feta with Preserved Lemon 3

I love the art of preserving food - smoking, curing, pickling, jam and sauce making, etc.  Some people are avid bakers, or have a passion for making desserts, but no amount of yeast or chocolate will ever excite me as much as creating a pot of pesto or a jar of jam.

I did a cooking class in Barcelona during a trip to Spain a few years ago, and I was really struck by discovering that the Spanish use a variety of ways of preserving food which not only prolongs the life of the food, but which they passionately believe actually "improves" its flavour - you only have to taste their bacalao (salt cod), chorizo sausage, or tuna preserved in olive oil to recognise the veracity of this.

I find it wonderful to be able to take great quality, fresh ingredients, when they are at their most abundant and preserve them to enjoy throughout the year.  But that Spanish ethos really resonates with me, and what excites me the most, is taking those ingredients and transforming them into something which is even more flavourful and interesting than the fresh ingredients themselves. Transforming lemon juice and zest (with the help of some butter and eggs) into lemon curd is pure magic, or (aided by the addition of salt) into preserved lemons blows my mind every time I use them to pep up a salad or casserole, in a way which fresh lemon can never quite achieve.  I love the fiery kick and depth of flavour that harissa will bring to a dish, which you just won't find from chillies on their own. Turning a bunch of fresh herbs into a pesto, is not just a great way of preserving that abundance of herbs when they're in season, but that pesto will add a layer of flavour and texture to soups, dressings, and pasta dishes that is greater than the herbs on their own.  I will never, ever tire of the magic of whisking egg yolks and olive oil together and ending up with mayonnaise - never!

This is the kind of food alchemy that excites me most, and keeps me coming back to the kitchen time and time again.  As I mentioned a couple of weeks ago, these are the kinds of things I like to keep my fridge and pantry stocked with - the kind of ingredients that can be rolled out to add an instant flavour boost to all manner of dishes, or which can be served up antipasto-style for a quick and simple meal.  I think this is also the kind of cooking that makes you feel very "accomplished" in the kitchen, in a way which is actually completely disproportionate to the level of expertise really required to create most preserves.  If you've ever served up a platter of homemade goodies or gifted a jar of homemade jam or chutney you will know this to be true - maximum kudos : minimal effort.  That's my kind of cooking.

Spiced Feta with Preserved Lemon 1

As soon as Diana Henry was voted in as our current I Heart Cooking Clubs chef, I knew I had to get my hands on her book "Salt Sugar Smoke".  I couldn't wait to open it when my package arrived from Amazon, and I was not disappointed.  I fell a bit in love with Diana from the very first page, and I can tell you that I have more little post-it note bookmarks on this book than any other in my collection.

Right from the get-go I have had her recipe for "Spiced Feta in Olive Oil" bookmarked as something that was definitely going to find its way into my repertoire, and my store cupboard.  Since our theme this week is Sweet Cloves and Liquid Gold - celebrating dishes with garlic, olives and/or olive oil - I knew this was the week to share.

I made very minimal changes to the recipe - adding in some preserved lemon to amplify the salty-lemony tang of the feta cheese, and substituting some pink peppercorns for the white peppercorns (partly because I didn't have any white ones, and also because I love the slight "fruitiness" of pink ones.  I also increased the amount of dried chilli flakes for a bit of extra kick.

This makes a wonderful addition to an antipasto platter, serve as part of a mezze feast, or just spread generously on some good crusty bread.

Spiced Feta with Preserved Lemons 2

Spiced Feta with Preserved Lemons Recipe
Adapted from recipe by Diana Henry
from Salt Sugar Smoke

3/4 cup olive oil
juice of 2x lemons
1/2 a preserved lemon, flesh discarded, rind finely sliced
small bunch of fresh thyme sprigs
3/4 teaspoon dried chilli flakes
1/2 teaspoon fennel seeds
1/2 teaspoon black peppercorns
1/2 teaspoon pink peppercorns
200g (7 oz) sheeps milk feta, cut or broken into chunks

In a small jug, mix together olive oil, lemon juice, preserved lemon rind, thyme sprigs, and dried chilli flakes.

Place fennel seeds, black peppercorns, and pink peppercorns into a mortar and pestle, and crush slightly before adding to the oil mixture.

Pack the chunks of feta into a sterilised jar (allow the jar to cool first though, otherwise the cheese will melt).  Pour the oil mixture over the feta - top up with a little more oil if the feta is not completely covered.  Seal the jar and refrigerate.

You could use this within a few hours, and it will keep for at least a couple of weeks.

If you would like to get to know Diana Henry a little better, and to see what everyone else has cooked up this week, then do go and visit my friends at I Heart Cooking Clubs and check out the links (who knows, you might even want to join the journey and cook along with us) ...

Diana Henry badge 1A


Monday, November 17, 2014

Persian Spice Breads

Persian Spice Breads 4

Question:  What do harissa, saffron, eggs, pumpkin, dates, maple syrup, rosewater, orange, spinach and chickpeas have in common?

Answer:  This eclectic group of ingredients can all be found in this month's Mystery Box Madness challenge at I Heart Cooking Clubs.

The challenge:  To choose and make a dish from any one of our eleven IHCC chefs, as long as that dish contains at least three of the mystery ingredients.

This month is the first of our mystery box challenges, and judging by the great dishes my fellow participants have come up with this seems destined to become a popular event.

I decided that I would probably use dates and oranges in my dish, and did a search through some of Diana Henry's and Yotam Ottolenghi's recipes, since they are my two favourite chefs.  I was imagining I would probably come up with some kind of salady thing that might also use spinach and chickpeas.  To my delight, however, I stumbled across Diana's Persian Spice Breads in her fabulous book, A Change of Appetite.  These breads used dates (tick), eggs (tick), and turmeric, for which I knew saffron would make a great (possibly even better) substitute (tick number three).

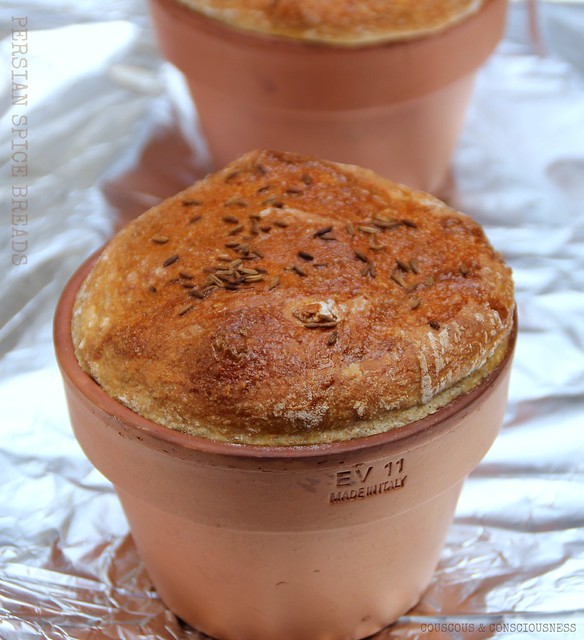
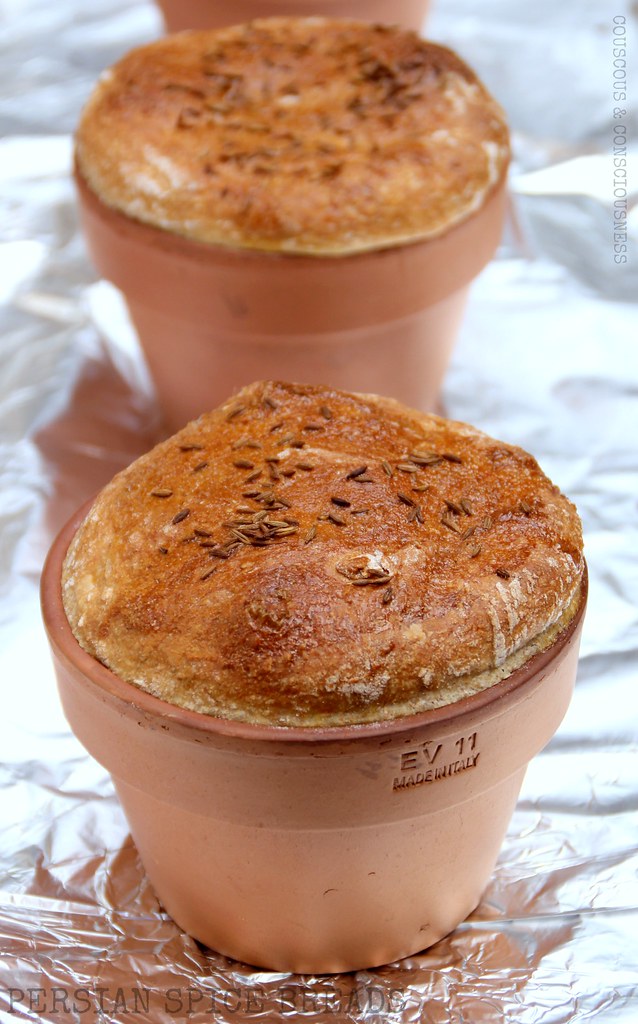
The original recipe calls for these to be made into little rolls, but I decided it would be fun to make them into little flower pot breads.  Little terracotta pots are inexpensive to buy and, as long as you season the pots first, they make great vessels for the baking of bread.

I also adapted this recipe to prepare the dough in my bread maker - partly because I am inherently lazy, and letting the machine do all the work means that I can do other things (like churning the coffee, maple, walnut frozen yoghurt I made at the same time - yes, recipe will follow), and also because I just don't seem to have a deft touch when it comes to dough and my hand-kneaded breads always seem to end up being hard and heavy.

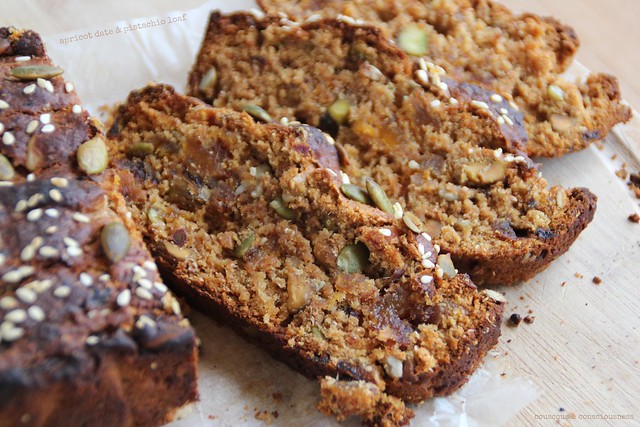
These breads ended up with a moist, soft crumb, and crisp crust on top.  The flavour of the saffron is delicate - just enough to have you wondering "what is that?", which is as it should be.  It pays to exercise restraint with this spice - not only will your wallet thank you for it, but it can easily overpower, and too much saffron is not a nice thing.  The combination of the dates and cumin (not something I would ever have thought of) is mindblowingly good - it delivers on that sweet/savoury thing that you often find in the most unexpected of ways in Middle Eastern food.

Persian Spice Breads 6

With the benefit of hindsight, although the flower pots looked cute, and is something I will definitely be repeating for other breads, in this instance I think the little bread rolls would have been better.  You can see in the photo, that although the date filling started out in the middle, it kind of rose to the top.  This means that although the top part of the bread is exactly as it should be - getting a bite of the date filling and the crusty cumin coated topping in every mouthful - the bottom part of the bread is ... well ... just bread.  Nice, saffron flavoured bread admittedly, but compared to the top bit, still just bread.  I think if you made rolls you would get an all round better filling:topping:bread ratio.

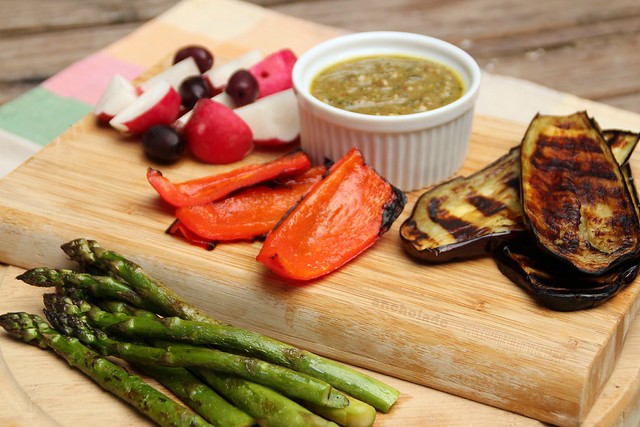
Whichever way you choose to make them, these spice breads are an unexpected delight.  Delicious served as a breakfast bread, or with a mezze spread, I will definitely be making these again.

How to season terracotta pots

Preheat oven to 200 degrees C (390 degrees F), and line a baking tray with tinfoil.

Brush pots liberally with oil, inside and out, and place upside down on the foil lined baking tray.  Place in preheated oven and bake for 30 minutes.  Remove from oven and leave to cool completely.  Brush all over with oil again, and return to the oven for a further 30 minutes.  Remove, and cool completely.  Your flower pots are now ready for use.  Ensure that you brush them well with oil, including the rim, each time you use them.

Persian Spice Breads 5

Persian Spice Breads Recipe
Adapted from recipe by Diana Henry
from A Change of Appetite
Makes 4x small flower pot loaves, or 8x rolls

pinch of saffron threads
175ml (6 fl oz) warm water
1x egg, lightly beaten
1 tablespoon oil
170g (6 oz) plain flour, plus extra for dusting
170g (6  oz) wholemeal flour
1/4 teaspoon salt
1-1/4 teaspoons dried yeast
2 tablespoons soft brown sugar
8x medjool dates, seeds removed and roughly chopped
butter
1x egg yolk
cumin seeds

Toast the saffron threads in a dry pan over low heat for a couple of minutes.  Remove and soak for ten minutes in the warm water.

Place saffron and water in the pan of your breadmaker.  Add half of the beaten egg (reserve the other half for later) and the olive oil.  Next add the flour, salt, brown sugar and yeast.  Set machine to the "dough only" cycle and leave it to do it's thing.  Check dough consistency after 5 to 10 minutes of kneading - adding a bit more flour if it's too wet, or a bit more water if it seems too dry.  I found I had to add about another half cup of flour - obviously add a bit at a time and see how it is coming together.

Preheat oven to 200 degrees C (400 degrees F) and liberally oil flower pots.

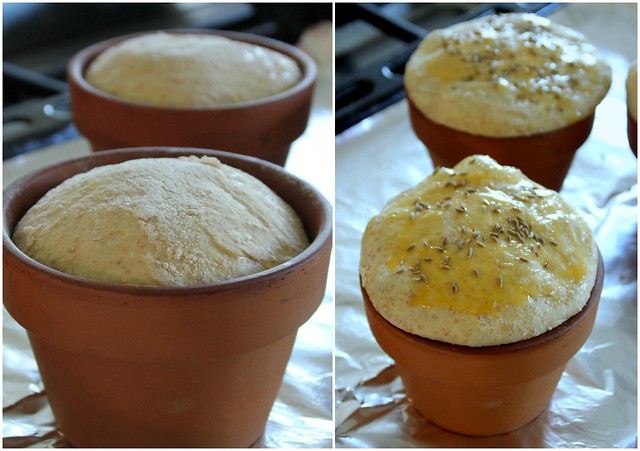
Once dough cycle on bread machine has finished, remove dough to a well floured bench, and dust dough with flour as necessary to make it manageable - it is quite a soft, and sticky dough.  Cut the dough into four equal portions (or eight if you are making rolls).  Flatten out each piece into a disc, placing some of the chopped dates and a generous knob of butter in the centre of each piece.  Pull sides of the dough around the filling, pinch together, and place into flower pots (or onto baking tray) seam side down,  Set aside in a warm place, covered with a clean tea towel to prove for a further 30 minutes.

Persian Spice Breads 3

Add the egg yolk to the previously reserved beaten egg, and brush the tops of the bread with the mixture.  Sprinkle liberally with cumin seeds.

Place pots, on a foil lined baking tray, into the oven and bake for 25 to 30 minutes (if making rolls probably only about 15 minutes), or until golden and baked through.  Remove from oven, and leave to rest about 15 to 20 minutes before trying to remove from the pots.

If you would like to get to know Diana Henry a little better, and to see what everyone else has cooked up this week, then do go and visit my friends at I Heart Cooking Clubs and check out the links (who knows, you might even want to join the journey and cook along with us) ...

Diana Henry badge 1A

... or check out A Change of Appetite and Diana's many other great titles available from Amazon USA, Amazon UK, or Fishpond NZ.


Sunday, November 9, 2014

Anchoiade with Chargrilled Vegetables

Anchoiade with Chargrilled Vegetables 3

Like most of my fellow countrymen, I love to travel.  Sadly, living as we do at the bottom of the world, traveling anywhere is expensive, so jumping a plane and jetting off to places afar doesn't happen as often as I would like it to.

Fortunately, however, keeping a pantry well-stocked with a few interesting and exotic ingredients means I can transport myself to any far flung corner of the globe without even leaving my kitchen.

There is literally a whole world (pardon the pun) of ingredients out there which will transform everyday dishes from ordinary to extraordinary.  And, although, many of these things sound extravagant, if you hunt them out at Asian and Middle Eastern specialty stores, they are generally surprisingly inexpensive.  Many of them too are incredibly easy to make yourself.

My pantry and/or freezer always contain these homemade ingredients:  preserved lemons, harissa, green harissa, hummus, pesto or tapenade, ricotta or mascarpone, chilli jam, pasta sauce, and a variety of chutnies.  I always have on hand a variety of homemade jams, bottled beetroot and roasted red peppers, and vegetables which have been pickled during the height of the season.  A few other ingredients, which I consider pantry staples - spices, fresh herbs, vinegars (red wine, sherry, balsamic, cider, rice wine), mustards (Dijon and whole-grain), pomegranate molasses, sweeteners (honey, date syrup, agave nectar, maple syrup), fish sauce, soy sauce, mirin, cooking sake, oyster sauce, to name just a few, are also always on hand.  With ingredients like these in the store cupboard, you can literally have breakfast in Turkey, lunch in Italy, and dinner in Thailand.

I'm always on the lookout for new and interesting ingredients to keep in my pantry, so I was pretty excited that our theme this week at I Heart Cooking Clubs is "Stock Your Exotic Pantry".  Actually I've been pretty excited ever since I got my hands on Diana Henry's "Salt Sugar Smoke".  This is seriously one of the most inspirational books to grace my kitchen for a long time, so I knew that this was exactly the place I was going to turn to meet this week's challenge.

Anchoiade

Diana's anchoiade seemed like the perfect dish to make.  The fact that I could make it using only ingredients I already I had on hand, and turn them into another great ingredient to always have around, seemed very serendipitous.

Anchoiade with Chargrilled Vegetables 2

Loaded with anchovies, garlic, almonds, parsley, lemon, and good extra virgin oil, this "dip" takes just moments to make, and packs a major flavour punch that will still be on your mind hours later.  I teamed this with some chargrilled peppers, aubergine, and asparagus straight off the barbeque, and even though I ate this feast sitting at my kitchen bench, in my mind I was sitting on the sun-drenched terrace of a French villa overlooking the Mediterranean.  This would also be great dished up as a dip with fresh, raw vegetables, or served antipasto-style with sourdough croutons, cos lettuce, baby boiled new potatoes, hard boiled eggs, tomatoes, olives, green beans, and chunks of grilled tuna - a kind of deconstructed nicoise salad.  With a jar of this in the fridge, there is always a Mediterranean feast in the house.

Anchoiade with Chargrilled Vegetables Recipe
Adapted from recipe by Diana Henry
from Salt Sugar Smoke

24x anchovies, packed in oil
large handful of roasted, unsalted almonds
3x cloves garlic, roughly chopped
large handful flat leaf parsley, roughly chopped
grated zest and juice of 1x lemon
flaky sea salt & freshly ground black pepper
extra virgin olive oil
1x red pepper, cored, deseeded, and cut into quarters
1x bunch asparagus, woody ends removed
1x medium sized aubergine, cut lengthwise into thick slices

Drain and reserve the oil from the anchovies.

Place anchovies, almonds, garlic, parsley, lemon zest and juice, salt and pepper into food processor.  Blitz until mixture becomes a coarse paste.  Add reserved anchovy oil, then with motor running, add olive oil in a very thin stream until you reach a smooth paste.

Toss vegetables with a generous drizzle of extra virgin olive oil, and season liberally with salt and pepper.  Heat the barbeque or chargrill pan, and cook until the vegetables are tender and charred.

Serve immediately or at room temperature, with a bowl of anchoiade on the side.

If you want to keep the anchoiade longer, store in the fridge in a sterilised jar, pouring a thin layer of olive oil over the surface.

Anchoiade with Chargrilled Vegetables 1

If you would like to get to know Diana Henry a little better, and to see what everyone else has cooked up this week, then do go and visit my friends at I Heart Cooking Clubs and check out the links (who knows, you might even want to join the journey and cook along with us) ...

Diana Henry badge 1A

Sunday, November 2, 2014

Asparagus Mimosa

Asparagus Mimosa 2

I have no notion which came first ... the chicken or the egg?  That's our theme this week at I Heart Cooking Clubs, which gives us the opportunity to explore Diana Henry dishes featuring, naturally enough, chicken or eggs.  And, whilst I'm pretty certain no one is going to come up with a definitive answer to that age old question, some of the dishes my friends have come up with would definitely answer just about any other woes.

I was certainly looking for a dish to satisfy a few woes myself this week.  We've had two weeks of builders, gib stoppers, electricians, etc doing flood damage repairs on our house, including ripping out and replacing the kitchen and dining room ceiling.  This would be disruptive enough in itself, but the fact that the workmanship and trade practices of some of these workmen left a bit to be desired, has been frustrating at best, and at times downright infuriating.

So I was looking for something verging on comfort food, which meant I was heading down the egg route, rather than the chicken route.  When all is said and done, is there anything more comforting than a simple, soft boiled egg?!

After picking up a fresh bunch of asparagus (hands down my favourite vegetable) at the market yesterday, I thought this asparagus mimosa would make a delightful, light and simple lunch, before tackling the big post-repair clean-up - a project which has kept me busy for most of the weekend.

Now, let's be truthful here - asparagus mimosa is nothing new - it's one of those classic dishes that has been around forever.  But, to be honest, I have often wondered what all the fuss is about ... after all, just how good could a few asparagus spears with a crumbled boiled egg over the top really be.

Well, I don't know about the original, but Diana Henry's version provided proof positive, if ever it were needed (and really I've said it here so often I should not have been surprised), that combining a few good quality ingredients, and "messing with them" as little as possible, will deliver sensational results.  Every! Single! Time!

Here simple steamed asparagus stems, drizzled with a lemony-herby-caper dressing, and topped with a soft-boiled free range egg, delivers on every front.  It provides all the comfort of dunking asparagus spears straight into a soft boiled egg in a cup, with the added flavour punch of the dressing, and turns it into a dish which is easily elegant enough to serve to company.

This would make a great appetiser as part of a large meal, but is also the perfect dish for a light spring lunch.  You don't need to be too particular about quantities - I've just given you a rough guide for one person, and you can easily multiply it up to feed as many as you like.

Important note:  A dish such as this is all about the ingredients, so use the best you can get your hands on.  Use only in-season asparagus IN YOUR PART OF THE WORLD.  Right now, I'm sure those of you in the northern hemisphere can probably buy asparagus shipped from New Zealand, or Australia, or South Africa - please don't!  Bookmark this recipe instead and wait until spring returns.  If you have a local farmer's market where you can buy asparagus picked fresh that morning, even better.  A juicy, organic lemon picked straight from the tree, and flat-leaf parsley picked straight from the garden, are perfect if you have them, but I know that's not always possible.  Good quality capers are a must - I like the ones packed in salt, but brined are fine too.  Extra virgin olive oil, should be the best that you can afford, and it goes without saying that only a free-range organic egg will do.  Also, although I never bother peeling my asparagus, I think it is worth doing here.  In a dish so simple, in which you really want the ingredients to shine in every possible way, it just seems right - it looks beautiful, and really helps the asparagus to soak up that dressing.

Asparagus Mimosa 1

Asparagus Mimosa Recipe
Adapted slightly from recipe by Diana Henry
from A Change of Appetite

For each person allow:
1x bunch (5-6 spears) asparagus
1x free range egg
zest and juice of 1/2 lemon
2 tablespoons extra virgin olive oil
1/4 teaspoon wholegrain mustard
flaky sea salt & freshly ground black pepper
small bunch flat leaf parsley, finely chopped
1 tablespoon capers, rinsed and drained, roughly chopped

Place egg in a small pot, cover with cold water, and bring to the boil.  Boil for four minutes.  Remove egg with a slotted spoon and place in a bowl of cold water, until egg has cooled enough to handle, but is still warm.

In a small bowl, whisk together lemon juice, olive oil, mustard, salt and pepper, until well combined.  Stir in the parsley, and capers.  Set aside.

Snap the woody ends off the asparagus spears, and peel the ends.  Boil the asparagus until just tender to the tip of a sharp knife - about four minutes, depending on the thickness of the spears.

Meanwhile, peel the egg, place on a plate or board and mash with a fork, until crumbled and yolk and white mixed together.

Drain asparagus as soon as it is ready and place on a serving plate.  Drizzle over a generous amount of the dressing, and spoon the crumbled egg over the middle of the asparagus.  Finish with another drizzle of olive oil if you like.

If you would like to get to know Diana Henry a little better, and to see what everyone else has cooked up this week, then do go and visit my friends at I Heart Cooking Clubs and check out the links (who knows, you might even want to join the journey and cook along with us) ...

Diana Henry badge 1A

... or check out A Change of Appetite and Diana's many other great titles available from Amazon USA, Amazon UK, or Fishpond NZ.


Monday, October 27, 2014

Espresso Chocolate Chip Pancakes

Espresso Chocolate Chip Pancakes 2

Today is a public holiday in New Zealand.  Not only does Labour Day commemorate the struggle for an eight-hour working day, but here it's also the day that really kicks off summer.  We are normally blessed with a hot sunny day on which everyone flocks to the beach and gets a nasty dose of sunburn, because somehow in our collective winter stupor we've forgotten about the great big hole in the ozone layer over New Zealand.  It's the day on which it is usually considered any risk of frost has passed and it is safe to plant tomatoes - we threw caution to the wind and planted ours last weekend.  No frost came, the sky didn't fall, the tomatoes appear to be thriving.

Unlike Labour Days passed, today is cool and breezy, low cloud is clinging to the hills around us, and rather than feeling the urge to flock to the beach, it felt more like a day for a late sleep-in, curl up on the sofa with a couple of movies, and enjoy a leisurely brunch.  A leisurely brunch in fact of espresso, chocolate chip pancakes, with a side of honey-roasted pineapple and yoghurt, and extra coffee.  Now I've got your attention, haven't I?!

It's Secret Recipe Club reveal day, and I can now tell you that my assigned blogger this month was the lovely Emily at Life on Food.  Having been born in Iowa, grown up in Georgia and Maine, Emily now lives in Connecticut with her husband, who also shares her passion for food and cooking.  Emily has a major in economics and works as a building consultant with colleges and universities.

Until this morning I wasn't hundred percent sure which one of Emily's many dishes I was going to make.  Emily has been blogging since 2009, and churning out on average around 300 posts a year, she gives new meaning to the word prolific.  That's a whole lot of dishes to choose from - just settling on a short list was pretty hard, let alone choosing just one.  My short list included New England Clam Chowder (although I'm not sharing that with you today, I will definitely be making this sometime soon), Lamb Meatballs with Toasted Orzo (this just reminds me of sunshine and Greek holidays), Cinnamon Rolls, and Shrimp Thai Noodles with Spicy Peanut Sauce.

But in the end, today is unquestionably a day for pancakes, and I love the "grown-up-ness" of Emily's Coffee Chocolate Chip Pancakes.  These are pancakes you make for a couple of lazy adults who just want to swan around for the day, not the ones you whip up for the kids before they rush out the door to sports day.  Emily's pancakes used instant coffee powder, but as we never have instant coffee around here, I brewed a double shot of espresso instead.  I didn't have any chocolate chips on hand either, so I subbed in some cacao nibs.  I think the slightly "bitter" flavour is another element that elevates these pancakes to grown up status. The main "liquid" ingredient in the batter is yoghurt, but I found, once I'd mixed up my batter, that it was very thick - I think this was probably because I only have very thick Greek-style yoghurt rather than a more "runny" variety, so I ended up having to add about 1/2 to 3/4 cup of milk to loosen the batter to the right consistency.  Use what you have and adjust accordingly.  The coffee flavour in these pancakes is not overt - it just adds that certain "je ne sais quoi" that gives a depth of flavour and leaves you wondering what it is.  Someone around here who hates coffee with a passion, thought they tasted pretty good - when he asked me what was in them, I said it was zucchini - never, ever would I let on that it was coffee.  Hopefully my secret is safe with all of you out there.

I served these pancakes with a side of this Honey Roasted Pineapple and a dollop of natural yoghurt.  It only takes a moment to prepare, and it takes care of itself in the oven while you cook the pancakes.  The vanilla and cinnamon perfumed honey and pineapple sauce hit just the right flavour notes drizzled over the pancakes, but if you just want the pancakes straight up maple syrup, or even just a generous knob of butter, would be perfect.

Espresso Chocolate Chip Pancakes 1

Espresso Chocolate Chip Pancakes Recipe
Adapted slightly from this recipe
from Life on Food

1 cup plain flour
1 teaspoon baking powder
1 teaspoon baking soda
2 tablespoons sugar
pinch of salt
double shot of freshly brewed espresso, cooled
1 tablespoon butter, melted and cooled
1 egg
1 cup natural yoghurt
1/2 to 3/4 cup milk, as necessary
1/3 cup cacao nibs (or chocolate chips)
extra butter for frying

Sift together flour, baking powder, and baking soda into a medium-sized bowl.  Add sugar and salt and mix to combine.

In a small bowl, whisk together espresso, melted butter, egg and yoghurt, until everything is well combined.

Make a well in the centre of the dry ingredients.  Add the yoghurt mixture, and mix until only just combined.  Thin with milk if necessary.  Fold in the cacao nibs.

Place a non-stick frypan over medium heat and add a small knob of butter.  As soon as butter is sizzling, add spoonfuls of the batter to the pan.  Cook for two to three minutes before flipping, and cook for a further two to three minutes on the other side.  Remove to a warm place and continue until all the batter has been cooked.

Serve immediately.

Hope you enjoy this dish as much as I did, and visit the links below to check out all the other great dishes my Secret Recipe Club friends made.


Secret Recipe Club is a way to not only find, but share new blogs.  Each month, one member is assigned to another member from their group "secretly" (hence the name).  That person selects a recipe (or more) to make, photograph, and then will draft up a blog post.  Everyone in the group posts on the same Monday together and gets to see who had their blog and what recipe(s) they chose.  It's such a fun experience and it's a great way to get new followers, too.  There are always new blogs to discover and our club has plenty to offer!  If you are a food blogger and interested in joining the Secret Recipe Club, be sure to check out the Join SRC page.


Sunday, October 26, 2014

Salmon Tartare with Rye Crackers and Fennel & Citrus Salad

Salmon Tartare & Fennel & Citrus Salad 1

I don't know how things are in your household, but in mine we live on a pretty tight budget.  When you have a passion for food and "luxury" ingredients, that can be a bit challenging at times.  It doesn't mean, I believe, that you need to go without, you just need to be a bit creative about the ways in which you use those things.  In many ways this goes right to the heart of my whole philosophy about food.

Case in point ... chicken.  We only eat free range, organic chicken in our house - not just for ethical reasons, but because it also tastes a whole lot better than your average battery farmed chicken.  A free range chook will however set you back about twice as much as a cage raised bird.  With a little planning, however, we can usually manage to get three to four meals out of a chicken, and a batch of soup out of the carcass, which works out pretty budget friendly in the end.

This salmon tartare is another great way of making a luxury ingredient go a long way.  A small salmon fillet, which would normally be a single serving as a main meal, becomes a sumptuous lunch for two, or even an appetiser for four.

It's Pot Luck week at I Heart Cooking Clubs, and we have the choice too cook with any one of our eleven IHCC chefs.  However, I'm still in the honeymoon phase of my relationship with our latest chef, Diana Henry, so I turned to Diana's book A Change of Appetite, where her Scandinavian inspired dish of Salmon Tartare with Pickled Cucumbers and Rye Crackers really caught my attention.

Salmon tartare is one of my favourite dishes, and I didn't make a great deal of changes to the recipe other than adding a slosh of vodka to the marinating salmon, because ... well ... just because, and leaving out the shallots as I didn't want anything to overwhelm the delicate flavour of the salmon.  A few snipped chives, had I had them, might have been nice.  In addition to the rye crackers, Diana serves this salmon tartare with a sweet and sour, pickled cucumber salad and dilled yoghurt.  I chose to make a refreshing fennel and citrus salad instead.

As far as the rye crackers go, I didn't make any changes to the recipe whatsoever, so I'm not going to reproduce the recipe in detail here for you - you'll just have to go get the book, and trust me when I tell you it is totally worth it.

These crackers are so easy to make, and so delicious, you will wonder why you've ever bought crackers in your life.  Not only that, whipping up a batch of these will run out to a fraction of the cost of buying crackers.

Rye flour, along with a little salt, sugar and baking powder are mixed with a little chilled butter until the mixture resembles damp sand, then mixed with milk to form a soft dough - using the food processor makes fast and easy work of this.

Break off golf ball sized chunks, roll in a light dusting of extra rye flour, and then roll out as thin as you possibly can into something vaguely resembling a circle.

Rye Crackers 1

Place crackers on a large baking sheet lined with baking parchment, prick all over with a fork, and bake in a hot oven for up to 10 minutes, until crisp and golden.  Cool on a wire rack.

Rye Crackers 2

These crackers are a wonderful accompaniment to the salmon, in both flavour and texture, and I think next time a little sprinkling of fennel seeds and sea salt over the crackers before baking might be a nice touch to echo the flavours in the salad.  These crackers also make a great vehicle for a variety of cheeses and chutneys.  A batch of these in your store cupboard won't last long I can promise you.

What tips do you have for stretching the budget to accommodate luxury ingredients?

Salmon Tartare & Fennel & Citrus Salad 2

Salmon Tartare Recipe
Adapted from recipe by Diana Henry
from A Change of Appetite
Click here for the free recipe card

250g (8 oz) salmon, skin and bones removed
1 tablespoon capers, drained and rinsed
juice of 1x lemon
2 tablespoons extra virgin olive oil
1 tablespoon vodka
freshly ground black pepper
generous handful of flat leaf parsley, finely chopped

Cut salmon into tiny dice, about .5cm (1/4 inch) in size, and place in a small bowl with the remaining ingredients.  Mix together gently, and chill while you make the crackers and salad, or for up to two hours.  Before serving, taste and adjust any of the seasonings according to your palate.

Fennel & Citrus Salad Recipe

1x orange, peel and all white pith removed
1x grapefruit, peel and all white pith removed
(if you can get pink grapefruit so much the better)
1x lemon, peel and all white pith removed
1x lime, peel and all white pith removed
1x fennel bulb
generous handful of fennel fronds, finely chopped
extra virgin olive oil
flaky sea salt & freshly ground black pepper

Place a sieve over a medium sized bowl.  Hold the peeled orange over the sieve to catch any pips and, using a sharp knife, cut down between the membrane and segment of fruit on each side to separate the fruit entirely from the membrane, and let the fruit segments fall into the bowl.  Squeeze the membrane over the bowl, extracting as much juice from it as you can.  Repeat with the grapefruit, the lemon and the lime, in each case also squeezing all of the juice out of the membrane.

Remove the tough outer "leaves" from the fennel bulb.  Cut it into quarters lengthwise and slice the fennel as thinly as you possibly can - a mandoline is the ideal tool for this job if you have one.

Add the shaved fennel to the citrus segments, along with the fennel fronds.  Season generously with flaky sea salt, freshly ground pepper and a good drizzle of extra virgin olive oil.

Chill until you are ready to serve.

If you would like to get to know Diana Henry a little better, and to see what everyone else has cooked up this week, then do go and visit my friends at I Heart Cooking Clubs and check out the links (who knows, you might even want to join the journey and cook along with us) ...

Diana Henry badge 1A

... or check out A Change of Appetite and Diana's many other great titles available from Amazon USA, Amazon UK, or Fishpond NZ.


Saturday, October 18, 2014

Roasted Apricot Frozen Yoghurt

Roasted Apricot Frozen Yoghurt 2

It's not that we're giving the gorgeous Diana Henry the cold shoulder so early in our relationship at I Heart Cooking Clubs, but we are giving her a bit of a frosty reception this week.  Yes, we're going "Icy Cold" and coming up with all manner of icy, chilled and frozen treats.

Now, I've told you before, I'm sure, that my dessert of choice pretty much any time of year is a frozen one, so I needed little encouragement to break the ice cream maker out of the cupboard and get churning.  Since I love ice cream, and Diana has loads of ice cream and sorbet recipes in her repertoire, making a bit of frozen magic together seemed inevitable.

My favourite new cookbook, A Change of Appetite, offered lots of gorgeous sorbets which have now been bookmarked, but it was the Greek yoghurt and apricot ice cream that took my fancy.

When apricots are at the height of the season, I usually roast them in batches with a little butter and brown sugar.  The butter and brown sugar more or less turns to caramel and the flavour of the apricots really intensifies.  Then I freeze them in batches to use in ice creams and smoothies all year long.

Roasted Apricot Gelato 2

In the original recipe Diana uses dried apricots and stews them in apple juice, before pureeing and mixing with the yoghurt.  With summer (and apricot season) just around the corner, it seemed like the perfect opportunity to use up one of my remaining bags of roasted apricots.  Diana recommends straining the pureed apricots, to avoid getting "bits" in the ice cream, but I'm personally a bit of a fan of the bits - it reminds me that I'm eating something with real fruit in it - so my apricots got a simple blitz with the food processor only.

When I made this Roasted Apricot Gelato, way back when, I didn't really think it could be improved on.  But I can honestly say that this frozen yoghurt version is a distinct improvement.  I love the slight tartness of the yoghurt with the richness of the roasted apricots.  The yoghurt and creme fraiche provide all the creaminess you would normally get from a custard based ice cream, and is a whole lot quicker and easier to make.  I also like to think that this is a healthier option than a regular ice cream - that may possibly be deluded, but I like to believe it.

Roasted Apricot Frozen Yoghurt 1

Roasted Apricot Frozen Yoghurt Recipe
Adapted from recipe by Diana Henry
from A Change of Appetite
Click here for the free recipe card

6x medium-large fresh apricots
brown sugar
butter

400g (14 oz) Greek yoghurt
4 tablespoons creme fraiche
2 tablespoons runny honey

Preheat oven to 180 degrees C (350 degrees F).  Cut apricots in half - remove and discard the stones.  Place apricots cut side up in an ovenproof dish that is just big enough to fit them quite snugly.  Sprinkle each apricot half with a little brown sugar, and top each with a small knob of butter.

Roasted Apricot Gelato 1

Place in hot oven and roast until the apricots have softened and started to collapse, and the sugar and butter have merged with the oozing fruit juices to become almost the consistency of caramel sauce.

This will take about 30 minutes, and it is helpful to baste the fruit with the juices half way through.  Allow to cool completely then, using a food processor or stick blender, blitz to a puree.

Add yoghurt and creme fraiche to the apricot puree and blitz again until combined.

Churn the mixture in a ice cream maker according to manufacturer's instruction.  Halfway through the churning process, drizzle in the honey.  Serve straight away or freeze for a few hours to firm up.

Roasted Apricot Frozen Yoghurt 3

If you would like to get to know Diana Henry a little better, and to see what everyone else has cooked up this week, then do go and visit my friends at I Heart Cooking Clubs and check out the links (who knows, you might even want to join the journey and cook along with us) ...

Diana Henry badge 1A

... or check out A Change of Appetite and Diana's many other great titles available from Amazon USA, Amazon UK, or Fishpond NZ.

I will also be submitting this post to Sweet New Zealand.  Inspired by Alessandra Zecchini, and hosted this month by Lesley at eat, etc ..., Sweet New Zealand is an event for all Kiwi bloggers (whether living at home or abroad), or all foreign bloggers living in New Zealand, to link up their sweet treats.

Sweet New Zealand Badge A


Sunday, October 12, 2014

Apricot, Date & Pistachio Loaf

Apricot, Date & Pistachio Loaf 1

So far at I Heart Cooking Clubs we've cooked with some great chefs:  Nigella Lawson, Mark Bitman, Giada de Laurentiis, Jamie Oliver, Tessa Kiros, Rick Bayless, Madhur Jaffrey, Yotam Ottolenghi (my favourite), Donna Hay, and Nigel Slater.  I'm excited now to tell you that a new chef joins the line up this week - we will spend the next six months cooking with Diana Henry.

Raised in Northern Ireland, and now living in London, Diana started cooking when she was just six years old, and has never looked back.  She is not just a passionate and adventurous cook, but also a gifted food writer.  Diana has published eight stunning cookbooks, writes a regular column for The Sunday Telegraph's Stella magazine and several other magazines, has her own website and appears on UKTV's Market Kitchen.

Diana talks a lot about the sense of connectedness that food and cooking gives her, something I relate to completely.  To welcome Diana this week to the IHCC fold I turned to her Date, Apricot & Walnut Loaf Cake from her latest book, A Change of Appetite.  In this book she turns towards lighter, fresher, healthier dishes (without any compromise in flavour) inspired often by dishes of the Middle East, Scandinavia, and the Far East.  There are some stunning recipes in this book, and I swear I want to make nearly everything.

I can imagine that if I could sit down in my kitchen for an afternoon with Diana, we would find a great deal to talk about.  Of course there would be coffee, and cake (there has to be cake), and this delicious loaf packed full of dried fruit, seeds and nuts would fit the bill perfectly.

I made a couple of changes to the recipe - don't I always?!  In the original recipe, Diana has you soften the fruit in apple juice and cook it down to a puree - I opted for an infusion of apricot tea and date syrup instead - but really you could use any fruit juice or even just water for that matter.  I cut down the amount of sugar just a little, and I used coconut sugar instead of brown sugar.  In the original recipe, Diana uses a mixture of regular flour and malted brown flour (which is not available here) - I used all wholemeal flour instead.  Lastly, because thoughts of apricots and dates and date syrup always transport me to the Middle East, I used pistachios instead of walnuts.  Once again, you could really use any kind of nuts that you like.

An important note here - my loaf tin is a tiny bit bigger than that called for in the recipe, so I didn't get the nice big slices that I was hoping for.  It also took quite a bit less cooking than that specified in the recipe.  The recipe offers a cooking time of 1-1/4 hours, but I noticed that mine smelled like it was done after about 45 minutes - a quick check, and I found that it was indeed ready, in fact ever so slightly over-done.  This could have been because of my larger tin size, but my tin was not that much bigger that it would have taken half an hour off the cook time I don't think, so I suggest that you keep a close eye on the time.

This is a deliciously moist and flavourful loaf, so fragrant with spices that your house will smell like Christmas while it's baking.  Like anything of this nature, this is fabulous with a generous smear of butter (although entirely unnecessary), and I found that it kept well for a week.  The only reason it lasted so long around here is that someone else in the house is not fussed on apricots - in most normal households I would expect this to be gone in a few days!

Apricot, Date & Pistachio Loaf Recipe
Adapted from recipe by Diana Henry
from A Change of Appetite
Click here for the free recipe card

1 cup chopped dried dates
1/2 cup chopped dried apricots
1/2 cup apricot tea
1 tablespoon date syrup
175g (6 oz) butter
130g (4.5 oz) brown sugar
grated zest of 1x orange
1x large free-range egg
225g (8 oz) wholemeal flour
1 teaspoon baking powder
1 heaped teaspoon mixed spice
generous grating of fresh nutmeg
1/3 cup pistachios, roughly chopped
generous handful of pumpkin seeds, plus extra for the top
generous handful of sunflower seeds
sprinkling of sesame seeds

Put dates and apricots in a small saucepan with the apricot tea and date syrup.  Set over medium heat, bring to a boil, then reduce heat and simmer until softened to a thick puree - 10 to 15 minutes.  Set aside to cool.

Also melt butter and leave it to cool.

Meanwhile, preheat oven to 180 degrees C (350 degrees F).  Grease a 22cm x 12cm x 6cm (8" x 4-3/4" x 3") loaf tin, and line the base with non-stick baking paper.

Add the cooled butter to the date and apricot mixture, along with the brown sugar, grated orange zest, and the egg.  Mix together well.

Place the flour in a large bowl with the baking powder, mixed spice, nutmeg, pistachios, pumpkin seeds, and sunflower seeds. Mix together well, then add the fruit mixture and mix until everything is just combined - don't over-mix.

Tip everything into the prepared baking tin, using a rubber spatula to even out the top.  Sprinkle over the extra pumpkin seeds and sesame seeds.  Place tin in the preheated oven, and bake for up to 1-1/4 hours or until golden on top and a skewer inserted into the centre of the loaf comes out clean.


Remove from the oven and cool for 10 minutes in the tin before removing to a wire rack to cool completely.

If you would like to get to know Diana Henry a little better, and to see what everyone else has cooked up this week, then do go and visit my friends at I Heart Cooking Clubs and check out the links (who knows, you might even want to join the journey and cook along with us) ...

Diana Henry badge 1A

... or check out A Change of Appetite and Diana's many other great titles available from Amazon USA, Amazon UK, or Fishpond NZ.

I will also be submitting this post to Sweet New Zealand.  Inspired by Alessandra Zecchini, and hosted this month by Lesley at eat, etc ..., Sweet New Zealand is an event for all Kiwi bloggers (whether living at home or abroad), or all foreign bloggers living in New Zealand, to link up their sweet treats.

Sweet New Zealand Badge A

I'm also linking this post to Tea Time Treats, hosted by one of my favourite bloggers - the lovely Karen at Lavender and Lovage, and The HedgeCombers.  The theme this month is vegetables, and technically there's no vegetables in this recipe, but I've been wanting to join in here for ages, so I'm taking the creative leap that since this loaf contains pumpkin seeds that's near enough :-)

Tea Time Treats

Monday, October 6, 2014

Roasted Aubergine, Red Pepper & Garlic Dip

Roasted Aubergine, Red Pepper & Garlic Dip

This is always one of my favourite times of the month - Secret Recipe Club reveal day.  That day when I, along with all my fellow participants, get to reveal our assigned blog (that person we have been "cyber stalking" for the last month) and the dish we have made from their blog.

But I do have a confession to make.  You see, I have committed the worst possible SRC crime - yes, I was supposed to post this a couple of weeks ago, but made a total mix up of dates and left my assigned blog hanging - Amy, how will you ever forgive me?  Thankfully our host, Sarah, has allowed me to atone for my sins by putting up my post this week with a different group.

Anyways, enough about that.  My assigned blog this month was Fearless Homemaker, hosted as you are now aware by Amy.  Raised in Boston, and now living in Nashville, Amy is a self-described food and cocktail lover, enthusiastic entertainer, and crafty DIYer.  Amy has a masters degree in Positive Psychology, and works as a co-ordinator for Cultural Care Au Pair.  She is passionate about cultural exchange, and working with the American host families and their international au pairs to ensure a positive experience for everyone.

Amy had so many recipes I wanted to try (every one of them beautifully photographed), and a number of them have now been pinned for me to make at a later date, like this Slow-Cooker Chicken & Mushroom Farro Risotto, Spaghetti with Oven Roasted Tomatoes & Caramelised Fennel, and this Glazed Lemon Pound Cake.  Actually it was the lemon pound cake that I was intent on making, but with an aubergine hanging around in the veggie bin which was in dire need of being used up, it was Amy's Roasted Eggplant, Red Pepper & Garlic Spread that won the day.

This was quick and easy to prepare, particularly using some ready roasted red peppers as I did - I roast loads of them during the season, and then bottle them in olive oil.  Just perfect for adding to salads, antipasto platters, casseroles, and pasta sauces throughout the rest of the year.  I skipped the onion, since we're not much fussed on it around here, and I added in a little bit of chilli paste for an extra kick, and a bit of paprika for it's lovely smokiness which I think is perfect with eggplant.

This dip is wonderful used, as Amy did, as a spread on fresh bread.  It would also be great served as a dip for other vegetables.  We used it as a rich, flavourful sauce for pasta, and would also be wonderful used as a pizza sauce - a great alternative for those who are sensitive to tomatoes.  This was so good, I made a second batch, which I've now stashed in the freezer ready for a quick mid-week meal.

Roasted Aubergine, Red Pepper & Garlic Dip
Adapted from this recipe at Fearless Homemaker
Click here for the free recipe card

1x medium sized aubergine, cut into 2.5cm (1 inch) cubes
olive oil
flaky sea salt & freshly ground black pepper
3x roasted red peppers, preserved in olive oil, drained and roughly chopped
(or 2x fresh red peppers, deseeded and cut into 2.5cm (1 inch) chunks)
2x cloves garlic, unpeeled and left whole
2 teaspoons chilli paste
1 teaspoon smoky paprika
1 tablespoon tomato paste (leave this out if you are sensitive to tomatoes)

Preheat oven to 220 degrees C (425 degrees F).

Toss eggplant cubes and garlic cloves with a generous slosh of olive oil, and a good seasoning of flaky sea salt and freshly ground black pepper.  (If you're using fresh red peppers, toss them in as well.)

Line a shallow roasting tray with baking parchment and spread vegetables in a single layer over the tray.  Place tray in the oven and roast until tender and golden - about 20 to 30 minutes.  (Keep an eye on the garlic - it can burn quickly, so you may want to remove it half way through.) Remove from the oven and allow to cool to room temperature.

Squeeze garlic cloves out of their skins, and add them to a food processor, along with the eggplant and peppers.  Blitz to a coarse paste.  Add the chilli paste, paprika, tomato paste, and a generous slosh of olive oil (I used the reserved oil from the roasted peppers).  Process until you reach a spreadable consistency.  Taste and season with extra sea salt and pepper if desired.

Hope you enjoy this dish as much as I did, and visit the links below to check out all the other great dishes my Secret Recipe Club friends made.

Also shared at Hearth and Soul, hosted by the lovely April J. Harris.