Showing posts with label marcella hazan. Show all posts

Saturday, November 13, 2010

Asparagus Frittata - Cooking Italy 14

Asparagus Frittata 2, cropped

I'm not exactly sure why, but for some reason I had never before made a frittata - I think it may have had something to do with never owning a non-stick pan and being afraid that it wouldn't come out of the pan.  Well, recently I decided to invest in one and I have to say it's been life changing - why did I never do this before?!  So now in the possession of a non-stick pan, I was pretty excited when a recent assignment for the Cooking Italy group was to make a frittata.  You will recall that we are cooking from Marcella Hazan's "Essentials of Classic Italian Cooking" book, and we had the option to choose any "flavour" we liked.  It being spring here, the choice was really a no-brainer - it just had to be asparagus.

This was an absolute breeze to make - it may have been my first frittata, but it definitely won't be my last.  I had beautiful, organic asparagus and gorgeous, bright-orange-yolked, free-range eggs - with such wonderful ingredients this was bound to be good, and it did not disappoint.  This made a beautiful light lunch, and was still delicious served cold (well, room-temperature really) the next day.

Asparagus Frittata
Adapted from Marcella Hazan's
Serves 4
Vegetarian
Click here for a printable copy of this recipe

450g (1lb) fresh asparagus
5 eggs (preferably free-range)
flaky sea salt
freshly ground black pepper
2/3 cup parmesan cheese, freshly grated
2 tablespoons butter

Snap the woody ends off the asparagus spears, and drop them into a pot of boiling salted water.  Cook until the spears are fork tender, but are still firm to the bite.  Remove from pan, cool, and then cut into short pieces about 1.5cm (1/2-inch) long.

Asparagus Frittata 4, cropped

Beat the eggs together in a bowl.  Add the asparagus, a couple of generous pinches of flaky sea salt, freshly ground pepper, and the grated parmesan cheese.

Melt the butter in a non-stick pan over medium heat.  As soon as the butter begins to foam, give the egg and asparagus mixture a good stir, and pour it all into the pan.

Turn the heat down to very low, and as soon as the eggs have thickened and set, with just the surface still being a bit runny, remove the pan from the heat and finish off under the grill (broiler) in your oven.  This will barely take a minute - remove as soon as the top is set and before it starts to brown.

Asparagus Frittata 3, cropped

Slide the frittata out of the pan onto a board or serving platter, and cut into wedges.

If you don't eat this all at once, it is wonderful the next day used in a sandwich on fresh ciabatta bread.

Asparagus Frittata 1, cropped

Do visit my Cooking Italy page to learn more about the group (maybe you'd even like to join in - you don't have to have a blog to join the group and cook along with everyone else), find links to other members of the group, and links to all the Cooking Italy recipes I've cooked so far.

Essentials of Classic Italian Cooking 

Monday, November 1, 2010

Chicken Fricassee & the Ingratitude of Youth - Cooking Italy 12

Chicken Fricassee 2,edited

Sometimes I wonder how it all went so horribly wrong.  When I was growing up chicken was something that we had only on very special occasions - my birthday, my brother's birthday, Christmas and Easter.  I can't remember if we also had it on Mum's and Dad's birthdays - maybe not - as only parents can, it's entirely possible that Mum and Dad went without so Geoff and I could have a real treat on our birthdays.

You see back then chicken was something of a luxury - I guess that was before someone discovered that if they did horrible, unmentionable things to chickens (instead of letting them run around naturally, and grow at a normal pace), they could churn them out by the thousands, thus making them incredibly cheap and we could afford to dine on them every night of the week.  Somewhere along the way, we turned into such an "I want it, and I want it now" kind of society, driven by greed rather than need, that it became okay to eat chicken five nights a week regardless of the consequences.  Yes, the price on that Gladwrapped packet at the supermarket is cheap, but it doesn't reflect the many other environmental and social costs that you are paying in other ways and don't even notice.

Now I could turn this into a whole post about the virtues of organic, free-range chicken, but ... enough said for now, you can obviously tell where I'm coming from on this subject.  That was a little bit of a digression, so back to the point, which was about chicken being something special and reserved for celebratory meals.

Roast chicken was always my birthday treat - it was my stand-out, altogether, most favourite meal and I used to look forward to it all year (along with the cherry cake that Mum also always made for my birthday).  Then, one year I sat down to the dinner table on the evening of my birthday, quivering with anticipation, when ... horror of horrors ... I was presented with some kind of chicken casserole.  I thought my whole world had come to an end - instead of the burnished, golden, crispy-skinned bird I expected to see before me, I witnessed pale, shredded up bits of chicken, floating around with carrots and onions (blech - two least favourite things in the world at that age) in a pale, insipid, creamy white sauce (blech again!).  To this day, I have no idea what possessed my mother, since she knew I hated anything stew or casserole-like, especially anything with carrots and onions in it, and she also knew that plain roast chicken was my favourite meal.  What an earth she was thinking goodness knows, but she had obviously discovered a new recipe somewhere and thought she was making a special treat.  Of course, with all the cruelty and heartlessness that only a child can muster, I remember having a complete tantrum and telling my mother that she had completely ruined my birthday, and "it was the worst birthday of my whole life"!!  A cook myself, now, I can reflect on how horribly hurtful my lack of gratitude must have been after she had spent several hours slaving away in the kitchen.

No doubt, Mum forgave me (as mothers do), and to her credit she did deliver on the cherry cake, but the memory of that chicken casserole has lived on.  I had a vague recollection that she called it French Chicken Fricassee.  Even though the palate of that ungrateful little wretch has matured considerably over the years, I can tell you that I was still less than enthusiastic about our assignment for the Cooking Italy group this week, which just happened to be Chicken Fricassee.

As you know, we are cooking from Marcella Hazan's "Essentials of Classic Italian Cooking".  On looking up the recipe, which incidentally happens to be on page 332 if you have the book, I was relieved to discover no creamy, white sauce, no onions and no carrots - instead I find chicken pieces which are firstly lightly browned and then simmered with porcini mushrooms, tomatoes and white wine.  Perhaps I could like this version of Chicken Fricassee after all.

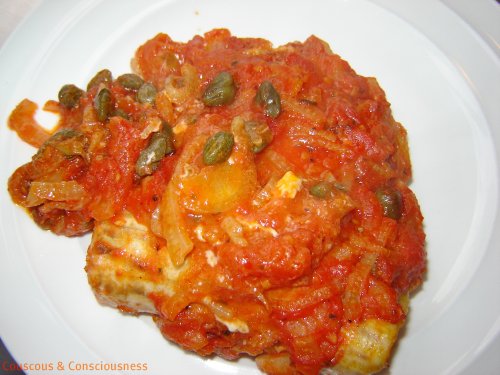
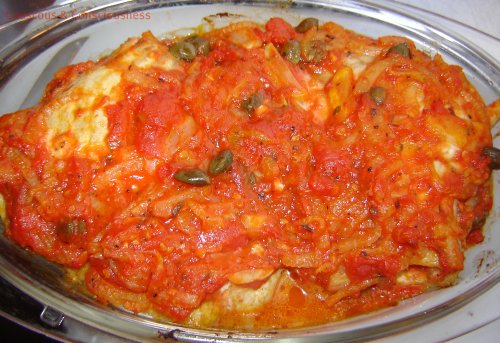
I made a few minor changes to the recipe - firstly, Marcella suggests cutting a chicken into four pieces and cooking the whole dish in a large skillet.  Well, I don't have a skillet big enough for that, so I cut my chicken into smaller pieces (8 pieces actually), and after browning the chicken pieces I actually cooked the whole dish in a large deep pan (more like a Dutch oven).  The other small change I made was that the recipe called for 1/4 cup of tinned tomatoes, chopped, and their juice - I'm sorry, but I'm not measuring out a 1/4 cup of chopped tomatoes for anyone - if I'm opening the tin, the whole lot is going in.  So, I probably ended up with rather more liquid than the original recipe intended, but what's wrong with a bit of extra sauce?!

My final verdict on this one - personally, I found it a little bit bland.  Whilst the porcini mushrooms had nice flavour, I did find them a little bit chewy - maybe that would be different if you had access to fresh porcini as opposed to dried ones.  My partner, on the other hand, loved this dish, and I can imagine it would be a great dish to serve on an occasion when you might not be entirely sure of your guests' tastes, or to feed those who don't have particularly adventurous palates.  In short there is nothing in this dish that is going to offend anyone.  To suit my own tastes, I think that next time I would put a bit of garlic and some fresh herbs in here to boost the flavour a bit;  a bit of pancetta might not go astray;  and I think that I would use a smaller quantity of porcini (enough to give a hint of flavour), but pad it out with some fresh mushrooms which I think will give better texture.

Chicken Fricassee with Porcini Mushrooms, White Wine & Tomatoes
Adapted from Marcella Hazan's
Serves 4
Click here for a printable copy of this recipe

1.5kg (3 lb) free-range chicken, cut into 8 pieces
(alternatively 8 bone-in chicken thighs would be great)
2 tablespoons olive oil
flaky sea salt
freshly ground black pepper
1/2 cup dry white wine
30g (1 oz) dried porcini
2 cups barely warm water
400g (15 oz) tin Italian plum tomatoes, chopped, with their juice
1 tablespoon butter

Firstly soak the dried porcini in the warm water to rehydrate for at least 30 minutes.

Chicken Fricassee 5

Remove the porcini from the water, squeezing out as much water as you can, and set the porcini aside.  Strain the soaking liquid through a sieve, lined with a paper towel, into a clean bowl and reserve.

Put oil in a skillet over medium high heat, and once the oil is hot add chicken pieces to the pan, skin side down.  Brown well, then turn over and brown the other side.  Season with salt and pepper and set aside.  You will probably need to do this in batches.

Chicken Fricassee 4, edited

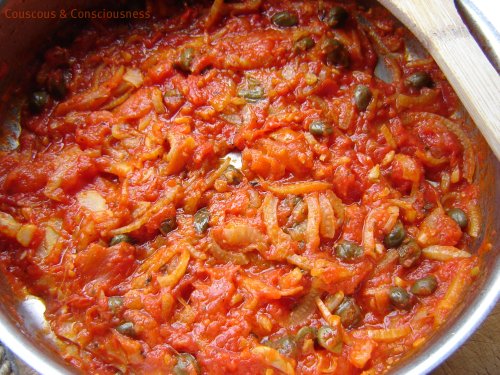
Once all the chicken pieces have been browned, add the wine to the pan to deglaze.  Allow it to bubble briskly for about 30 seconds, all the while using a wooden spatula to loosen all the brown bits from the bottom of the pan.

Now add the porcini mushrooms, the reserved soaking liquid, the chopped tomatoes and their juice.  Bring to a boil, return the chicken pieces to the pan, reduce the heat to a gentle simmer.  Partially cover the pot, leaving the lid slightly ajar, and continue to simmer for 40-50 minutes until the chicken is very tender.  Turn the pieces of chicken occasionally during that time.

Once cooked, remove the chicken pieces from the pan and transfer to a serving platter.  Tilt the pan and skim off as much of the fat as you can.  If the pan juices are very thin, turn the heat up to high and boil to reduce.  Then swirl the butter into the pan juices, keep stirring until emulsified, and then pour the entire contents of the pan over the chicken.  Serve immediately.

Chicken Fricassee 1, edited

I served this with rice and a salad, but it would be equally good with polenta or pasta.

Do visit my Cooking Italy page to learn more about the group (maybe you'd even like to join in - you don't have to have a blog to join the group and cook along with everyone else), find links to other members of the group, and links to all the Cooking Italy recipes I've cooked so far.

Essentials of Classic Italian Cooking 


I'm also submitting this post to Cookbook Sundays, hosted by the lovely Brenda at Brenda's Canadian Kitchen.  She's worth a visit any day of the week, but why not head over there right now and see who else has dusted off their cookbooks - you'll almost certainly find some great recipes, and maybe you'll discover a new book you'd like to add to your collection.

cookbook sundays

Sunday, October 17, 2010

A Farm Wife's Fresh Pear Tart - Cooking Italy 11

Pear Tart 1, cropped

After a bit of a hiatus, our leader (Angela at Spinach Tiger) has given us a new schedule of assignments and we're back into rattling the pans at the Cooking Italy group.  Our first assignment this week turned out to be A Farm Wife's Fresh Pear Tart from, of course, Marcella Hazan's "Essentials of Classic Italian Cooking" book.

"Uh-oh", I thought (you know how I feel about baking), but buoyed up by a couple of recent successes in the baking department, I was ready to give this a go.  As long as I stuck carefully to the recipe I felt reasonably confident of being able to pull it off.

Then, came the curve-ball.  Angela emailed us all to tell us she had made the cake and found it a bit on the "rubbery" side.  She pointed out that there was no shortening in the recipe and thought that a little bit of melted butter might make a difference.  Oh boy - we were on dangerous ground now - tinkering with the recipe (especially when I don't know what I'm doing) would surely lead me to disaster.  I was nervous about this.

Then a reprieve came.  Another member of our group, Lynne at FrancoFoodie, emailed to say she too had made the cake and had been happy with the texture.  So now I decided to stick to the original recipe for my first attempt - plenty of time to play around with it and experiment another time if this wasn't exactly to my liking.

Marcella recommends using winter Bosc or Anjou pears for this, and even though we are in spring here now there are still a few late season Beurre de Bosc pears hanging around.  I found these pears yesterday at my local organic produce market.

Pear Tart 5, cropped

This recipe is about as simple to make as a cake recipe could possibly be, and the end result ... I really like this - it is even better I think today than it was yesterday.  It is not a flashy, show-off kind of cake that commands your attention before you've even tasted it - it's infinitely more humble.  It's a simple cake, which I can well imagine a "farm wife" making from the limited ingredients she might have had on hand - I can visualise her collecting a couple of eggs from the hen house and picking a few pears from the tree - sugar and butter almost certainly in short supply.  It's not too sweet, and without any butter is not rich.  I found the texture to be quite firm and dense (though not heavy), and although I can see how someone might describe this as "rubbery" it is not the word that I would use.  I keep thinking that I have had something like this before - there is something about it makes me feel very nostalgic - maybe it is just the fact that this really speaks to me of simpler times.  This is not a cake that is going to set your tastebuds alight, but it's honest and simple and I for one wouldn't change a thing.

Pear Tart 2, cropped

Note:  The original recipes suggests 12 cloves as an optional ingredient.  I didn't use cloves at all, as I'm not hugely fond of them.  Both Angela and Lynne used just half a dozen and found that to be plenty.

A Farm Wife's Fresh Pear Tart Recipe
Adapted from Marcella Hazan's
Click here for a printable copy of this recipe

2 eggs
1/4 cup milk
1 cup sugar
salt
1-1/2 cups all purpose flour
900g (2lb) fresh pears
butter
1/2 cup dry breadcrumbs
6-12 cloves (optional)

First preheat the oven to 190 degrees C (375 degrees F).

Next prepare a 23cm (9 inch) round cake tin.  Grease the pan generously with butter, then sprinkle breadcrumbs into the tin, shake them all around to coat all of the base and sides, then turn over and give it a bit of a tap on the bottom to shake out any surplus.

Prepare the pears - peel them, cut them in half lengthwise, scoop out the core, and then cut into thickish slices.  Put them into a mixing bowl and set aside.

I mixed the batter together in the food processor, but you could really pretty easily do this by hand or using a hand-mixer.

Beat together the eggs and milk.  Add the sugar and a pinch of salt and continue beating.  Sift in the flour, and pulse a few times just until a thick batter is formed.

Pour the batter over the pears, and mix until all the pears are well coated, then tip everything into the prepared cake pan.  Using the back of a spoon or spatula, level off the top, and then dot little bits of butter all over the surface.  If using, now stud the surface with the cloves.

Bake for 50 minutes, or until cooked through and golden on top.

Remove from the oven, allow to cool to lukewarm, and then, using a couple of spatulas, loosen it from the bottom of the tin and transfer to a plate.

Pear Tart 4, cropped

Do visit my Cooking Italy page to learn more about the group (maybe you'd even like to join in - you don't have to have a blog to join the group and cook along with everyone else), find links to other members of the group, and links to all the Cooking Italy recipes I've cooked so far.

Essentials of Classic Italian Cooking

I'm also submitting this post to Cookbook Sundays.  Why not go visit and see who else has dusted off their cookbooks - you'll almost certainly find some great recipes, and maybe you'll discover a new book you'd like to add to your collection.

cookbook sundays

Monday, September 20, 2010

Pasta with Sausage & Peppers in Cream Sauce Recipe - Cooking Italy # 11

Pasta with Sausage & Peppers 1, edited

You already know that I love pasta, and big bowls of rustic, flavourful, family-style meals, but I don't think I've mentioned here before that I have a big weakness for sausages.  Whilst, as I've told you in previous posts, I like to keep my intake of meat fairly minimal, I can't imagine ever leaving sausages out of my diet.

One of our assignments back in February (okay, so I'm slow) for the Cooking Italy group was Marcella Hazan's Pasta with Sausages and Cream Sauce from Essentials of Classic Italian Cooking.  I really liked the idea of this dish, but I also knew (despite the fact that others in the group had tried it and loved it) that I was going to have to make some changes to Marcella's original version in order to satisfy our palettes.

The original recipe called for "sweet sausage, containing no fennel seed, chilli pepper, or other strong seasonings".  Well, that definitely was not going to cut it for me - so rule one broken, and I used these Sicilian-style sausages from Peter Timbs Butchery - they were slightly spicy (not excessively so), contained fennel seeds, and were in my opinion just what I was looking for in this dish.

Pasta with Sausage & Peppers 5, edited

The second change I made was leaving out the onion that the recipe called for, since we pretty much don't do onion around here.  Instead I chose to add some red and yellow peppers.  I loved the texture and colour that these brought to the dish, and I thought that the sweetness of the peppers was a nice foil to the spiciness of the sausages.

Pasta with Sausage & Peppers 6, edited

Then, instead of using regular pouring cream, I used some creme fraiche.  I love the "lemony" tang that this adds, and also creme fraiche is such a forgiving ingredient to use - it doesn't take any thickening and never splits or curdles.  Because, I'd used the creme fraiche I left out the parmesan cheese that was called for - I just didn't feel it needed it.

I will definitely make this again, since it went down pretty well here.  It makes a great family style meal, and was perfect for a coolish evening.  Was I happy with the changes I made?  Yes, absolutely.  Would I make any other changes?  If I'd had some on hand I would definitely have added some chopped, flat-leaf parsley at the end, and I think next time I would add a sprinkling of chilli flakes as well to give it a bit more "pep".

If you would like the original recipe, you can find it here on Angela's blog (Spinach Tiger), or read on for my version.

Pasta with Sausage & Peppers in Cream Sauce Recipe
Inspired by Marcella Hazan's
Click here for printable copy of this recipe
Serves 4

500-600g sausages of your choice
1 red pepper
1 yellow pepper
olive oil
250g creme fraiche
400g pasta shapes
(I used farfalle & gnocchi-shaped pasta)
flaky sea salt
freshly ground black pepper

Set a large pan of water over high heat and bring to the boil.  Once it has come to a boil, salt liberally, add the pasta to the pan, and cook until al dente.

Meanwhile, remove the casings from the sausages - just run a sharp knife down the full length of the sausage, peel off the casing and discard - it will come off very easily.

Core and de-seed the peppers, and cut into pieces - roughly about 2cm squares.

Heat a tablespoon or two of olive oil in a large skillet, set over high heat.  Add the sausages to the hot oil and using a wooden spatula break the sausages up into smallish pieces (about the same kind of size as the pieces of pepper).

Pasta with Sausage & Peppers 4, edited

Once the sausages have started to brown and are almost cooked through, push them to one side and add the peppers to the pan.  Sprinkle a little flaky sea salt and freshly ground pepper over the peppers and continue cooking until the peppers have softened and started to caramelise, and the sausages are completely cooked through.

Pasta with Sausage & Peppers 3, edited

Add creme fraiche to the pan, and stir until the creme fraiche has completely dissolved and warmed through, scraping up all the brown bits from the bottom of the pan.  Taste for seasoning and adjust as necessary.

Pasta with Sausage & Peppers 2, edited

Set aside about a cup of the pasta water, then drain pasta and add to the sauce.  Toss pasta through the sauce until completely coated, adding a little of the reserved pasta water if necessary.

Serve, family style in a large bowl or platter, sprinkling some freshly chopped flat-leaf parsley over the top if desired.

Essentials of Classic Italian Cooking [Hardcover]


Do visit my Cooking Italy page to learn more about the group (maybe you'd even like to join in - you don't have to have a blog to join the group and cook along with everyone else), find links to other members of the group, and links to all the Cooking Italy recipes I've cooked so far.

I'm submitting this post to Hearth and Soul blog hop - do visit and have a look at some great food submitted by wonderful people who really do cook from the heart.

Wednesday, August 25, 2010

Shredded Carrot Salad Recipe - Cooking Italy 10


Carrot Salad with Rocket, edited 2

Let me begin by telling you that carrots are probably my least favourite vegetable - okay, actually mashed swede is my least favourite, but carrots are a close second.  As a child I positively loathed & detested them, and many a "you're not leaving this table until you've eaten your carrots" battle was mounted as I tried to assert my early culinary independence - I think the triumphs were fairly evenly divided between parents and child, depending on whatever hidden agenda either party might have had at the time.  If I gave in fairly quickly and ate the carrots (trying not to gag on every mouthful), then you could be pretty certain that I was doing a "suck-up" for something else that seemed infinitely more important to me at the time - parents of course never see through that kind of stuff, yeah right!!

Anyway, as I've suggested, I'm not fond of carrots in most forms.  A raw carrot is ok, quite palatable, but generally not something I'd seek out or really bother with.  Roasted carrots, on the other hand, I positively love (go figure), and a roast to me is not complete without them.  Boiled or steamed carrots - absolutely loathsome - just never grew out of it!  Soups and stews - I use carrots in these all the time for the flavour they impart, and can't imagine making something like that without them, but when it comes to eating the finished dish, as much as possible I eat around the bits of carrots - I don't pick every last little bit out (I'm not quite that bad), but I just avoid them as much as possible.

So when one of our assignments this month for the Cooking Italy group was the Shredded Carrot Salad from Marcella Hazan's "Essentials of Classic Italian Cooking" I confess to being somewhat ambivalent about it.  I politely excused myself on the basis that it's not "salad season" here right now.  Actually, this group is pretty cool, and you don't really need an excuse if you don't like something;  everyone understands if you just come right out and say it.  But it's not so much that I don't like a carrot salad - I just can't get excited about it.

Needless to say then, I was somewhat surprised when I was fishing around in the veggie crisper of my fridge today, looking for lunch and a carrot leapt into my hand literally screaming "pick me, pick me"!  "I don't want you" my mind told the carrot.  "Oh, yes you do" replied the carrot, "and, some of that rocket, too".  Ah, so that's what the carrot really wanted - it just wanted to get friendly with my rocket (that's arugula to some of you folks on the other side of the world - in case you were wondering).  Well, let me tell you, the rocket that I got at the farmers' market on the weekend is so good (actually, quite possibly the best I have ever had) that if I were a vegetable I would want to get very friendly with it too.  But, carrot and rocket?  Not a pairing that immediately jumps to mind, but who am I to keep them apart if they're intent on each other.

Well, let's just see what's in this Carrot Salad recipe of Marcella's (if you have the book it's on page 549).  The recipe calls for nothing more than shredded carrot, salt, extra virgin olive oil, and lemon juice - hunnph, well that's nothing to get excited about!  Ok, I see she has a variation which includes rocket, but in which she replaces the lemon juice with red wine vinegar.

I decided I wanted the rocket, but (being the contrary soul that I am) I also wanted to stick with the lemon juice rather than the red wine vinegar.  Whilst I can't vouch for what the red wine vinegar would have tasted like, I can tell you that the lemon juice was a pretty darn good choice.  This must surely be the simplest salad on the planet to make - this is what I did.

Tear up some rocket leaves, and put them in your serving bowl.
Grate your carrot (I used one carrot for lunch for one person), using the largest holes on your grater.  Add the shredded carrot to the rocket leaves in your bowl.
Add the zest and juice of half a lemon (the zest is not called for in the original recipe, but why deprive yourself of it, and I think it really enhances the lemony taste without the sharpness that can come from too much juice).
Sprinkle over some flaky sea salt.
Drizzle over a little extra virgin olive oil.
Toss everything together well, taste and adjust seasoning with more salt or lemon juice if necessary.

Much to my surprise, this was astonishingly good.  Not just ok - but actually very good.  I loved the pepperiness of the rocket with the sweetness of the carrots and the tang of the lemon.  Marcella says to serve this straight away, but I actually let mine stand for about 45 minutes, and I think that was a good thing - the result was that some of the juice ran out of the carrots, and mixed in the bottom of the bowl with the olive oil and lemon juice, leaving me with a little puddle of delectableness that was so delicious I picked up the bowl and drank it, and then actually licked the bowl clean (one of the joys of eating lunch alone)!  This salad was so good, in fact, that it is distinctly possible that I will have this for lunch again tomorrow - now that's really surprising!

This salad is beautifully light and refreshing - would be a great inclusion for a summer barbeque;  or, as I discovered, makes a pleasing and healthy lunch on an "almost spring" day - rocket is a rich source of calcium, manganese, copper, iron, potassium, folic acid, and vitamins A, C and K, while the beta-carotene in carrots is an anti-oxident that combats the free radicals which contribute to heart disease, cancer and deterioration of eyesight.  I swear I could literally feel this salad doing me good while I ate it!

I'm a great believer that, if we really tune in, eating is a very instinctual thing - when you listen your body tells you what it needs.  So the next time you suddenly develop an eye for something you would ordinarily leave behind, there's a good chance that you are being offered something that your body is needing.  Take heed, and you may be pleasantly surprised.

Do visit my Cooking Italy page to learn more about the group (maybe you'd even like to join in - you don't have to have a blog to join the group and cook along with everyone else), find links to other members of the group, and links to all the Cooking Italy recipes I've cooked so far.

I'm also submitting this post to the Two for Tuesdays blog hop.

Essentials of Classic Italian Cooking 

Thursday, April 22, 2010

Baked Brill with Tomato & Fennel Sauce - Cooking Italy 7


This fish dish was an assignment for the Cooking Italy group - a group of food enthusiasts learning to cook regional Italian food through the recipes of Marcella Hazan's Essentials of Classic Italian Cooking. (You can visit Angela at Spinach Tiger or view my Cooking Italy page to learn more about the group and see what some of the others have been cooking.)  This dish was actually one of our recipes for March and, even though I did manage to make the dish back in March, it has been sitting in "draft" for several weeks now.

I don't know why it has taken me so long to get around to writing up this post.  Perhaps I didn't want it to get lonely - after all, it is in good company there in my draft box, along with a whole lot of other posts in various stages of completion that have yet to make it to actual publication.  But seriously, even now I am feeling some kind of reticence about this post, trying to find the right words.  Certainly I felt a distinct lack of enthusiasm about making the dish - in fact just days before I had said to someone, "I want an interesting fish dish - I'm so over "fish in tomato-based sauces" recipes".  So, I wasn't exactly fired up about making this;  but, hey, it was on the list and, unlike some other recipes on the list, there wasn't anything unseasonal for me required (most other members of the group are in the northern hemisphere, so I'm sometimes out of step with everyone else) and I had everything on hand that I needed except the actual piece of fish.

Well, I was more than pleasantly surprised by this dish.  As I have now come to expect from Marcella's dishes, this totally delivered on flavour, colour, and texture, as well as ease of preparation and cooking - every ingredient is balanced perfectly, achieving a dish which is both elegant and comforting at the same time - another two characteristics that I am discovering arise again and again in Marcella's recipes.  (By the way, if you would like to read a bit more about Marcella Hazan, and her husband Victor check out this post by Jaden over at Steamy Kitchen - Jaden writes one of the blogs I follow regularly, and she had the extraordinary privilege a few days ago of cooking with Marcella in her home - I am so envious!)

Back to the fish - I did make a couple of small changes to the recipe.  Firstly, the day I choose to make this I couldn't get any fresh sole, but instead found a beautiful piece of brill that was just the right size for two people.  As Marcella suggests, any flat fish will do for this.


I had never eaten brill before, but I loved its firm, yet succulent texture and flavour which easily stood up to the sauce.  I cut this fillet in half down the middle, lengthwise, and each portion was the perfect size for one person.

The other big change I made, and I frankly think this was an improvement, was replacing the onion in the sauce with fennel.  As we "don't do onions" in our house - actually I can take them or leave them, but my "significant other" absolutely won't have a bar of them - I used a thinly sliced fennel bulb instead.


Now I may be "bastardising" some very classical and traditional Italian recipe here, but to my palate the fennel was infinitely better in both taste and texture than the onion would have been.

Marcella also suggests optionally including a hot, red chilli, which I didn't, but I can imagine that if you wanted something to fire-up your taste buds a little more that would be a good addition.

Baked Brill with Tomato & Fennel Sauce
Adapted from Marcella Hazan's
Serves 3-4
Click here for a printable copy of this recipe

1 large bulb of fennel, thinly sliced
3 tablespoons extra virgin olive oil
1 clove garlic, finely chopped
400g tinned tomatoes in their juice, crushed
flaky sea salt
2 tablespoons capers (I prefer salted)
1 teaspoon dried oregano
freshly ground black pepper, or
1 hot, red chilli, chopped
brill or other flatfish fillets

Preheat your oven to 225 degrees C (450 degrees F).

Heat the olive oil in a skillet over medium heat, then add the sliced fennel and cook until it softens and begins to colour slightly.  Add the garlic, and once the garlic is ever so slightly browned, add the crushed tomatoes and a couple of generous pinches of salt.  Give everything a good stir to combine well, and then simmer for about 15-20 minutes.  By this stage the sauce will have thickened (you may need to add a little bit of water during this time).  Add the capers, herbs, pepper or chilli; stir to combine and simmer for just another minute or so longer.  Remove from the heat.


Wash and dry the fish fillets.  The fillets will be folded in half, and then put into an ovenproof dish, slightly overlapping, so choose a baking dish which is just large enough to accommodate all your fillets in a single layer.

Spread a thin layer of the sauce over the base of your baking dish.  Dip the fillets in the sauce, coating them well on both sides.  Fold the fillets in half, arrange in the dish, and pour the remaining sauce over the top of the fillets - you want to end up with fish fillets which are more or less "smothered" inside and out with the sauce.

Bake in the preheated oven for 5 to 10 minutes depending on the thickness of your fish - mine took closer to 10 minutes, but you want to be careful not to overcook the fillets, so maybe check them after 5 minutes.


I served this just with some crusty sourdough bread (perfect for dunking into that luscious sauce) and a simple rocket and parmesan salad.  Oh, and did I mention a lovely, crisp New Zealand sauvignon blanc is just the thing to wash it down with!!

So, even though I said I was soooooo over tomato-based fish dishes, this one has hit my list of ones that is destined to be repeated in my house many times over.

Essentials of Classic Italian Cooking