Showing posts with label capers. Show all posts

Sunday, February 1, 2015

Sicilian Artichoke & Broad Bean Salad with Saffron Dressing - Salad Days # 1

Sicilian Artichoke & Broad Bean Salad 3

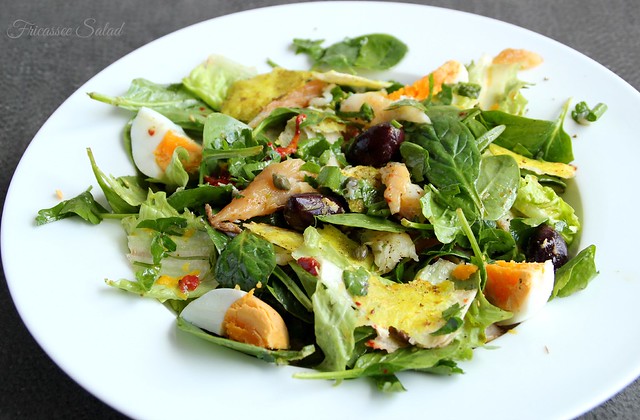
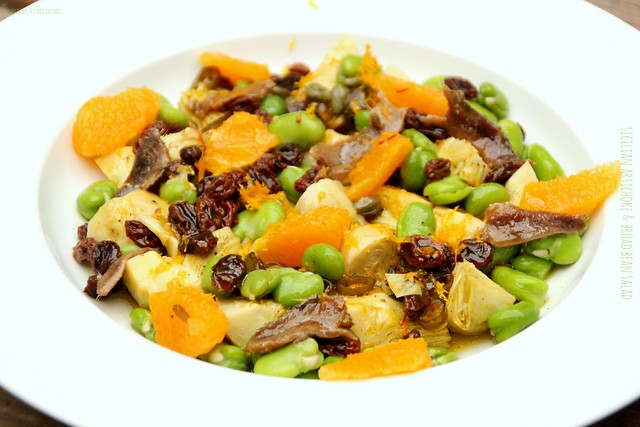
This week at I Heart Cooking Clubs our theme is Veggie Variations - our mission to choose any one of Diana Henry's meat-free, veggie filled dishes, of which I can tell you she has many.  I've had her Sicilian Artichoke & Broad Bean Salad with Saffron Dressing recipe, from A Change of Appetite, bookmarked for ages and, since artichokes and broad beans are two of my favourite vegetables, this seemed like the perfect time to make it.

Sicilian Artichoke & Broad Bean Salad 2

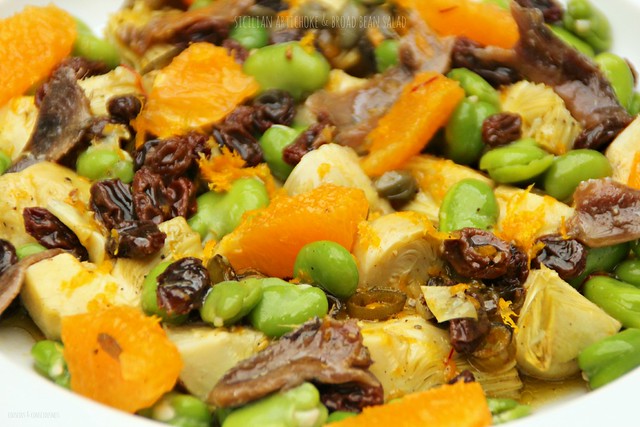
The fact that this "veggieccentric" meal (though I did sneak in some anchovies) is also a salad, that salad of any description just happens to be my favourite meal of any kind, that it offered a riot of colour on a grey and gloomy day, and that it delivered a sublime combination of flavours and textures (which is always the benchmark of a great dish for me), meant that this dish ticked every conceivable box for me.

In fact, I love salad so much that I've decided that I am going to make a different salad (and I'll try to post as many of them as I can) every day for the whole month of February - that's 28 days of salad.  I'm pretty excited about that, and because there can never be too many salads, I'm also giving you the opportunity to share some salads of your own.  I'll be posting more details tomorrow and I'll also be putting up a linky which will stay open for the whole month, so if you have a salad that you'd like to share (on any day or every day) feel free to join in.

Now back to the salad at hand.  This was everything I dreamed it was going to be.  The saffron plays a lovely earthy background note to the sweetness of the honey and orange in the dressing, and its flavour infuses the artichokes beautifully.  The textures of the artichoke and broad beans, provide a great base to the little flavour explosions that come from the oranges and raisins, chilli, capers and anchovies.  No two mouthfuls are the same.  The orange was my own addition to things here, as were the capers and anchovies, but they are the very first things that come to mind when I think of Sicily so in they went.  I left out mint and pine nuts because I didn't have them on hand, and honestly I didn't miss them, but all manner of herbs and nuts would be great add-ins.

I ate the whole thing on my own as a substantial meal, though you could probably stretch it to feed a couple of people for a lighter meal such as lunch.  Of course, this would also be great as an accompaniment to a larger meal, especially something that would sit comfortably with big bold flavours;  personally, I found it didn't need anything more than a good pinot noir.

Sicilian Artichoke & Broad Bean Salad 1

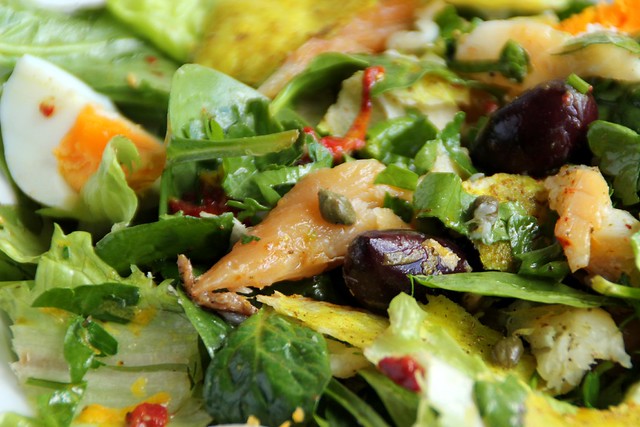
Sicilian Artichoke & Broad Bean Salad with Saffron Dressing Recipe
Adapted from recipe by Diana Henry
from A Change of Appetite
Serves 1 as a substantial main meal or
Serves 2 as a light lunch or
Serves 4 as an accompaniment to a larger meal
Click here for a printable copy of this recipe

juice of 1/2 a lemon
1 tablespoon red wine vinegar
generous pinch of saffron stamens
1 teaspoon runny honey
flaky sea salt & freshly ground black pepper
3 to 5 tablespoons extra virgin olive oil
zest and juice of half an orange

generous handful of raisins
1 cup frozen broad beans
6x large artichoke hearts, bottled or canned
olive oil
1x garlic clove, roughly chopped
1x green chilli, finely sliced, deseeded if you prefer
generous handful of capers
6x anchovies, roughly chopped
zest and segments of fruit from the other half of the orange

Put lemon juice, red wine vinegar and saffron threads into a very small saucepan, and heat gently until the saffron begins to release its colour and fragrance.  Remove from the heat and cool slightly.  Pour into a small jug and whisk in the honey, salt, pepper, orange juice and zest, then whisking constantly slowly drizzle in the extra virgin oil until you reach a nicely emulsified dressing consistency.  Taste and adjust to your liking.  This should have a good balance of sweet and savoury.

Cut artichoke hearts into quarters, place them in a bowl and pour over the dressing.  Set aside for at least an hour if you can manage it for the flavours to infuse.

Put raisins in a small bowl, and cover with boiling water.  Set aside for about 30 minutes until the raisins have plumped up.

Put frozen broad beans into another small bowl, and cover them too with boiling water.  Leave to stand for 5 minutes, drain, then remove and discard the tough greyish skins.

Heat a slosh of olive oil in a small saute pan over medium heat.  Add the garlic, chilli, and capers to the pan, and saute until fragrant and the capers are slightly crispy.

Arrange artichoke hearts on a serving platter.  Scatter around the broad beans, raisins, orange segments and anchovies.  Sprinkle over the sauteed garlic, chilli and capers.  Drizzle liberally with the dressing from the artichokes, and finish with a final sprinkling of grated orange zest.

If you would like to get to know Diana Henry a little better, and to see what everyone else has cooked up this week, then do go and visit my friends at I Heart Cooking Clubs and check out the links (who knows, you might even want to join the journey and cook along with us) ...

Diana Henry badge 1A

... or check out A Change of Appetite and Diana's many other great titles available from Amazon USA, Amazon UK, or Fishpond NZ.

I'm also sharing this at Souper (Soup, Salad & Sammie) Sundays, hosted by my very lovely friend Deb at Kahakai Kitchen, and at Weekend Cooking, hosted by the lovely Beth at Beth Fish Reads.


Sunday, November 2, 2014

Asparagus Mimosa

Asparagus Mimosa 2

I have no notion which came first ... the chicken or the egg?  That's our theme this week at I Heart Cooking Clubs, which gives us the opportunity to explore Diana Henry dishes featuring, naturally enough, chicken or eggs.  And, whilst I'm pretty certain no one is going to come up with a definitive answer to that age old question, some of the dishes my friends have come up with would definitely answer just about any other woes.

I was certainly looking for a dish to satisfy a few woes myself this week.  We've had two weeks of builders, gib stoppers, electricians, etc doing flood damage repairs on our house, including ripping out and replacing the kitchen and dining room ceiling.  This would be disruptive enough in itself, but the fact that the workmanship and trade practices of some of these workmen left a bit to be desired, has been frustrating at best, and at times downright infuriating.

So I was looking for something verging on comfort food, which meant I was heading down the egg route, rather than the chicken route.  When all is said and done, is there anything more comforting than a simple, soft boiled egg?!

After picking up a fresh bunch of asparagus (hands down my favourite vegetable) at the market yesterday, I thought this asparagus mimosa would make a delightful, light and simple lunch, before tackling the big post-repair clean-up - a project which has kept me busy for most of the weekend.

Now, let's be truthful here - asparagus mimosa is nothing new - it's one of those classic dishes that has been around forever.  But, to be honest, I have often wondered what all the fuss is about ... after all, just how good could a few asparagus spears with a crumbled boiled egg over the top really be.

Well, I don't know about the original, but Diana Henry's version provided proof positive, if ever it were needed (and really I've said it here so often I should not have been surprised), that combining a few good quality ingredients, and "messing with them" as little as possible, will deliver sensational results.  Every! Single! Time!

Here simple steamed asparagus stems, drizzled with a lemony-herby-caper dressing, and topped with a soft-boiled free range egg, delivers on every front.  It provides all the comfort of dunking asparagus spears straight into a soft boiled egg in a cup, with the added flavour punch of the dressing, and turns it into a dish which is easily elegant enough to serve to company.

This would make a great appetiser as part of a large meal, but is also the perfect dish for a light spring lunch.  You don't need to be too particular about quantities - I've just given you a rough guide for one person, and you can easily multiply it up to feed as many as you like.

Important note:  A dish such as this is all about the ingredients, so use the best you can get your hands on.  Use only in-season asparagus IN YOUR PART OF THE WORLD.  Right now, I'm sure those of you in the northern hemisphere can probably buy asparagus shipped from New Zealand, or Australia, or South Africa - please don't!  Bookmark this recipe instead and wait until spring returns.  If you have a local farmer's market where you can buy asparagus picked fresh that morning, even better.  A juicy, organic lemon picked straight from the tree, and flat-leaf parsley picked straight from the garden, are perfect if you have them, but I know that's not always possible.  Good quality capers are a must - I like the ones packed in salt, but brined are fine too.  Extra virgin olive oil, should be the best that you can afford, and it goes without saying that only a free-range organic egg will do.  Also, although I never bother peeling my asparagus, I think it is worth doing here.  In a dish so simple, in which you really want the ingredients to shine in every possible way, it just seems right - it looks beautiful, and really helps the asparagus to soak up that dressing.

Asparagus Mimosa 1

Asparagus Mimosa Recipe
Adapted slightly from recipe by Diana Henry
from A Change of Appetite

For each person allow:
1x bunch (5-6 spears) asparagus
1x free range egg
zest and juice of 1/2 lemon
2 tablespoons extra virgin olive oil
1/4 teaspoon wholegrain mustard
flaky sea salt & freshly ground black pepper
small bunch flat leaf parsley, finely chopped
1 tablespoon capers, rinsed and drained, roughly chopped

Place egg in a small pot, cover with cold water, and bring to the boil.  Boil for four minutes.  Remove egg with a slotted spoon and place in a bowl of cold water, until egg has cooled enough to handle, but is still warm.

In a small bowl, whisk together lemon juice, olive oil, mustard, salt and pepper, until well combined.  Stir in the parsley, and capers.  Set aside.

Snap the woody ends off the asparagus spears, and peel the ends.  Boil the asparagus until just tender to the tip of a sharp knife - about four minutes, depending on the thickness of the spears.

Meanwhile, peel the egg, place on a plate or board and mash with a fork, until crumbled and yolk and white mixed together.

Drain asparagus as soon as it is ready and place on a serving plate.  Drizzle over a generous amount of the dressing, and spoon the crumbled egg over the middle of the asparagus.  Finish with another drizzle of olive oil if you like.

If you would like to get to know Diana Henry a little better, and to see what everyone else has cooked up this week, then do go and visit my friends at I Heart Cooking Clubs and check out the links (who knows, you might even want to join the journey and cook along with us) ...

Diana Henry badge 1A

... or check out A Change of Appetite and Diana's many other great titles available from Amazon USA, Amazon UK, or Fishpond NZ.


Sunday, October 26, 2014

Salmon Tartare with Rye Crackers and Fennel & Citrus Salad

Salmon Tartare & Fennel & Citrus Salad 1

I don't know how things are in your household, but in mine we live on a pretty tight budget.  When you have a passion for food and "luxury" ingredients, that can be a bit challenging at times.  It doesn't mean, I believe, that you need to go without, you just need to be a bit creative about the ways in which you use those things.  In many ways this goes right to the heart of my whole philosophy about food.

Case in point ... chicken.  We only eat free range, organic chicken in our house - not just for ethical reasons, but because it also tastes a whole lot better than your average battery farmed chicken.  A free range chook will however set you back about twice as much as a cage raised bird.  With a little planning, however, we can usually manage to get three to four meals out of a chicken, and a batch of soup out of the carcass, which works out pretty budget friendly in the end.

This salmon tartare is another great way of making a luxury ingredient go a long way.  A small salmon fillet, which would normally be a single serving as a main meal, becomes a sumptuous lunch for two, or even an appetiser for four.

It's Pot Luck week at I Heart Cooking Clubs, and we have the choice too cook with any one of our eleven IHCC chefs.  However, I'm still in the honeymoon phase of my relationship with our latest chef, Diana Henry, so I turned to Diana's book A Change of Appetite, where her Scandinavian inspired dish of Salmon Tartare with Pickled Cucumbers and Rye Crackers really caught my attention.

Salmon tartare is one of my favourite dishes, and I didn't make a great deal of changes to the recipe other than adding a slosh of vodka to the marinating salmon, because ... well ... just because, and leaving out the shallots as I didn't want anything to overwhelm the delicate flavour of the salmon.  A few snipped chives, had I had them, might have been nice.  In addition to the rye crackers, Diana serves this salmon tartare with a sweet and sour, pickled cucumber salad and dilled yoghurt.  I chose to make a refreshing fennel and citrus salad instead.

As far as the rye crackers go, I didn't make any changes to the recipe whatsoever, so I'm not going to reproduce the recipe in detail here for you - you'll just have to go get the book, and trust me when I tell you it is totally worth it.

These crackers are so easy to make, and so delicious, you will wonder why you've ever bought crackers in your life.  Not only that, whipping up a batch of these will run out to a fraction of the cost of buying crackers.

Rye flour, along with a little salt, sugar and baking powder are mixed with a little chilled butter until the mixture resembles damp sand, then mixed with milk to form a soft dough - using the food processor makes fast and easy work of this.

Break off golf ball sized chunks, roll in a light dusting of extra rye flour, and then roll out as thin as you possibly can into something vaguely resembling a circle.

Rye Crackers 1

Place crackers on a large baking sheet lined with baking parchment, prick all over with a fork, and bake in a hot oven for up to 10 minutes, until crisp and golden.  Cool on a wire rack.

Rye Crackers 2

These crackers are a wonderful accompaniment to the salmon, in both flavour and texture, and I think next time a little sprinkling of fennel seeds and sea salt over the crackers before baking might be a nice touch to echo the flavours in the salad.  These crackers also make a great vehicle for a variety of cheeses and chutneys.  A batch of these in your store cupboard won't last long I can promise you.

What tips do you have for stretching the budget to accommodate luxury ingredients?

Salmon Tartare & Fennel & Citrus Salad 2

Salmon Tartare Recipe
Adapted from recipe by Diana Henry
from A Change of Appetite
Click here for the free recipe card

250g (8 oz) salmon, skin and bones removed
1 tablespoon capers, drained and rinsed
juice of 1x lemon
2 tablespoons extra virgin olive oil
1 tablespoon vodka
freshly ground black pepper
generous handful of flat leaf parsley, finely chopped

Cut salmon into tiny dice, about .5cm (1/4 inch) in size, and place in a small bowl with the remaining ingredients.  Mix together gently, and chill while you make the crackers and salad, or for up to two hours.  Before serving, taste and adjust any of the seasonings according to your palate.

Fennel & Citrus Salad Recipe

1x orange, peel and all white pith removed
1x grapefruit, peel and all white pith removed
(if you can get pink grapefruit so much the better)
1x lemon, peel and all white pith removed
1x lime, peel and all white pith removed
1x fennel bulb
generous handful of fennel fronds, finely chopped
extra virgin olive oil
flaky sea salt & freshly ground black pepper

Place a sieve over a medium sized bowl.  Hold the peeled orange over the sieve to catch any pips and, using a sharp knife, cut down between the membrane and segment of fruit on each side to separate the fruit entirely from the membrane, and let the fruit segments fall into the bowl.  Squeeze the membrane over the bowl, extracting as much juice from it as you can.  Repeat with the grapefruit, the lemon and the lime, in each case also squeezing all of the juice out of the membrane.

Remove the tough outer "leaves" from the fennel bulb.  Cut it into quarters lengthwise and slice the fennel as thinly as you possibly can - a mandoline is the ideal tool for this job if you have one.

Add the shaved fennel to the citrus segments, along with the fennel fronds.  Season generously with flaky sea salt, freshly ground pepper and a good drizzle of extra virgin olive oil.

Chill until you are ready to serve.

If you would like to get to know Diana Henry a little better, and to see what everyone else has cooked up this week, then do go and visit my friends at I Heart Cooking Clubs and check out the links (who knows, you might even want to join the journey and cook along with us) ...

Diana Henry badge 1A

... or check out A Change of Appetite and Diana's many other great titles available from Amazon USA, Amazon UK, or Fishpond NZ.


Thursday, October 2, 2014

Fricassee Salad

Fricassee Salad 1

Just when I was thinking he couldn't surprise me any longer, Yotam Ottolenghi comes along and damn nearly blew my mind.

I've been cooking and posting Ottolenghi dishes for the last four and a half years, when I first introduced him to you with this Baked Aubergine with Saffron Yoghurt Sauce and Pomegranate.  We often hear the term "genre-bending" applied to movies, novels, works of art, and pieces of music - I'm not sure if such a term can be applied to food and cooking, but if it can then I'm sure it certainly applies here.  That was a dish unlike anything I'd eaten or cooked before, and it was for me the beginning of a whole new food journey.

Over this time, I've been stunned by the wonderful flavour and texture combinations Ottolenghi pulls together.  He's introduced me to unique ingredients, which I had never previously heard of, and which have now become part of my every day pantry staples.

Yet, even though ingredients such as harissa paste, preserved lemons, pomegranate molasses, za'atar, dried Persian limes, rose petals, and orange flower water, have all now become almost "common place" in my kitchen, the flavour punch that these ingredients deliver is anything but.

So it should have come as no surprise that this dish, adapted from Ottolenghi's book Jerusalem, completely knocked my socks off, but I was still seriously "wowed" by it.

Fricassee Salad 2

In his preface to the recipe, Ottolenghi says that "This salad is a deconstruction of Tunisian fricassee - a fried bun stuffed with tuna, harissa, olives, anchovies, a spicy pumpkin relish, pickled lemon, cooked potato and hard boiled egg."  He remarks that the resemblance to the classic French Nicoise salad is no coincidence, "and is evidence of the interaction between French and Tunisian cuisines during the years of French occupation".

I made a few changes to the recipe, mostly for the sake of convenience.  Firstly, the original recipe called for fresh tuna to be gently poached in oil and then left to stand for 24 hours.  For ethical reasons, much as I love tuna, I choose not to eat it.  And, although, I thought this technique could just as readily be applied to a nice piece of salmon, I was after lunch in half an hour - not tomorrow.  Ottolenghi does suggest a good canned tuna as a substitute for the confiting process, but it turned out I had a nice piece of smoked mackerel on hand and decided that would make an acceptable alternative.  Ottolenghi's recipe also calls for boiling potatoes in water flavoured with plenty of turmeric, but again I was looking for something a little more instant.  Instead I brushed a flour tortilla (any flat bread would do) with a mixture of olive oil and turmeric, for that gorgeous golden colour, and sprinkled it with a little za'atar for good measure, then baked until crisp, and crumbled it into the salad.

I'm sure the original recipe is sensational, and I will definitely take the time to make it as written (subbing in some salmon for the tuna) very soon, but this shortcut version made a fast, flavourful lunch that ticked all the boxes for me.  The bold combination of harissa, anchovies, black olives, capers, and preserved lemons packed a flavour punch that delivered so much more than I expected.

If you own a copy of Jerusalem, you will know that every time you pick it up (constantly), there are a couple of recipes that you frequently tell yourself "I have to make that", and yet somehow it hasn't happened yet.  Our mandate this month at Tasting Jerusalem* group is to do just that.  I had a couple of recipes lined up and let me tell you this was not one of them.  This was one of the recipes that I've kind of just skimmed over so many times and, if it wasn't for the fact that I was looking for lunch and recognised that I had pretty much all the ingredients on hand, I probably would have done so again.  I'm ever so grateful that this recipe stopped me in my tracks - it's worth so much more than a fleeting glance, and has definitely been bookmarked by me now as one of the standout recipes in the book.  I hope you'll give this a try.

Fricassee Salad 3

Fricassee Salad
Makes one very generous meal, or two appetisers
Adapted from recipe by Yotam Ottolenghi & Sami Tamimi
from Jerusalem: A Cookbook

150-200g (5-7 oz) smoked fish, flaked into bite sized chunks
1x flour tortilla
extra virgin olive oil
1/2 teaspoon turmeric
za'atar
anchovies, as many as you like (I used four), roughly chopped
1 tablespoon harissa paste
capers, again as many as you like
1/4 of a preserved lemon, rind only (flesh discarded), thinly sliced
black olives, as many as you like
1x fresh lemon, zest and juice
1/2 roasted red pepper, cut into thin slices
1x boiled egg, shelled and quartered
2x generous handfuls salad greens (I used a mixture of baby spinach & cos)
1x generous handful flat-leaf parsley, roughly chopped
flaky sea salt & freshly ground black pepper

Preheat oven to 180 degrees C (350 degrees F).  Mix 1 tablespoon of extra virgin olive oil and the turmeric together to make a paste, and brush over the surface of the flour tortilla.  Sprinkle liberally with za-atar. (If you don't have za'atar, try a sprinkling of dried thyme and sesame seeds instead.)  Place on a tray and bake in the preheated oven until puffed and crispy - this will only take a few minutes.  Remove from oven and set aside to cool.  It will crisp up some more as it cools down.

Place anchovies, harissa paste, capers, black olives and preserved lemon rind in a small bowl.  Add plenty of freshly ground black pepper and a generous slosh of olive oil (I used the oil that the roasted peppers had been preserved in).  Toss together gently to combine.

Place salad greens, parsley, red peppers, and flakes of smoked fish in a large bowl.  Season with just a touch of flaky sea salt, and add the grated zest of the lemon, along with its juice.  Gently combine.

Now add the anchovy mixture to the salad bowl, and toss gently to combine everything well.  Place everything in a serving bowl.  Arrange boiled eggs over the top, and finish with another drizzle of extra virgin olive oil.  Serve immediately.

If you're interested in more great food from Ottolenghi check out Jerusalem and his other great titles available from Amazon USA, Amazon UK or Fishpond NZ.

* Have a look also at what my "Tasting Jerusalem" friends have been doing - you'll find plenty of great inspiration. (“Tasting Jerusalem is a virtual cooking community exploring the vibrant flavors and cuisine of the Middle East through the lens of “Jerusalem: A Cookbook” by Ottolenghi and Tamimi published by Ten Speed Press. You can follow along and cook with us by subscribing to omgyummy.com, following the hashtag #TastingJrslm on Twitter and Instagram, liking our Facebook page or joining our Google+ Community and finally checking out all of our groups’ dishes on Pinterest.”)

Sunday, February 9, 2014

Chargrilled Artichoke Hearts on Pea & Feta Crostini

Chargrilled Artichoke Hearts on Pea & Feta Crostini 1

This week at I Heart Cooking Clubs, we're "Getting Saucy" with Donna Hay, and whilst the Pea & Feta Puree I bring you today, atop crunchy sourdough crostini, is not exactly a sauce or dressing, I figure it's near enough.

I was inspired by this recipe from Donna's website, but made a few simple changes ... I adjusted quantities a little to suit my tastes and needs;  I decided to add some goat feta to the puree instead of finishing with shaved parmesan;  and I also added a few capers.

This made a delicious light meal, or would also be great for an appetiser.  The pea puree has a wonderful balance of flavours and texture - sweetness from the peas, brightness and freshness from the lemon, some salty tang from the feta, and a little brininess from the capers.  A little mint would be a nice addition too if you have some on hand.  You could use this in a multitude of ways:  serve as a dip with fresh vegetables or pita crisps;  instead of artichokes hearts, top the crostini with some smoky chorizo or sweet scallops for a fabulous appetiser;  or even as a side dish with some grilled salmon.

Chargrilled Artichoke Hearts on Pea & Feta Crostini 2

Chargrilled Artichoke Hearts on Pea & Feta Crostini Recipe
Inspired by recipe from Donna Hay
Serves 2 as a light meal or 4 as an appetiser
Click here for a printable copy of this recipe

4x slices sourdough bread
extra virgin olive oil
1x clove garlic

1 cup frozen peas, thawed
grated zest of 1/2 a lemon
75g (3 oz) goat feta
1x clove garlic
1 teaspoon capers
freshly ground black pepper
4x chargrilled artichoke hearts, cut into quarters
extra virgin olive oil

Preheat the oven to 200 degrees C (390 degrees F).

Brush slices of bread lightly with olive oil, both sides, and place bread on an oven tray.  Bake bread in the preheated oven until toasted and golden.  Remove from the oven and rub both sides of the bread with garlic clove.  Set bread aside to cool.

Put thawed peas, lemon zest, feta, garlic, and capers in the bowl of a small food processor, and pulse a few times until ingredients are combined but still have some texture.  Season liberally with freshly ground black pepper.

To assemble, spread toasted bread liberally with pea puree.  Top each one with a couple of pieces of artichoke, and finish with another grind of black pepper and a drizzle of extra virgin olive oil.

This was quick and easy to put together, and I will definitely be making this again.  I hope you'll give this a try.

If you would like to get to know Donna Hay a little better, and to see all the fabulous dishes my friends have come up with, then do go visit I Heart Cooking Clubs and check out the links.

IHCC Donna Hay Badge resized

I'll also be sharing this post this week at See Ya In the Gumbo hosted by the lovely Michelle at Ms. enPlace, Weekend Cooking hosted by Beth at Beth Fish Reads, and at Foodie Fridays hosted by Designs by Gollam.

See Ya in The Gumbo Badge     Weekend Cooking Badge     Foodie Friday Badge


Sunday, December 29, 2013

How to Make Gravlax & Cured Salmon Galettes

Cured Salmon Galettes 1

'Tis The Season, and don't we all know it.  The festive season can be a wonderful time of the year - a time to spend time with family and friends, share some celebratory food (and a drink or two), but it can also be a highly stressful time of year.  Many of us take on too much ... trying to keep up with busy jobs, be the perfect hostess, stay on top of children's end of year activities, get the Christmas shopping done without blowing the budget ... the list goes on and on.  Not to mention all the over-indulgence on so many levels.

This week at I Heart Cooking Clubs we are all about food and drink for holiday parties and entertaining, and thankfully our current guest chef, Donna Hay, has plenty of great ideas to make entertaining for the festive season a breeze.

These little salmon pastries, adapted from a recipe from the Donna Hay website are perfect for a holiday party.  They are elegant, delectable and ridiculously easy to put together.  The original recipe uses smoked salmon, and that would certainly be delicious, but since gravlax is also incredibly easy to make and a great stand-by ingredient to have on hand at this time of year, I thought I would also share my recipe.

Wishing you all much joy for what remains of the festive season, and a happy and fulfilling year ahead.

Gravlax Recipe
Click here for a printable copy of this recipe

45g (1-1/2 oz) sugar
60g (2 oz) brown sugar
60g (2oz) coarse sea salt
6 to 8 juniper berries
ground black pepper
1 teaspoon fennel seeds
2 tablespoons gin, optional
600-700g piece of salmon fillet, skin on, pin bones removed

In a small bowl, mix together the sugar, brown sugar and salt, combining well.

Lay a large sheet of tinfoil (at least twice the length of the piece of salmon) on your kitchen bench, and sprinkle half the sugar/salt mixture over the centre of the foil.  Place the salmon on top of the sugar/salt mixture, and cover the fish completely with the remaining mixture.  Sprinkle juniper berries, ground pepper and fennel seeds over the top, and drizzle over the gin if using.

Gravlax 1

Note:  You could also at this time top the salmon with any of the following optional ingredients:  a fennel bulb, thinly sliced;  a large bunch of chopped dill;  zest of a lemon or 1/2 of a chopped preserved lemon;  vodka instead of gin - I imagine even tequila would work well.

Wrap the tinfoil closely around the fish and seal all edges well.

Place the package in a dish, just big enough to hold it, and weight it down.  Refrigerate for two to three days, turning it over each day.

Fish will be ready when it feels firm to touch.

Gravlax 2

Slice thinly and serve with buckwheat blini, bagels, in salads, as an addition to an appetiser platter, or atop these little galettes - even tossed through pasta is great.

Cured Salmon Galettes 2

Cured Salmon Galettes Recipe
Adapted from recipe by Donna Hay
Makes 8
Click here for a printable copy of this recipe

1x sheet ready rolled flaky pastry
1x egg, lightly beaten
1/2 cup sour cream
1 teaspoon white wine vinegar
1 tablespoon chopped flat leaf parsley
pinch dried tarragon flakes
1 heaped teaspoon capers
flaky sea salt & freshly ground black pepper
8x slices of gravlax
handful of rocket leaves

Preheat oven to 200 degrees C (390 degrees F).

Cut the pastry square into four equal squares, then cut each square in half - you will end up with four rectangles.  Brush the pastry rectangles with the beaten egg, and prick each one in several places with a fork.  Place the prepared pastry on a parchment lined baking sheet, and bake in the preheated oven until puffed and golden - about 10 minutes.

Meanwhile, in a small bowl, mix together the sour cream, vinegar, parsley, tarragon, capers, salt and pepper.  Taste and adjust any of the flavourings as necessary.

Remove the baked pastry from the oven.   Top each one with a dollop of the sour cream mixture, a slice of salmon and a rocket leaf.

Serve immediately or at room temperature.

This is a great appetiser to serve for any festive occasion, or would also make a delicious, light lunch served with a fresh salad.

If you would like to get to know Donna Hay a little better, and to see all the wonderful festive fare my friends have been cooking up, then do go visit I Heart Cooking Clubs and check out the links.

IHCC Donna Hay Badge resized

I'll also be sharing this post this week at See Ya In the Gumbo hosted by the lovely Michelle at Ms. enPlace, Weekend Cooking hosted by Beth at Beth Fish Reads, and at Foodie Fridays hosted by Designs by Gollam.

See Ya in The Gumbo Badge     Weekend Cooking Badge     Foodie Friday Badge


Saturday, November 2, 2013

Green Olive Tapenade & Mozzarella French Toast Sandwiches

Green Olive Tapenade & Mozzarella French Toast Sandwiches 1

I know there are people out there who love a good sandwich, and whose imagination knows no bounds when it comes to dreaming up creative things to put into said sandwich.  I'm not one of them.  It might be a throw-back to all those school lunches I hated, but I confess to a certain amount of ambivalence towards sandwiches.

Should I happen to go into a cafe for lunch, the rest of what they have on offer would have to totally suck before I would choose a sandwich, and chances are, if the sandwich is the only appealing thing they have on offer, I would get up and leave.  My one exception to dining out on a sandwich is the classic BLT - who doesn't love that? - however, my rule for that is it's room service food called for in the middle of the night, and must be accompanied by a big bowl of french fries.

Likewise, it would be a rare thing for me to make a sandwich at home.  A slice of fresh bread or toast, with something delicious atop ... sure, but a sandwich ... no.

And there's an art to composing a sandwich, don't you think?  Someone round here loves a sandwich, which should contain ham, mustard, beetroot, cheese, tomato, lettuce, boiled egg, and mayonnaise.  Being asked to make said sandwich fills me with anxiety.  For a start, should the ham be at the bottom or the top?  In what order should the remaining ingredients be added?  Then, how on earth do you get all that to stay together, without everything collapsing out the sides as soon as you put the top layer of bread on?  It's all just fraught with difficulty.

I can, however, manage to pull off a "chip buttie", the obligatory accompaniment to fish and chips - take two slices of soft white bread, slather generously with butter, select half a dozen or so of the best, fattest chips, and envelop them between the two slices of bread.  Ditto the "bacon sarnie" - as above, but replace the chips with two or three rashers of bacon straight from the pan.

I do have a couple of other sandwiches in my repertoire ... these gorgeous little hearts of lemon, cream cheese and basil (the perfect pass around with a glass of bubbles), and these Chocolate Panettone French Toast Sandwiches (just the thing for a decadent Sunday brunch) ...

Sandwich Collage

... or these Orange Mango French Toast Sandwiches served with a Honey Roasted Strawberry Compote.  Now, that's my kind of sandwich!

Orange Mango French Toast with Honey Roasted Strawberry Compote 3

Which, at last, brings me to my point - if you want to get me to eat a sandwich, try soaking it in egg, frying it in butter, and calling it french toast.  You can guarantee I won't be turning my nose up at that.

So, with out theme this week at I Heart Cooking Clubs of Sandwich Sensations, the hunt was on through my Donna Hay books to come up with a sandwich that was going to excite me.  I did give more than passing thought to the idea of ice cream sandwiches, but in a time deprived week baking cookies and making ice cream was just not going to happen.  Of course, I know that Donna wouldn't blink twice at the idea of using store-bought cookies and ice cream, but somehow that just didn't exactly seem blogworthy.  Flicking through my books, I found all manner of steak sandwiches, burgers, baguettes filled with chicken or prosciutto, but that just wasn't what I was looking for.  I was after french toast, but I felt more inclined towards something savoury, than the sweet direction my french toast usually takes.  And then I found it ... on the Donna Hay website, this recipe for Fried Mozzarella & Olive Finger Sandwiches.

I began by making my own tapenade, using green olives and capers, rather than the store-bought black olive tapenade in the original recipe, and my tapenade recipe follows.  Realistically, if you can't be bothered, a store-bought tapenade is fine, but in defence of making your own - this will make more than you need for a sandwich, the leftover will keep for ages and makes a great addition to an antipasto platter, and homemade works out at a fraction of the price of store-bought.  Oh, and did I mention it really only takes about five minutes to make, using ingredients you probably already have on hand - you couldn't run out to the store and buy some in that time.

I hope you'll give this sandwich a try.  The tart, briny, lemony, herbaceous flavours of the tapenade are a great foil to the creamy mozzarella, and there is no better way I know to encase such a filling than with soft-on-the-inside-crunchy-on-the-outside french toast with a parmesan crust.  Yes, that's right ... parmesan crust ... didn't see that coming, did you?!

Green Olive Tapenade 1

Green Olive Tapenade Recipe
A Couscous & Consciousness original
Makes about 1-1/2 cups
Click here for a printable copy of this recipe

1 cup green olives
(do yourself a favour and buy stone-in olives - pitting them is not difficult and the flavour is superior)
1-1/2 tablespoon capers
1/4 of a preserved lemon (skin and flesh)
(or substitute grated zest of a lemon and lemon juice to taste)
1x clove garlic
handful flat leaf parsley
freshly ground black pepper
extra virgin olive oil

Remove pits from olives and put them into your food processor - if your processor has a small bowl attachment that will be ideal.

Add capers, preserved lemon, garlic, parsley and pepper to the food processor.  Pulse a few times until everything is roughly chopped.  Now, with the motor running, add olive oil in a thin stream until you achieve a coarse paste.

Taste.  With the brininess of the olives and capers, as well as the salty preserved lemon, it is unlikely you will want to add any salt.  However, if you've used fresh lemon instead, you may feel the need to add a tiny bit of salt.

Store in the refrigerator.  Will keep at least a couple of weeks.

Green Olive Tapenade & Mozzarella French Toast Sandwiches 3

Green Olive Tapenade &
Mozzarella French Toast Sandwiches Recipe
Adapted from a recipe by Donna Hay
For one sandwich
Click here for a printable copy of this recipe

2x slices wholemeal sourdough bread
1 tablespoon green olive tapenade (see recipe above, or store-bought)
3x slices of mozzarella
1x egg
2 tablespoons milk
flaky sea salt & freshly ground black pepper
1 cup Parmesan cheese, freshly grated
1 tablespoon butter

Spread one slice of bread with the tapenade, top with the mozzarella, and then the remaining slice of bread.  Cut sandwich into three even-sized pieces.

In a shallow dish, whisk together the egg, milk, salt and pepper.  Spread the Parmesan out on a plate.

Melt the butter in a non-stick frying pan set over medium heat.

Meanwhile, dip the sandwiches in the egg mixture, leaving them a good minute on each side to soak up all the egg mixture.

Remove sandwiches from the egg mixture and press them into the Parmesan, coating both sides.

Transfer sandwiches to the hot frying pan, and cook until golden brown on both sides and the mozzarella is melting and gooey.

Serve immediately.

Green Olive Tapenade & Mozzarella French Toast Sandwiches 2

If you would like to get to know Donna Hay a little better, and to see all the Sandwich Sensations my friends have come up with, then visit I Heart Cooking Clubs and check out the links.

IHCC Donna Hay Badge resized

I'll also be sharing this post this week at See Ya In the Gumbo hosted by the lovely Michelle at Ms. enPlace, Weekend Cooking hosted by Beth at Beth Fish Reads, Souper (Soup, Salad & Sammie) Sundays hosted by my special friend Deb at Kahakai Kitchen, and at Foodie Fridays hosted by Designs by Gollam.

See Ya in The Gumbo Badge        Weekend Cooking Badge         Souper Sundays Badge         Foodie Friday Badge


Monday, June 3, 2013

Quick Pickled Lemons and Fish & Caper Kebabs with Burnt Aubergine

Fish & Caper Kebabs with Quick Pickled Lemons & Burnt Aubergine

New Zealanders as a people are sports-mad in general, and rugby-mad in particular.  It is without doubt our national sport, and it's importance is so deeply embedded in our national psyche, that details of some amazing triumph on the rugby field or, shudder the thought, devastating defeat (heads must surely roll), will often be lead story in our national news broadcast ahead of child kidnappings, murders, parlimentarians in trouble, or earthquakes in China.  We know here what's really important!

At the end of a rugby match, the captains of each team are always interviewed for their comments.  And I can wager, a pound to a pinch of the proverbial, that their statement will always begin with the words, "Well, it was a game of two halves, and full credit to the other team ... blah, blah, blah".

Why, am I telling you all this.  Because this is going to be a post of two halves, with once again full credit to Yotam Ottolenghi.

In the first half of this post, I'm bringing you Ottolenghi's Quick Pickled Lemons.  At I Heart Cooking Clubs, our Monthly Community Recipe for the month of May was preserved lemons, either the traditional method which takes 4-6 weeks of curing, or this quick pickled version, ready in 24 hours.  As I have already posted preserved lemons here before - in fact they were the very first thing I ever posted on this blog - I decided to give the quick pickles a try.  These quick pickles, I have to say, are incredibly moreish and I know that these just became a "refrigerator staple" for me to accompany all manner of things.  I would still urge anyone to have a go at preserved lemons as well.  I always have at least a jar or two in my fridge - they are incredibly easy to make (and very cheap compared to bought ones), and they are invaluable for bring wonderful flavour to stews, casseroles, couscous, salads, and even dressings.  If you do a search of preserved lemons on this blog, you will find a number of recipes in which I've used them.

Quick Pickled Lemons

In the second half of the post, the Quick Pickled Lemons are served up with Fish & Caper Kebabs and Burnt Aubergine, from Ottolenghi's book Jerusalem: A Cookbook.  I'd had this recipe bookmarked for a while, and with out theme this week of "Pattycake, Pattycake" at I Heart Cooking Clubs, this seemed like the perfect opportunity to give these a try.

The fishcakes - light and delicate (no stodgy fishcakes, these babies), with the little hits of briny capers - were an absolute hit around here.   The burnt aubergine accompaniment - sumptuous smokey flavour, enhanced with garlic and herbs - may possibly have been an even bigger hit.  With the pickled lemons on the side, this was a stunning meal.  Apart from a bit of work involved in preparation of the lemon and aubergine, both of which could be done well in advance, this makes a quick and easy meal to put together for a midweek supper - a great dish for entertaining too.

Quick Pickled Lemons
Adapted (slightly) from recipe by Yotam Ottolenghi & Sami Tamimi
Click here for a printable copy of this recipe

1x smallish red chilli, roughly chopped
juice of 1x lemon
3x medium lemons
(halved lengthwise, then sliced widthways as thinly as possible)
35g caster sugar
1 tablespoon coarse sea salt
1x clove garlic, crushed
1 teaspoon smokey paprika
1/4 teaspoon ground cumin
1/2 teaspoon turmeric

Grind the chilli to a rough paste with juice of 1/2 lemon in a mortar and pestle.  Transfer to a large bowl with the juice of the other half of the lemon, and all the remaining ingredients.  Mix everything together well, massaging all the flavourings into the lemons.  Cover the bowl and leave on the bench overnight.  Next day transfer to a clean, sterilised jar and refrigerate.  Will keep for approximately 2 weeks.


Fish & Caper Kebabs with Burnt Aubergine Recipe
Adapted, slightly, from recipe by Yotam Ottolenghi & Sami Tamimi
Click here for a printable copy of this recipe

Burnt Aubergine
3x medium aubergine
1/4 cup natural, unsweetened yoghurt
1x garlic clove, roughly chopped
generous handful flat-leaf parsley leaves
flaky sea salt
freshly ground black pepper

Fish Kebabs
430g white fish, skinned & boned (I used tarakihi)
1 cup panko breadcrumbs
1 medium free-range egg, lightly beaten
2 tablespoons capers
generous handful flat-leaf parsley, roughly chopped
grated zest of 1x lemon
1 tablespoon lemon juice
3/4 teaspoon ground cumin
1/2 teaspoon turmeric
flaky sea salt
freshly ground black pepper

sunflower oil for frying

Begin by burning the aubergines.  Cut a few long slashes through the skin of each one,  and put onto the grill of a hot barbeque.  Turn regularly and cook until the skin is black and flaky, and the flesh is soft - about 15- 20 minutes. (* See note below)

Remove the aubergines from the heat and leave until cool enough to handle.  Cut in half lengthwise, scoop out the soft flesh in long strips and discard the blackened skin.  Put the flesh into a sieve set over a bowl for any water to drain out of the flesh while you prepare the fish kebabs.

Cut the fish into very thin slices, and then into very tiny dice,  Put the diced fish into a bowl.  Add the breadcrumbs, egg, capers, herbs, lemon zest and juice, and spices.  Season generously with flaky sea salt and pepper.  Mix everything together well, and using your hands shape into small patties - you should get 10-12 patties depending on the size you make them.  Place the patties in a single layer on a plate or tray, cover and refrigerate for about half an hour to firm up.

Meanwhile finish off the burnt aubergine.  Put the drained aubergine flesh into the bowl of a food processor, along with the garlic, parsley, and yoghurt.  Add a generous pinch of flaky sea salt and a good grind of black pepper.  Pulse in the food processor a few times, just until everything is roughly chopped and combined.  Make sure that you keep a bit of texture - you don't want a smooth paste.  Set aside.

Set a frying pan over medium-high heat, and cover the base with a thin layer of oil.  Cook the kebabs in batches, until golden all over and cooked through - only a couple of minutes on each side.  They are very delicate, so do take care putting them into the pan and turning them.

Serve hot, with a generous dollop of the burnt aubergine on the side and a small amount of the quick pickled lemons.

*Note:  Ottolenghi offers a method for burning the aubergines of lining the base of a gas hob with tin foil and then blackening them directly in the flame. This smacks to me of "mess" and also having to stand over the flame and keep moving the aubergines around.  His alternative suggestion is doing them in the oven under a hot grill. My method of choice is doing them on the barbeque - altogether less mess and less fuss, and works perfectly.  You do want to make sure first of all that you make a few long slashes through the skin in each one - helps to prevent any possibility that they might explode!!

If you would like to get to know Yotam Ottolenghi a little better, then do go and visit my friends at I Heart Cooking Clubs and see what they've all cooked up ...

IHCC Ottolenghi Leek Badge resized

... or check out Jerusalem and Ottolenghi's other great titles available from Amazon USA, Amazon UK or Fishpond NZ.

          Jerusalem 

I'm also sharing this post this week at See Ya In the Gumbo hosted by the lovely, and very amusing, Michelle at Ms. enPlace.


See Ya in The Gumbo Badge

Friday, August 10, 2012

Italian Sausage with Gnocchi & Red Peppers

Italian Sausage with Gnocchi & Red Peppers

It's hard not to get caught up in Olympic fever.  Every time you turn on the TV or radio or internet, there it is - some captivating image of someone's jubilation in triumph or despair in defeat.  Of course, most of us here in New Zealand are by now suffering severe sleep deprivation, as most of the events are taking place in the middle of the night for us.  It's hard to go off to bed when you want to watch just one more race ... oh, hang on, just one more ... okay, this is definitely the last one - you understand the scenario.

Anyway, London seems to be doing a great job of hosting the games, and even if you are not a huge "sports nut", you can not help but find the skill and power, dedication and determination with which so many athletes participate uplifting and inspiring.

Of course, the games will always have its detractors, and as I understand it the location of the Olympic park in London's East End, and its impact on that community has not found favour with many.  One of the great tragedy's has been the loss of the Manor Garden allotments.  The gardens were established in 1900 by Major Arthur Villiers to provide plots of land for local families in a deprived area to grow vegetables.  Divided into 80 plots, a tight-knit community tended their allotments for over a century.  Although, many plot holders have been long-standing East End families, newer plot holders brought a wide variety of ethnic backgrounds to the community.

One couple to find themselves part of this community was Sam and Sam Clark, the couple behind London's Moro restaurant, and their book Moro East offers a collection of recipes that chronicles a year of life in this community garden.  With the gardens having been demolished in 2007, this book is a real treasure documenting something which is gone forever.  I have read that the gardens may be re-established after the games are over (does anyone know if that is true?), but in my mind some things can never be regained.  Anyway, Moro East is a wonderful book - I've borrowed it from the library on a number of occasions, and have it on my wishlist for adding to my collection.

So why am I telling you all this.  Well, apart from the fact that it's a story which I think is worth the telling, the recipe I'm sharing with you today is adapted from one which I came across in a recent issue of Cuisine magazine, and on reading the introduction to the recipe I noted that it was adapted from a recipe in Moro East.  And that is the end of the story.

Now, on to the food!!  This dish could not be simpler to make.  It is a one-pan-wonder which is totally my favourite kind of dish, both to cook and to eat.  I used gnocchi instead of the potatoes called for in the original recipe, making this a dish that can be knocked out in about 10 minutes flat instead of half an hour.  I was thinking to add in some chillies for a bit of extra heat, but then I noticed that my sausages were already seasoned with red pepper flakes, so instead I added in some red peppers, making this somewhat reminiscent of another of my favourite recipes from Lidia's Italy by Lidia Bastianich.  This needs nothing more than a fresh green salad on the side and a good glass of wine, to make a quick and easy dinner that is sure to become a real family favourite.

Italian Sausage with Gnocchi & Red Peppers 2

Italian Sausage with Gnocchi & Red Peppers Recipe
Adapted from this recipe in Cuisine Magazine
Serves 3-4 normal people or 2 gluttons
Click here for a printable copy of this recipe

300-350g Italian pork and fennel sausages
1x red pepper, cored, deseeded & cut into strips
olive oil (approx 3 tablespoons)
flaky sea salt
500g gnocchi (I used De Cecco brand)
1x bay leaf
1-1/2 cups chicken stock
1/2 preserved lemon
1 tablespoon capers
generous handful flat-leaf parsley, finely chopped

Remove the sausages from their casings.  This is easily done by just running a sharp knife down the full length of the sausage, then peeling the casing away.  Then break the sausage meat into bite-sized pieces.

Set a large, heavy-bottomed skillet over medium heat, and add a tablespoon of olive oil.  As soon as the oil is heated, add the sausages pieces.  Move them around in the pan from time to time, and when they look as though they are half-cooked, add the red pepper strips.  Sprinkle with a small pinch of flaky sea salt (be restrained, as there will be saltiness from the sausages, chicken stock and preserved lemon), and continue cooking until the sausages are brown and crispy and the peppers softened.  Remove from the pan and set aside.

Add another couple of tablespoons of olive oil to the pan, and then add the gnocchi.  Stir them around to coat them all in the oil, and then fry for a few minutes to brown a little.  You will get bits that stick to the bottom of the pan, but those little stuck bits soon become little crispy bits, and they will all lift when you add the chicken stock and help to make the sauce.

As soon as the gnocchi have browned a bit, add the sausages and peppers back into the pan, stir to combine, add the bay leaf, and then pour in 1 cup of the chicken stock.  Stir and scrape the bottom of the pan to loosen all those stuck bits, and keep stirring as the liquid thickens.  If needed add the remaining 1/2 cup of stock.

Remove from the heat.  Discard the flesh from the preserved lemon, retaining just the peel.  Thinly slice the peel and stir into the pan along with capers.  Sprinkle parsley over the top and serve immediately.

This dish ticks all the classic comfort food boxes, while the spicy heat of the sausages coupled with the little hits of preserved lemon and capers elevate it to something less ordinary than just sausage and potatoes.  I hope you'll give it a try.

Italian Sausage with Gnocchi & Red Peppers 3

Moro East, and other Moro cookbooks are available from Amazon in the US, Amazon UK, or Fishpond in New Zealand.

Moro East

This week I'm sharing this post with at Gallery of Favourites hosted by April at The 21st Century Housewife and at See Ya in The Gumbo hosted by Michelle at Ms. enPlace.

Secret Recipe Club