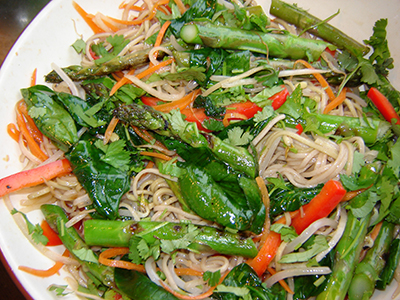
By now I think you all know about my love for fresh asparagus - I just never seem to tire of it. My beloved however doesn't share my passion for this spring treasure (he's more of a broccoli guy), so while he's been away this week I have been totally indulging my every asparagus whim. I've been cooking up dishes in which the asparagus is "the hero" - taking centre stage rather than being "the bit on the side" that I usually have. This asparagus and noodle salad, adapted from The Wagamama Cookbook, is one of my old favourites. It's also very adaptable - I have made this using broccolini instead of asparagus on occasions, and I imagine it would also be fantastic with the addition of prawns if you wanted something special and not entirely vegetarian.
This is the perfect summer salad - light, healthy, crunchy and tangy - enjoy.
Piece of daikon (Japanese radish) about 4" long, peeled
1 small carrot, peeled
90g green-tea soba noodles*
90g plain soba/buckwheat noodles*
1/2 red pepper
1 red chilli
1 bunch asparagus
2 handfuls of mung bean sprouts
1 tablespoon vegetable oil
handful of baby spinach
salt
small bunch coriander, chopped
Dressing ingredients:
1 medium shallot, finely chopped
1" piece fresh ginger, peeled & grated
1 clove garlic, finely chopped
1 1/2 tablespoons rice vinegar
1 tablespoon water
3 tablespoons tamari
1 tablespoon tomato ketchup
100ml vegetable oil
First make the dressing - simply combine all the ingredients in a screw top jar, give it a good shake and set aside. This will keep for at least a week in the refrigerator.
Begin the salad by shredding the daikon and carrot into long, fine strands - I use one of those wide blade peelers that has a shredder on the opposite side (you can see it in the picture). If you don't have a suitable shredder or tool for doing this, cut into the longest, finest juliennes that you can manage. Then put the daikon and carrot strands into a bowl of cold water and ice, and refrigerate for at least an hour until crisp.
Meanwhile, cook the noodles in boiling water - they will only take 2-3 minutes - drain and refresh under cold running water. Set aside.
Remove the seeds from the red pepper, and cut into thinnish strips. Remove the seeds and membrane from the chilli, and slice.
Drain the now crisp daikon and carrot. Mix with the noodles, red pepper and chilli, and 2-3 tablespoons of the dressing. Season with salt and set aside on serving platter or bowl.
Heat a griddle pan until smoking. Toss the asparagus spears with a little of the oil and salt, and cook on the griddle for a few minutes until lightly charred. Remove from heat and cut spears in half. Similarly now toss the bean sprouts in a little oil and salt and add to the griddle. Give them a couple of minutes, turning them occasionally, then add the spinach. Almost immediately after adding the spinach turn off the heat. The spinach will begin to wilt in the residual heat, and once it has just wilted remove.
Add the asparagus, bean sprouts and spinach to the rest of the salad. Toss lightly to combine, and sprinkle chopped coriander over the top.
Notes
* I say gluten-free here because soba noodles are traditionally made from buckwheat flour which, as I understand it, is gluten-free. However, the packets of soba noodles I had both contained wheat flour as well as buckwheat flour, so check ingredients carefully if this is important to you. You could substitute with any wheat-free noodles.
* If you can't find green-tea soba noodles (though these are pretty much available in most supermarkets and Asian specialty stores now), you can cook plain noodles in boiling green tea.
Some of you will be surprised to know that I am a woman of few words in the morning. It's simply not my best time of day, and just being upright is challenging enough for me without being required to make any kind of meaningful conversation within the first hour of being roused. Once my general reticence to start the day has subsided, the first words that I usually utter are "what would you like for dinner?". The response usually goes along the lines of "I don't know - I'm not even dressed yet". Whilst this might be a fairly predictable reply, I'm sure you'll agree it's not particularly helpful!
Occasionally though my partner will be working late, or might be in a totally different "food mood" to me and will suggest that I fix something for myself and he will organize his own dinner. I used to be totally hopeless at cooking just for myself - solo dining used to be something like a couple of boiled eggs or a few crackers and a piece of cheese. Now I love such opportunities - these are the times when I can make something for myself that my partner doesn't like, or indulge in something that might be too extravagent to cook for a crowd but which is a wonderful treat for one.
When just such an opportunity presented itself the other morning, my mind immediately leapt to thoughts of two of my spring time favourites - asparagus and scallops. Casting my mind around for inspiration on how to put them together I remembered something I had seen Giada de Laurentiis do on Food TV (have I mentioned that I am a Food TV addict?) - a grilled asparagus and melon salad.
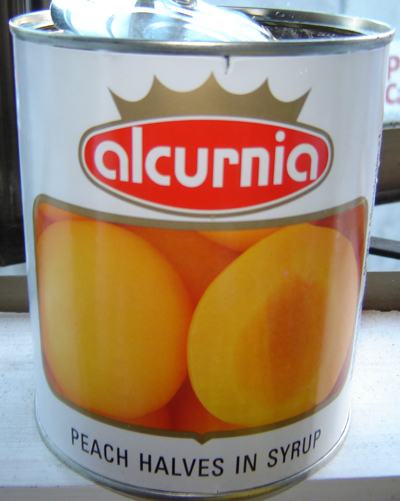
Using that as my inspiration I decided to use peaches instead of melon - this is after all not the season for melon, and I knew that any melons in the shops at present would be watery and tasteless. I know it's not the season for peaches either, but I have a peach secret ... in my opinion, even when they are in season, peaches these days just seem to be usually flabby, thick skinned and horrible - they taste nothing like the peaches of my childhood. But I have discovered these fantastic tinned peaches from Spain, available from the Mediterranean Warehouse, which of course you can have all year round.
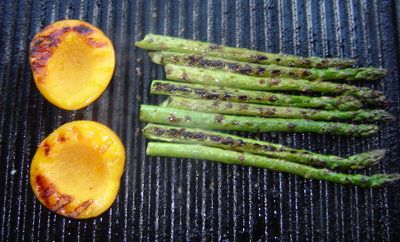
I drizzled the asparagus with a little olive oil, sprinkled them with a little flakey sea salt, put them on a hot grill pan, along with the peaches, until tender and charred.
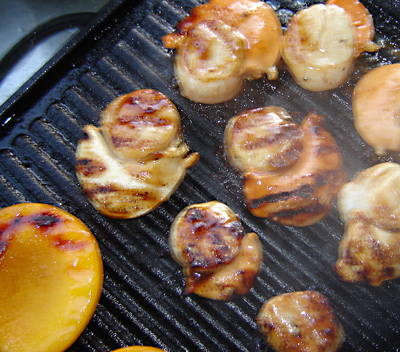
Meanwhile, I popped a couple of slices of prosciutto in a hot oven until crisp. I treated the scallops to a tamarind and maple syrup glaze, which I marinated them in for a while, before then cooking them also on the hot grill pan. They literally take only a couple of minutes.
Some peppery wild rocket I had picked up at the organic vege market went into the final assembly, along with a little drizzle of very good extra virgin olive oil, and I have to say this was a taste sensation. I know that I will be making this again and again.
The quantities in the recipe following are for one serving, but you could easily just multiply that if you wanted to serve more people - this would be fantastic served on a big platter for a light but luxurious lunch.
Tamarind Glazed Scallops
with Grilled Asparagus & Peaches Recipe
(you could use the pulp which you soak and then drain,
but I prefer to use the concentrate)
2T maple syrup
1tsp olive oil
salt & pepper
(this amount would easily be enough for 12x scallops)
Preheat oven to 180 degrees, with an empty baking tray in the oven while it heats.
Mix all ingredients for the Tamarind Glaze together in a small bowl. Add scallops to the bowl, making sure they are all completely covered with the glaze, and leave to marinate while you prepare the other ingredients.
Place slice/s of prosciutto on the hot baking tray, and place in the oven until crispy - this will really only take a few minutes, so keep an eye on it.
Drizzle a little bit of olive oil over the asparagus spears, and place on a very hot grill pan. Place peach halves on the grill pan at the same time. Sprinkle a little flakey sea salt over the asparagus and cook until charred and tender.
Remove asparagus from the pan. Continue cooking the peaches. Shake excess marinade off the scallops and add them to the pan. Cook until caramelised on each side - this literally takes just seconds on each side.
To assemble, place asparagus on plate. Arrange peach halves and scallops over the top. Strew a few torn up rocket leaves over the top. Crumble the crispy prosciutto over the top of everything, and finish with a drizzle of the best extra virgin olive oil you can lay your hands on.
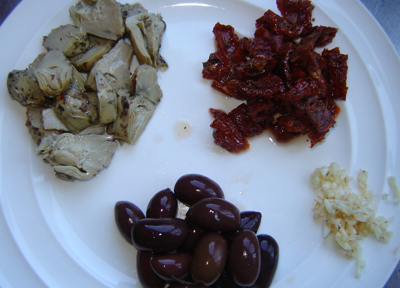
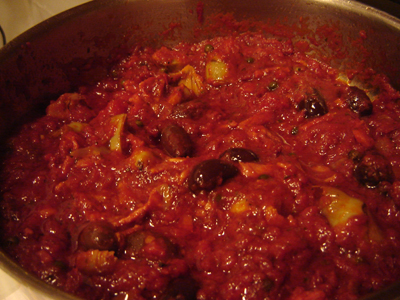
About 16 years ago, at a restaurant in Santa Monica (the name of which I have long since forgotten), my husband and I enjoyed a wonderful dish of pasta in a tomato based sauce with artichoke hearts, sundried tomatoes, and black olives.
We loved it so much that I couldn't wait to get home and try to recreate something similar. I'm pleased to say that my creation was a hit, and it became a "regular" in our household. So much so that we called it "Tuesday Pasta" because, you guessed it, I made it most Tuesday nights. For the life of me I don't remember why we always had it on Tuesdays - that, like the name of the restaurant where this dish was inspired, is but a distant memory. Much time has gone by since then, and habits have changed, as in fact have my marital circumstances, so I no longer make this pasta dish with quite the same regularity, and not necessarily on Tuesdays.
It is still, however, probably my all time favourite pasta dish, and if I could only ever share one recipe in my life this would probably be it. As I always have all of the necessary ingredients in my pantry all of the time, I now think of this as my "Pantry Pasta" recipe. This is the dish that I can whip up when I haven't had time to go shopping, and I want to get dinner on the table in about 15 minutes - really! All the preparation can be done while you are waiting for the pasta water to come to the boil, and then the sauce comes together in the time it takes for the pasta to cook.
I should also mention that what follows should be treated more as a guide than a recipe that needs to be strictly adhered to - simply use what you have on hand or if you want to add more of something you like and less of something you don't then simply adjust to suit your tastes. I use artichoke hearts - I like the roasted ones, but unroasted is fine; sundried tomatoes; black olives - green are just as good if they are your preference; capers - I like the salted ones best, but the ones in brine are fine if that's what you have, or leave them out altogether - I actually used green peppercorns once instead of the capers (not successful I might add, they just somehow didn't work in this dish at all); diced pancetta, or bacon, or chorizo sausage, or when I want a vegetarian option this works fantastically well with eggplant; a few anchovies (entirely optional) - these just melt into the sauce and add a bit of complexity to the flavour of the sauce without any discernable "fishy" taste; and fresh herbs - I think basil works best, but flat-leaf parsley and rocket are also good and I have on occasion even put in a handful of baby spinach just before serving. As you may now have suspected, I'm very much a "handful of this - a dollop of that" kind of cook, and that very much applies to this dish - I think I have made it hundreds of times and I'm sure it has never tasted exactly the same twice. So feel free to put your own twist on this, enjoy playing around with it, and if you come up with something sensational I would love to hear about it.
Pasta with Artichoke Hearts, Sundried Tomatoes & Olives Recipe "Pantry Pasta"
200g pancetta cubed, or bacon cut into small pieces (substitute sliced chorizo sausage if desired) (vegetarian substitute - 1 small eggplant cut into 1" cubes) 2x cloves of garlic, finely chopped 2T olive oil 2T tomato paste (I like the stuff that comes in tubes) 1/2tsp - 1tsp chilli flakes, optional 1x tin tomatoes or jar of tomato passata 8x artichoke hearts, roasted (cut in half if smallish, or into quarters if large) 6x sundried tomatoes, cut into thin strips 2x handfuls of black olives 2T capers 4-6 anchovies, optional generous handful of basil leaves, torn salt & pepper 1 cup parmesan cheese, grated 250g pasta shapes, whatever is your favourite
Place a large pot of water over high heat, and bring to the boil.
While water is boiling, chop the bacon (or chorizo, or eggplant), mince garlic, chop artichoke hearts and sundried tomatoes, tear basil leaves into small pieces, and grate parmesan cheese (pecorino also makes a good substitute if you prefer).
Once water has come to a rolling boil, add a good handful of salt and pasta. Boil until al dente.
Meanwhile, heat oil in a large skillet, and cook bacon until brown. When bacon is almost brown, add garlic to pan (don't put the garlic in earlier or it will burn and turn bitter).
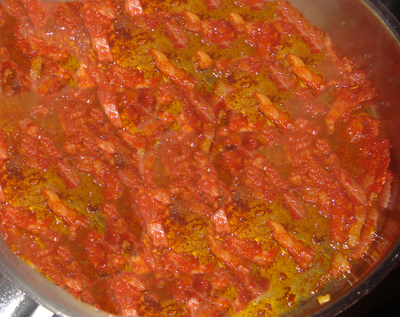
Once the bacon and garlic are browned, add the tomato concentrate and 1/2 tsp of the chilli flakes (if using), and cook for a couple of minutes allowing the sugars in the tomato concentrate to caramelise - it will turn quite a dark brown. This is a really important step - it adds lots of flavour and rich colour to your sauce.
Add the anchovies and cook for another 30 seconds.
Next add the tinned tomatoes or passata to the pan. If using whole tinned tomatoes, break them up a bit with a wooden spoon. This will start to bubble immediately - keep stirring scraping up all the bits of browned tomato concentrate. Then turn heat down to a simmer. Add half of the torn-up basil leaves, artichoke hearts, sundried tomatoes, olives and capers.
Cook for another minute or two until everything is warmed through. Taste and adjust seasoning with salt and pepper if necessary. Then keep warm until pasta is finished cooking.
Drain pasta, reserving a little of the pasta water (use this reserved water to loosen the sauce if necessary).
Add the drained pasta to the sauce. Stir in half the parmesan cheese and another sprinkling of chilli flakes if you like it spicy. Lastly stir in the remaining basil leaves.
Serve in warm bowls with remaining parmesan sprinkled over the top.
This makes 3 generous servings, but could easily feed 4 with the addition of a fresh green salad, some good crusty bread to mop up the sauce, and I like to wash it down with a glass or two of Valpolicella.
At our yoga school, Yoga Tapas, we begin every one of our classes by spending some time sitting and doing some breathing in Virasana - the Hero Pose. This is a poignant reminder to me every time I come before my students of the courage it takes for so many of them to keep coming back to their mats.
I frequently tell my beginners classes that, contrary to what they may believe, they don't require much in the way of strength and/or flexibility in order to develop a yoga practice - those are things that will come with time. What they do need is faith, courage and determination.
Every student at some stage hits that class or point in their practice when they think "that's it - I quit!" This is usually the time when they need their yoga practice the most, but most listen to that self-destructive little inner voice and quit. The brave ones carry on - these are the students who keep coming back (no matter how hard it is); these are the students I teach; and I am so grateful for the opportunity to do so.
Why is it so hard? Well, there is no doubt, that yoga can be a physically demanding practice and many students have physical obstacles to overcome in the way of illnesses and injuries. We also have numerous students who suffer from emotional and psychological obstacles such as various phobias, anxiety, ADHD, severe depression and bipolar disorder, stress related allergies and more. Through our yoga practice we begin to reconnect the body, mind and spirit - a process of self-discovery, self-awareness and eventually self-acceptance which is not always an easy journey, especially for students who have much self-doubt to overcome along the way.
It is tempting when you come into a class full of students and sit down on your mat to listen to that little voice that is telling you that "everyone else in the room has totally got their act together and can breeze effortlessly through a class, while you on the other hand are a total loser and shouldn't be there - you better quit real quick before everyone else finds you out". That sneaky little voice does not want you to discover that everyone else is actually feeling exactly the same way you do to one degree or another, and it will do anything it can to get you to quit before you discover your true potential, because once that happens you won't listen anymore.
I applaud everyone of you who hears the voice and keeps coming back to your mat despite it. You are my heroes.
Footnote: One new student, who has suffered for many years with severe depression, has decided to try regular yoga practice for 3 months and measure the difference it makes in her life. She is writing a blog to document her progress. I know that there is nothing unique about how she feels - there are many of you who have faced the same thing. Perhaps you might leave a comment on her blog or send her an email to let her know she's not the only one - maybe it will even be a surprise to you to learn that you are not the only one.
One of the great joys of living in a cold climate is witnessing the passing of four distinct seasons, and spring always seems like such a particularly joyful time after a bleak winter. I feel a growing excitement as, with each day, we move towards this time of renewal - evidence of new life is popping up everywhere. Early blossoms are out; azaleas, camelias and daphne are all starting to flower; and the first brave daffodils have popped their heads up and turned towards the sun.
I can feel this in my yoga practice too. Having just completed day 27 of a 30 day Ashtanga yoga intensive, despite the aching muscles and fatigue, I feel as though my practice has just been "spring-cleaned". My practice feels new and fresh; I think I have learned to listen even more closely to my body, and to be more intuitive in my practice so that I don't keep repeating the same old injury patterns; and I feel an incredible joyousness inside. My spirit feels light and my heart feels open.
Warmer days are making me happier too, and with the official start of spring now just days away, I am starting to dream of spring food - I feel I've had my fill of squash and root vegetables - I'm longing for asparagus and broad beans. In fact, the first of the new season's asparagus is in the supermarket already, but at $51.99 per kilo I think I will be waiting for it a little longer. It should be mentioned that asparagus is probably my absolute favourite vegetable, and once it becomes readily available I tend to eat it every day until the end of the season. I steam it, roast it, grill it, make soups, risottos, salads and tarts. In short, I can't get enough of it.
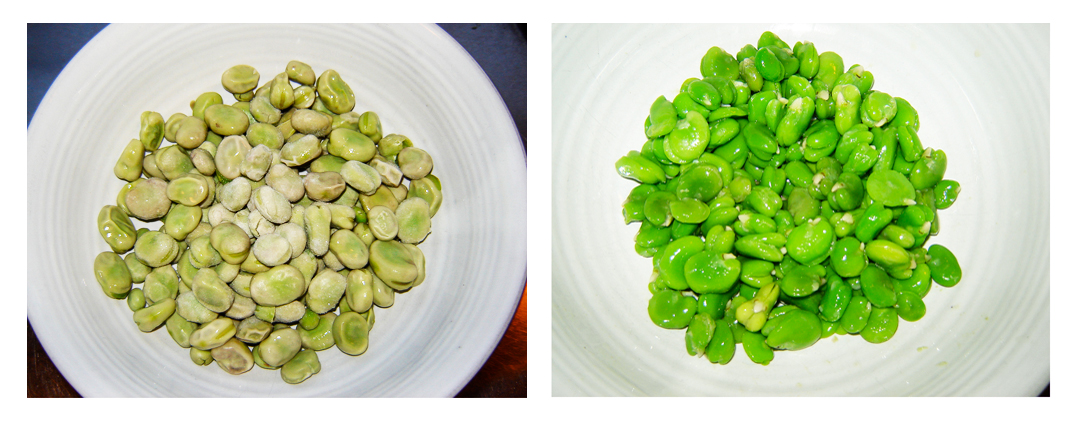
Broad beans are another real favourite of mine and, knowing that fresh ones are just around the corner, I made this salad the other night to use up the last of the frozen ones I had in the freezer. I make this salad a lot with fresh broad beans when they are available, with local Jersey Bennie potatoes of course, but it works just as well with frozen ones (beans that is, not frozen potatoes). This salad has great texture, and the creaminess of the avocado and the lemony vinaigrette give it a real lusciousness. This salad is a great accompaniement to fish or grilled lamb, or is perfect on its own for a light lunch.
Almost Spring Salad Recipe
Vegetarian Click here for a printable copy of this recipe
10 small/4 medium salad (waxy) potatoes 1 avocado 200g broad beans, after removing pods (if fresh) 1 lemon, zest & juice 4 tablespoons extra virgin olive oil 1 teaspoon whole-grain mustard dash maple syrup salt & pepper
Cut potatoes in half (if small), or in quarters (if larger), and boil in lightly salted water until just tender - don't overcook. Drain, cool enough to be able to handle, then cut pieces in half again, and set aside.
If using fresh broad beans remove the outer pod first. Bring water to a boil, add beans, bring water back to the boil, and cook about 2 minutes. Drain and immediately refresh in cold water. Once cold remove the thick outer shell from the beans, you will then be left with the gorgeous, glossy green beans.
Cut avocado in half, remove the seed and skin, then cut into chunks.
Combine cooled potatoes, broad beans, and avocado. Zest the lemon and sprinkle over the vegetables.
In a small jug or jar combine the olive oil, juice of the lemon, wholegrain mustard, maple syrup, salt and pepper. Taste and adjust seasoning as necessary. You may also need to adjust the balance of oil to acidity depending on the juiciness of your lemon.
You will need to dress this salad quite liberally as the potatoes are quite thirsty, so you may want to increase the quantity of dressing accordingly.
Footnote: I am off to Bali next week for 3 weeks to do a yoga retreat with Graeme & Leonie Northfield. As I imagine I won't have time for blogging while I am away, this will probably be my last post for a few weeks. Hopefully I will have plenty of food and yoga news for you when I get back in late September. Maybe fresh asparagus will be waiting for me then too.
It is no secret, amongst those who know me, that my culinary style is predominantly influenced by the flavours of the Mediterranean. However, Asian flavours also play a big role in my culinary repertoire - Indian and Thai food being particular favourites.
In fact I like nothing better, on a leisurely Sunday, than having the time to prepare an Indian feast from scratch - having the time to roast and grind spices, grate fresh coconut to make coconut milk, a trip out to the Asian supermarket to pick up any ingredients I may not have, making my own curry pastes, pickles, chutnies and home-made flatbreads, and maybe even a batch of ice cream to finish off with.
I love the way that being involved in every step of preparing such a meal somehow makes me feel closer to generations of women who still spend much of their daily lives preparing food for their families in just this way. Spiritually speaking, I get that we are all connected, but something about cooking in this way really reinforces that connection for me. First sniff of cumin and I am immediately transported to a humble Indian village, where women squat around simple fires and cooking pots to cook for their loved ones. To me, there is a physicality to the grinding of spices, grating coconut, roasting of nuts, slicing & dicing vegetables, rubbing and marinating meats that completely absorbs me. I find that I am able to be very "present" throughout the process - this to me is really cooking from the heart. Furthermore, there is no doubt in my mind that even the simplest of food which is prepared with love, tastes of love.
I think our mothers and grandmothers understood this. We all know that no-one else's apple pie, for example, tastes quite like Mum's. Now, in reality, there is probably nothing particularly special about Mum's apple pie. But she makes that pie with love for her family and friends. I am convinced that on some level that is transmitted to us - it comes through in the taste, maybe we witness the way she chops the apples with a small smile on her face, or sings softly to herself as she prepares the pastry. And so, I believe, Mum's apple pie satisfies us on an emotional level in a way that no other apple pie can.
Today, however, most modern women are juggling careers as well as home lives, and simply don't have the time to spend several hours a day channeling the domestic goddess. I am no exception. Modern women often need to fall back on a bit of "convenience feeding" and, as a result, many children today are raised on a diet of pre-packaged microwave meals and take-outs. I actually have a theory that overeating in an effort to try and satisfy the emotional appetite has much to do with today's obesity problems - I don't think it is only about the high fat, sugar and sodium levels of many convenience foods.
It doesn't, however, have to be this way. With a well-stocked pantry, and a little bit of planning and forethought, great tasting food can come out of your own kitchen in a matter of minutes. Weekends are a great time to pre-prepare meals which can be frozen - soups, curries, and casseroles all freeze and reheat really well. A crockpot is also a really useful gadget to have in the kitchen - it takes barely moments to put a few ingredients into the slow cooker in the morning, and come home to a hot and satisfying meal at the end of the day.
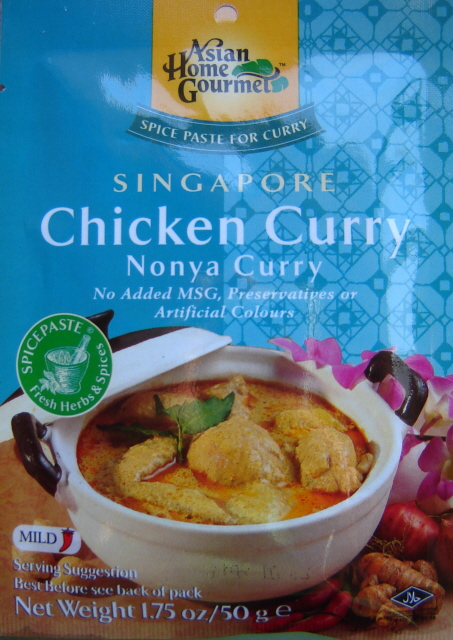
I teach yoga classes most evenings, not usually finishing work until 8pm. Because I also need to get up pretty early in the morning to teach classes again and do my own practice, I need to get to bed fairly early as well. That means that I need to be able to turn out a meal fairly quickly after my work day is over. So I have to be fairly well organised - I can often find time to do a little bit of preparation in between classes (maybe chop vegetables, or other ingredients, get any pans or utensils out that I plan to use, etc). A real key to this for me is keeping my pantry well stocked with things like tins of tomatoes, jars of artichoke hearts, sun dried tomatoes & olives (things that can be thrown together in a flash with a bit of pasta and a grating of parmesan). Tinned beans and chickpeas are also a great stand-by - generally I like to cook my own and keep a few bags of them in the freezer, but a tin on the pantry shelf is great for an emergency. And jars or sachets of various curry pastes are fantastic for a meal in minutes - yes, it is great to spend the time making your own, and that is certainly my ideal - but it is just not always realistic.
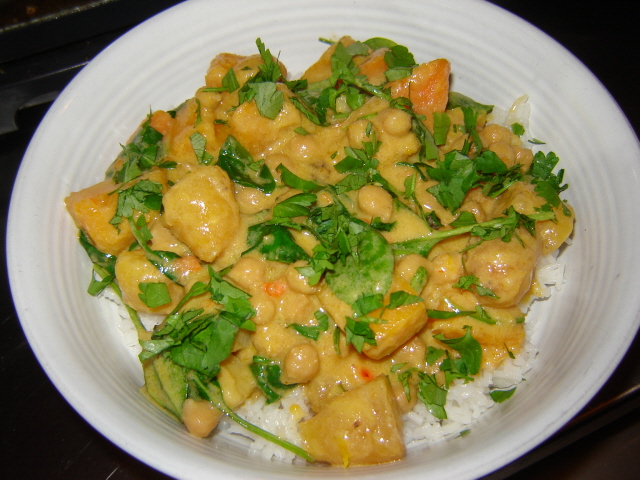
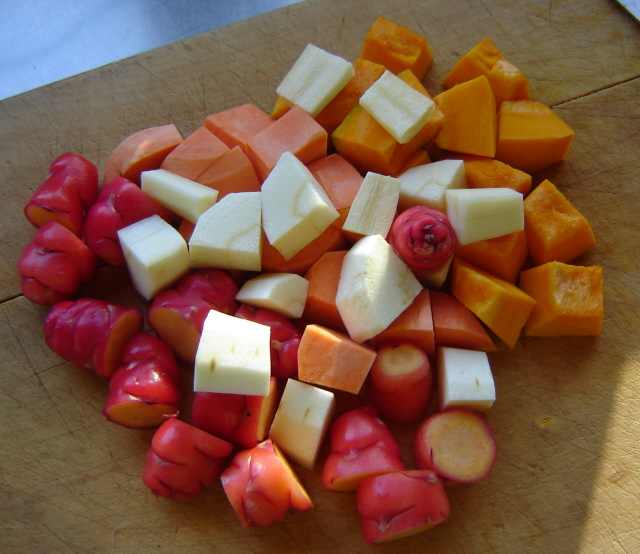
This recipe then, is one I make a lot - I can make this curry in the time it takes to cook the rice - that is less time than it would take to order and pick up a takeaway. I always have a sachet of this Nonya curry paste (amongst others) in the cupboard, as well as a can of coconut milk, and adding plenty of fresh vegetables I don't feel I am compromising anything in the way of flavour or nutritional value. Give it a bit more zing with some fresh chilli, lemon juice and herbs. Serve with some rice or roti on the side, and this really makes a great meal. I frequently make this just with pumpkin and chickpeas, but a quick look in the vege bin the other day revealed that I also had half a kumara (sweet potato), half a parsnip, and a few yams that needed to be used up, so in they went too. I have to admit I wasn't quite sure how well the parsnip would work in this, but it was actually great. Feel free to experiment with any combination of vegetables, and leave me a comment if you come up with some additions that work well for you.
400-500g chopped firm vegetables (pumpkin, sweet potato, yams, parsnip) 1 red chilli 1-1/2 cups cooked chickpeas 1 sachet Asian Home Gourmet Nonya Curry paste (refer Source Guide) 425ml can coconut cream 1 tablespoon vegetable oil 2 handfuls of fresh baby spinach 1 lime, grated zest & juice bunch fresh coriander
Chop assortment of vegetables into bite size pieces, about 1.5-scm. Remove seeds and membrane from the chilli, and finely slice.
Heat oil in saucepan over medium heat. Once hot, stir curry paste into the heated oil, reduce heat to low-medium, and cook paste, stirring constantly for 1 minute.
Add chopped vegetables and sliced chilli to the pan, stir thoroughly until all vegetables are coated with the paste, and cook for a further 3 minutes, stirring from time to time.
Add the can of coconut cream to the pan, reduce heat to low and simmer until vegetables are just tender - about 10 minutes.
Once vegetables are tender, add chickpeas to the pan and continue to cook just long enough to warm the chickpeas through.
Remove pan from the heat, add the spinach and stir until the spinach is just wilted. Stir in the grated zest and juice of the lime.
Serve immediately over steamed rice, and top with chopped fresh coriander.
Frozen Lemon Yoghurt
To finish? I happened to have some of this Frozen Lemon Yoghurt in the freezer that I made according to this recipe from David Lebovitz. This is gloriously tangy and refreshing, ridiculously easy to make, and was the perfect ending to a meal such as this.
All in all, this was a great meal in a hurry, with absolutely no guilt attached.
Students, particularly new ones, are often curious about the name of our yoga school - Yoga Tapas. For most people the term "tapas" immediately conjures up thoughts of small dishes of Spanish food, and they generally want to know what this has to do with yoga - "does it mean that you just do little bits of yoga?" I am often asked. The more hopeful ones, I imagine, are thinking that supper will be laid on after class! Big disappointment for them no doubt.
In yogic terms, however, tapas is something altogether different. The word comes from the Sanskrit root word "tap", meaning to heat, burn, purify. Whilst that may well imply "cooking something up", in case you are still think this has something to do with food, let's examine the concept in the context of our yoga practice and our daily lives.
A foundational text of yoga, considered by many to be of principal importance, is The Yoga Sutras of Patanjali. There is some uncertainty as to exactly when these were written, but scholars generally attribute the time of composition to somewhere between 200BC and 500AD - certainly puts paid to the idea that yoga is a bit of a modern day "fad", doesn't it. The text prescribes adherance to an "eight limb path", in order to quiet the mind and thereby achieve true consciousness.
Most of us are already familiar with the third limb - that of asana, or the physical practice of various postures. Many of you will be less familiar with the first two limbs, however - the yama and niyama, which are the ethical principles and personal disciplines which a yoga practitioner endeavours to follow. There are five of each of these, with tapas being the third niyama. This is often translated as commitment, dedication, or discipline.
In Hinduism, figuratively speaking, the term denotes spiritual suffering or austerity. Practices of mortification of the flesh are also considered forms of tapas. Examples of such practices are found in many religions, and can range from simple abstention from excessive indulgences (food, sex, alcohol) to self-inflicted pain or physical harm (whipping, piercing, genital mutilation, beating, etc). To Hindus, spiritual enlightenment is considered the highest goal in life, and it is generally believed that one must go through many reincarnations to achieve this. Sadhus, however, believe they can "short-cut" the road to salvation by renouncing earthly pleasures, and burning off bad karma by putting their bodies through extreme physical hardship.
One such example is that of the Standing Baba or Khareshwari who have taken a vow to remain standing - some sources suggest for a period of 12 years, others suggest "forever". Whilst they may walk about, the vow of the Khareshwari prohibits them from sitting or lying down, not even for eating, sleeping or going to the toilet. They do, however, have a swing-like contraption which supports the torso during sleep, and which during the day enables them to rest the arms. A sling underneath the swing, enables the Standing Baba to rest one leg at a time.
Bajrang Das, a Standing Baba, who never sits down, day and night.
He sleeps standing too, hanging over his swing. A metal chastity belt covers his genitals.
In his book, Shantaram, Gregory David Roberts describes a visit to a hashish den operated by a group of Standing Baba. He gives a vivid account of the extraordinary pain and disfigurement that he witnessed, observing that for the first five to ten years of practising this austerity the Standing Babas endured huge, bloated legs, often severely ulcerated, before the legs eventually wither away to just bone in the ensuing years. He speaks of terrible pain experienced with every downward pressure of the feet, causing them to sway constantly from one foot to another. In conclusion he says: "The faces of the Babas were radiant with their excruciation. Sooner or later, in the torment of endlessly ascending pain, every man of them assumed a luminous transcendent beatitude. Light, made from the agony they suffered, streamed from their eyes, and I've never known a human source more brilliant than their tortured smiles."
So, the next time you think you're suffering after 30 seconds in a standing posture, spare a thought for these guys!
Most of us, however, are not living the life of an ascetic or intending the observance of painful austeries. For us, tapas refers to a "burning effort under all circumstances to achieve a definite goal ..." (BKS Iyengar, Light on Yoga). We can of course think of this in terms of practising with determination and focus, striving to burn up impurities in the body and to achieve perfection in this posture or that. However, if you begin to think of tapas as simply exercising the dedication and commitment to: get on the yoga mat every day, without expectation of any particular result; or to sit for meditation every day, even when you don't feel like it; or simply to exercise the love and patience to remind your child for the umpteenth time not to run through the house with muddy boots on. "If you think of tapas in this vein, it becomes a more subtle but more constant practice, a practice concerned with the quality of life and relationships rather than focused on whether you can grit your teeth through another few seconds in a difficult asana." (Judith Lasater, Yoga Journal)
In his book, Meditations from the Mat, Rolf Gates offers a refelection on tapas that really resonates with me. As I could not possibly paraphrase this any better, I quote: "The word that most of us use to describe this energy is 'dedication'. This is not the dedication of steely self-control, it's the dedication of the human heart that yearns for beauty. It is our own capacity for love that underlies our ability to practice with burning zeal, year after year. Again and again students say they come to yoga to work on their flexibility, or to tone their abs, buns, and thighs, but that something else has kept them coming back. Something else has blossomed in their hearts. Yoga opens the door to the life that we have yearned to live. It is this yearning, this gladness, that carries us back onto our mats day after day. Tapas is our opportunity to witness the power of love in our everyday lives. As you approach your next practice, note the force that brings you to the mat. See if you can discern, under the clamor of desire and aversion, the still, pure voice that yearns for beauty."
I'm reposting this recipe, because I rather "red-facedly" have to admit to a bit of an oops in the original recipe. As I mentioned in a recent post, one of the real challenges I've discovered in writing this blog has been actually translating what I cook into an actual recipe that you can recreate. I am more used to "sloshing" and "dashing" rather than measuring ingredients carefully (one of the reasons I am not much of a baker), and very often it doesn't matter - but of course sometimes it does. So after a couple of people mentioned to me recently that they had made these fritters and found the batter to be very thick (just add a bit more milk I told them), I thought I should actually make them myself according to the recipe instructions I had given. Very embarrassed, big lesson learned, why did I not do this in the first place? Follow the instructions I did, and boy was that batter thick - now let me say that this should be quite a stiff batter, but not like that - so what was wrong. I had completely left out the inclusion of milk in the ingredients, and had rather overstated the amount of cornmeal. So please forgive me and read on ... both the recipe below and the printable copy of the recipe have now been amended. I have also added a couple of other notes at the end of the recipe that I think are helpful.
Sunday evening dinner in our house generally tends to fall into one of two categories.
Sometimes it's the day for a roast dinner - usually a free-range chicken with some seasonal vegetables.
More often though, Sunday is the day we go out for a leisurely brunch/lunch, followed by a drive around the Port Hills, and a gelato on the way home. On those occasions, something simple and uncomplicated is called for - maybe just poached eggs on toast (free-range eggs and great bread being absolute essentials for this), or a grilled cheese sandwich (need I say more, again, about the quality of ingredients here).
Also in this quick and easy category is my favourite Sunday stand-by - corn fritters. Actually I think of these as a great fall-back dish any time that I am short of time, energy or inspiration, which can happen pretty much any day of the week! Of course these are best made in the summer when fresh corn is available, but I seem to long for them more in the winter, and I don't hold back from using frozen corn when fresh is out of season. I have on occasion used tinned, but the corn seems to take on a slightly "metallic" taste that I don't particularly like; so, frozen is my preference if fresh is unavailable.
Over the years I've tried numerous recipes for these, tweaking them a bit here and there, and this is what I've ended up with. The starting point was Bill Granger's corn fritters from his book Sydney Food. Then I came across an adaptation of this recipe on The Wednesday Chef blog, and in keeping with that I too like to mix rice flour with the plain flour to lighten the batter up a little. I also replace the liquid with creme fraiche and add some cornmeal for an extra little bit of crunch, an idea borrowed from an Annabelle White recipe. Lastly, my secret confession - I add a tin of creamed corn - yes, really! Now let me just say that creamed corn truly gives me the shudders - I even cringe when I open the tin and smell it. But a good friend put me on to this one and, after trying it out, I had to admit it was surprisingly good. So now it has become an essential ingredient in my corn fritters.
So this is my recipe - a little bit Bill Granger, a little bit Wednesday Chef, a little bit Annabelle White, and a little bit Julia Selwyn.
Vegetarian (Makes approximately 8 large fritters or 12-16 smaller ones)
1/2 cup rice flour (refer Source Guide) 1/2 cup plain flour 1 teaspoon baking powder 1/4 teaspoon salt * 1 teaspoon ground coriander 1/2 teaspoon ground cumin 1/4 teaspoon paprika 1 tablespoon cornmeal 2 free-range eggs, lightly beaten 1/2 cup creme fraiche 1/2-3/4 cup milk * 2 cups corn kernels (if fresh, you will need about 3 cobs) (if frozen, thaw kernels before use) 410g can of creamed corn 1/4 cup chopped flat-leaf parsley vegetable oil for frying
* See notes below
Sift rice flour, plain flour, baking powder, salt, coriander, cumin and paprika into a large bowl. Add cornmeal and combine well.
Combine the eggs, creme fraiche, and milk in a separate bowl, then slowly pour the egg mixture into the dry ingredients, whisking as you go. Continue whisking until the batter is smooth.
Add the corn kernels, creamed corn, and parsley. Stir to combine.
Heat oil in a large frying pan over a medium heat, using enough oil to cover the bottom of the pan. When the oil is hot, drop spoonfuls of batter into the pan and cook until golden brown underneath (about 2 to 3 minutes). Turn over and cook the other side (again about 2 minutes). Remove and keep warm while you repeat with the remaining batter, using more oil to cook as necessary.
* Notes: The amount of milk you need here will depend a bit on the size of eggs you use (I like FRENZ brand free range eggs, and I buy their biggest super jumbo sized ones), and also on your corn - if you are using fresh or frozen corn you will need a bit more liquid than if you are using tinned. Buttermilk is particularly nice if you have it, or a tablespoon of lemon juice added with regular milk is a nice option. The amount of salt you need will also depend on the type of corn you are using - since most tinned corn already has salt in it, you might find you need a bit more if using fresh, frozen or tinned that has no added salt. I suggest that you cook just a teaspoon of batter first, then taste for seasoning and adjust as necessary before cooking the rest of your fritters.
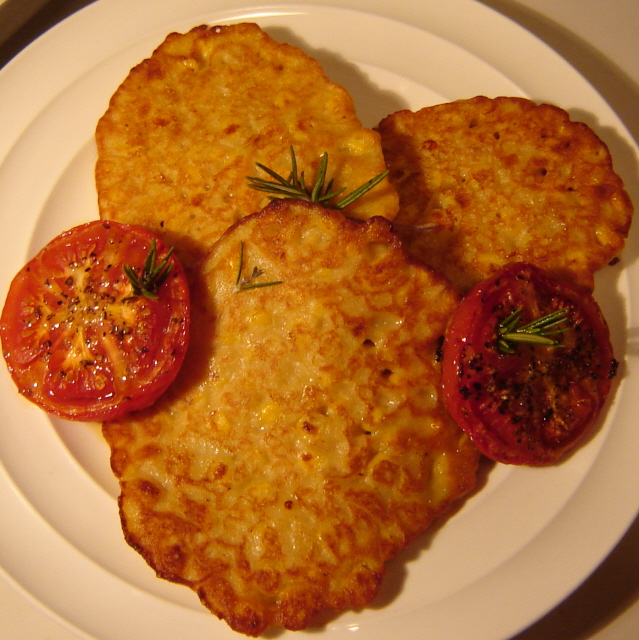
I like to serve these with sweet Thai chilli sauce and Maple Roasted Tomatoes (see below). My partner also likes some crispy bacon and a dollop of sour cream with his.
Maple Roasted Tomatoes Recipe
tomatoes maple syrup salt pepper
Slice tomatoes in half and place cut side up in a shallow baking dish which is just big enough to hold the tomatoes snuggly. Drizzle maple syrup over the top of the tomatoes and season generously with salt and freshly ground pepper. Bake in a slow oven for 45 minutes.
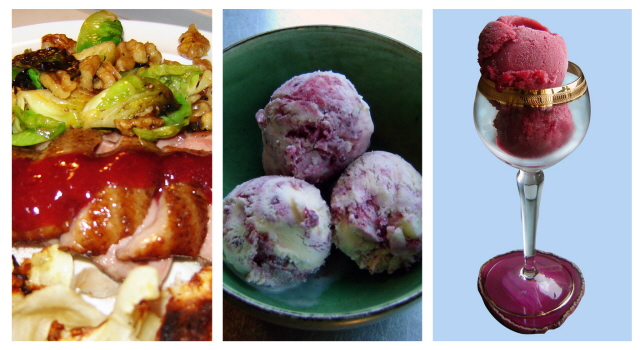
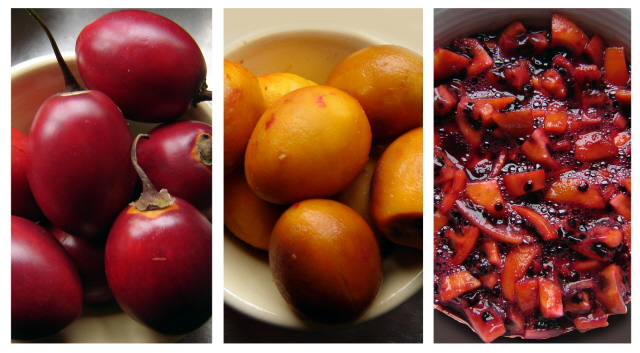
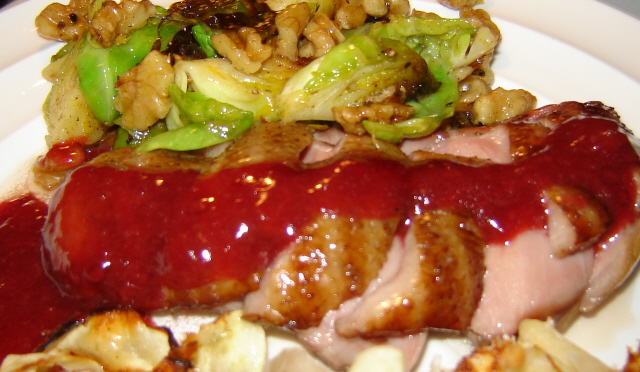
I mentioned a couple of weeks ago that I had been enjoying the abundance of fresh tamarillos right now, and experimenting in the kitchen with them. My brain is still whirring with all sorts of possibilities to trial, but if I waited until I had exhausted all of those before posting, tamarillo season would be over before you got to try any of them. So here are three recipes I have made, and loved every bite of – a Spicy Tamarillo Sauce with Smoked Duck Breast, a Tamarillo Sorbet, and a White Chocolate, Tamarillo & Rose Water Ice Cream. I hope you will try them and enjoy them too. I would also love to hear your comments if you have a favourite recipe using tamarillos.
For all of these recipes you need to begin by blanching, peeling and chopping the tamarillos. Make a small cut in the skin of each tamarillo, drop into a bowl of hot water for about 1 minute, then remove. The skin should now slide off easily – if not, return to the hot water for a minute more. Once peeled, you are ready to cut the tamarillos into small pieces - I cut each one into quarters, then each quarter into four slices.
Blanch and peel the tamarillos according to the earlier instructions. Slice the tamarillos and place in a small saucepan, along with the spices, sugar, maple syrup, and water. Bring up to the boil, then reduce to a simmer for about 10 minutes or until the fruit is soft. Cover and set aside to cool. Remove the spices, puree using an immersion blender or food processor, and reheat before serving. This can be made several hours or even a couple of days ahead of time.
Heat a skillet over high heat, really no oil required as a fair amount of fat will render out of the duck breast. Score the skin of the duck breasts, and once pan is hot, slide in the duck breasts, skin side down. Cook until the skin is crispy, and then turn over for a couple of minutes more. This will really not take much time at all – since the duck has already been smoked, you are not trying to cook it, simply to crisp up the skin and warm it through.
Serve sliced, with the warmed tamarillo sauce poured over the top.
I also served this with some sautéed brussel sprouts with walnuts, and crispy parmesan parsnips (cut parsnips into wafer thin slices, using a peeler, toss with egg white and parmesan cheese, spread out on a baking sheet, and cook in a hot oven until brown and crisp – about 10-15 minutes).
This sauce also works well with roast duck or venison.
White Chocolate, Tamarillo & Rose Water Ice Cream Recipe
Click here for a printable copy of the complete recipe
Vegetarian, gluten-free
Makes about 1.5 litres
This begins with a good vanilla ice cream base, which I adapted from David Lebovitz’s recipe for vanilla ice cream (you can find his original recipe here) - this is simplicity itself to make, and the end result is rich, creamy and fragrant. Of course, like all things simple, the end result is only as good as the quality of ingredients you use – so do use free range eggs, organic milk and cream if you can get it, and good, fresh vanilla beans (look for ones that are still pliable, not stiff and hard). A tamarillo rose water pulp and chunks of white chocolate are then swirled through the churned ice cream.
Recipe
100g good quality white chocolate, chopped
6 ripe tamarillos (preferably organic)
1½ tablespoons sugar
45ml hot water
1½ teaspoons rose water (refer Source Guide) (optional)
Blanch, peel and chop tamarillos according to earlier instructions. Put all of the chopped fruit into a non-metallic bowl and combine with the remaining ingredients. Cover bowl with cling film and set in the fridge to marinate for at least 24 hours. Don’t be concerned if it seems as though the rose water is very over-powering at this stage. It will completely mellow out by the time it has finished its marinating process, at which stage there will be almost no discernable flavour of the rose water. “Why bother then?” you may wonder. Well, somehow, even though you can’t detect the specific taste of rose water, it seems to really accentuate the floral, slightly perfumed notes of the tamarillos’ flavour.
1 teaspoon pure vanilla extract (refer Source Guide)
Combine milk, salt, and sugar in a small saucepan and gently heat. Split the vanilla bean lengthwise, scrape out the seeds, and add the seeds and pod to the milk as its heating. Remove pan from the heat, cover, and leave for about one hour to allow the flavour to infuse.
Next strain the cream into a 2 litre bowl, and then stand that bowl in an ice bath.
Lightly whisk the egg yolks in a separate bowl.
Reheat the milk, and then slowly pour the warmed milk into the egg yolks, whisking constantly.
Return the warmed egg yolks and milk to the saucepan. Then cook over a low heat, stirring constantly, until the custard is thick enough to coat the back of a spoon or spatula.
Strain the custard into the cream, which is standing over its water bath, and keep stirring until the custard is cool. Stir in the vanilla extract, and return the vanilla bean (which was strained out earlier) to the custard.
Completely cover the surface of the custard with a layer of cling fling, and then refrigerate for at least 8 hours, or preferably overnight.
Remove the vanilla bean from the chilled custard, and then churn in your ice cream maker according to the manufacturer's instructions.
While the custard is churning – give the cold, marinated tamarillos a quick blitz with an immersion blender or food processor. I gave this really just a couple of seconds as I wanted to keep plenty of texture rather than ending up with a puree.
Once the ice cream has finished churning, remove from machine. Fold in the white chocolate, and then swirl the tamarillo mixture through the ice cream to get a “ripple” effect. Serve immediately or freeze about 4 hours to firm up a bit more.
This recipe begins with a tamarillo rose water pulp, just as in the ice cream recipe. The resulting sorbet is deliciously tart and refreshing, and the colour is such a glorious shade of pink it would bring even Nigella to her knees – the photo doesn’t quite do it justice I feel.
Blanch, peel and chop tamarillos according to earlier instructions. Put all of the chopped fruit into a non-metallic bowl and combine with the remaining puree ingredients. Cover bowl with cling film and set in the fridge to marinate for at least 24 hours. Note, earlier comments with regard to rose water.
Once fruit has marinated, puree using a food processor or immersion blender, and then strain to remove the seeds.
For the sorbet, place the water and sugar in a small saucepan over medium heat until sugar has completely dissolved. Combine with the pureed fruit, and then chill for at least 8 hours, preferably overnight.
Pour into ice cream maker and churn according to manufacturers instructions. If you don’t have an ice cream maker, freeze until firm about 4 hours. Remove from freezer and beat using food processor or blender, and then return to freezer. Repeat once more.
You can find more information and suggestions for using tamarillos here.

 Begin the salad by shredding the daikon and carrot into long, fine strands - I use one of those wide blade peelers that has a shredder on the opposite side (you can see it in the picture). If you don't have a suitable shredder or tool for doing this, cut into the longest, finest juliennes that you can manage. Then put the daikon and carrot strands into a bowl of cold water and ice, and refrigerate for at least an hour until crisp.
 Heat a griddle pan until smoking. Toss the asparagus spears with a little of the oil and salt, and cook on the griddle for a few minutes until lightly charred. Remove from heat and cut spears in half. Similarly now toss the bean sprouts in a little oil and salt and add to the griddle. Give them a couple of minutes, turning them occasionally, then add the spinach. Almost immediately after adding the spinach turn off the heat. The spinach will begin to wilt in the residual heat, and once it has just wilted remove.
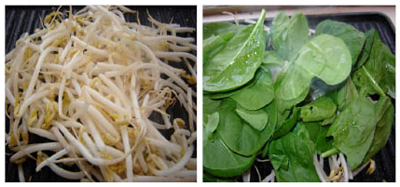 Add the asparagus, bean sprouts and spinach to the rest of the salad. Toss lightly to combine, and sprinkle chopped coriander over the top.
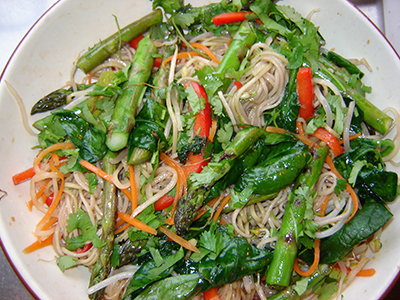


