Saturday, February 25, 2012

Panzanella & Cookbook Sundays # 12


Panzanella

Those of you who have been visiting here for a while, know that I regularly cook along with my friends at I Heart Cooking Clubs, and that for the last five months we have been cooking the food of the lovely Tessa Kiros.  As we choose a different chef to inspire us every six months, we only have one more month to spend with Tessa.  I have been loving delving into her books, and would love to add more of them to my collection;  sadly, budget constraints means an embargo on cookbook buying right now.  Nevertheless, without buying another book I still have more recipes bookmarked in my existing collection than I will be able to cook in the remaining month.  I could happily spend another six months with Tessa.

Anyways, our theme this week is "Lighten Up!"  All my friends in the northern hemisphere, approaching the tail end of a long winter of carb-loading and casseroles, are getting in the mood for spring and some lighter fare.  Being at the fag end of summer, as we are here in the southern hemisphere, we have salad produce not just in abundance, but at their very best, so this week's theme was right up my alley (which is not always the case).

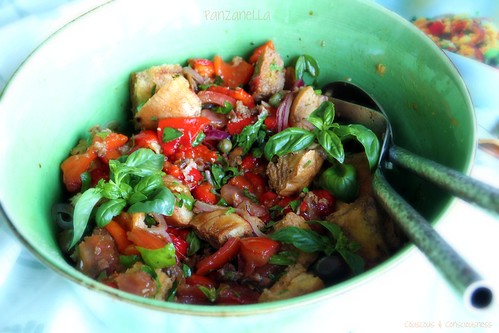
With tomatoes and peppers in great supply right now, and reasonably priced to boot, I decided to go with an adaptation of Tessa's Panzanella from her book Twelve: A Tuscan Cook Book, and as this is a book I haven't used before this will also be my contribution this week to Cookbook Sundays.  If you've been delving into your cookbooks lately, I'd love you to share your post with me and my friends who are trying to get those cookbooks down off the bookshelves and onto the kitchen bench.  Keep reading for full details on how to participate.

Twelve: A Tuscan Cook Book

As I so often do, I used Tessa's recipe as inspiration, but made a few tweeks and changes to make it my own.  Now, there are probably panzanella rules, with a strict list of ingredients that are allowed to be included, and I have most likely broken every panzanella rule known to the Tuscan housewife.  Maybe Alessandra can help me out here.  Alessandra is Italian, and is also a fellow Kiwi blogger, and she is the one who calls us on it and keeps us honest when we take liberties with traditional Italian fare - we learn a lot from her and I, for one, am always grateful for her advice - so maybe she can tell me a thing or two about panzanella.  Perhaps to play it safe I will call my version a panzanella-inspired salad.

This is a rustic salad, the basic premise of which is to use up stale, leftover bread - I love dishes which come about in this way.  The bread is soaked to soften it, then it is crumbled through the salad.  In Tessa's recipe she begins by cutting up tomatoes, putting them in a colander, sprinkling with salt, and standing for a while to allow the juice to drain away.  She then goes on to soak the bread in water.  Why, I thought, soak bread in water when you are draining off all that beautiful, flavourful juice from the tomatoes.  "Two birds, one stone" - I drained my tomatoes in a colander set over a bowl containing the bread cubes.  Tessa includes celery in her recipe which I omitted, and I added in a few extras - roasted red peppers (wish I'd used yellow actually, just because the colour contrast would have looked prettier), garlic, capers and black olives.  I'm sure there are plenty of other things you could put in this, though I would say that bread, tomatoes and basil are the critical ingredients and most importantly, do not even contemplate making this with anything less than tomatoes picked at the height of the season - out of season, hothouse tomatoes will absolutely not do for this.

Panzanella Recipe
Inspired by a recipe by Tessa Kiros
Serves 6
Vegetarian

Note:  Quantities are not critical here - simply use this recipe as a guide and adjust quantities and ingredients to suit what you have on hand


day-old bread - I used 2/3 of a loaf of ciabatta bread
perfectly ripe tomatoes - I used 4 large tomatoes
red or yellow peppers - I used 3 red peppers
1/2 red onion, finely sliced
white wine vinegar
salt
clove of garlic, finely chopped
capers - a small handful
black olives - a large handful
flat-leaf parsley - generous handful, roughly chopped
basil leaves - generous handful, roughly torn
extra virgin olive oil
balsamic vinegar
flaky sea salt
freshly ground black pepper

Preheat the oven to 180 degrees C (350 degrees F).  Place peppers in a shallow baking dish, and roast in the preheated oven, turning from time to time, until the skin has blackened in places on all sides, and the peppers are slightly soft.  Remove from the oven and put the peppers into a plastic bag.  Set aside for about 10 minutes to sweat - this will enable the skins to slide off easily.  When cool enough to handle, peel the skins off the peppers and discard, at the same time removing and discarding the seeds and core.  Tear or chop the flesh of the peppers up into largish pieces and set aside.

Cut the bread into largish cubes and put into a large bowl.

Set a strainer over the bowl, cut the tomatoes into quarters and scoop the seeds out into the strainer.  Using the back of a spoon, press as much juice as you can through the strainer and toss the bread well in the juice.  Discard the seeds from the strainer, set the strainer back over the bowl, and put the tomato quarters into the strainer.  Sprinkle with a little flaky sea salt, to draw out a little more juice, and allowing it to drain into the bread.  Leave to stand for about 10 minutes.

Put the onion slices into a small bowl, cover with cold water, sprinkle with a little salt and add a splash of white wine vinegar.  Leave to stand for 10 minutes.

Remove the tomato quarters from the strainer, tear or roughly chop into pieces and add to the bread in the bowl.  Add the chopped garlic, peppers and drained onions, along with the capers, olives, and chopped and torn herbs.  Drizzle liberally with the extra virgin olive oil and balsamic vinegar, and season with flaky sea salt and freshly ground black pepper.

Toss well, taste and adjust seasonings as necessary, and serve. 

If you would like to get to know Tessa a little better, then do go and visit my friends at I Heart Cooking Clubs and see what they've all cooked up ...

IHCC Tessa Kiros Button

... or check out Falling Cloudberries and many of Tessa's other great titles available from Amazon or Fishpond NZ.


Now read on to learn more about Cookbook Sundays.

Cookbook Sundays Badge 

If you're anything like me you have dozens of cookbooks gathering dust on your bookshelves, some of which have never even been cooked from.  Sure I spent hours browsing through them when I first bought them, marking all the recipes I was going to make with little post-it notes, and yet still those books languish in the bookcase and never make it to the kitchen.  There are others from which I have made but one recipe which was such a resounding success that I've made it over and over again, and yet somehow I've never made anything else from that book.  Sound a bit familiar?!

Take comfort - you are not alone, and now Cookbook Sundays is your opportunity to change that.  Every Sunday I'm going to share with you a recipe that I haven't made before from one of my ever expanding collection of cookbooks.  And, because I know that if you have read this far then you are guilty of this too, I'm inviting you to join in with me.  Each week my Cookbook Sundays post will have a linky for you to share something you've cooked from one of your cookbooks.

The rules for joining in are simple:
  1. Your post must state the author and the title of the book your recipe has come from.
  2. Your post must mention Cookbook Sundays and link back to this post.  Including the Cookbook Sundays badge is optional, but always appreciated.
  3. You may submit as many entries as you like, and you may use the same cookbook as many times as you like.  Old posts are also welcome.
  4. Lastly,  remember that what goes around, comes around - one of the reasons you are participating in this is because you want people to read your posts, so do the right thing and go and visit a few of the other participants - you can even "Like" your favourites. 
Now, go and dust off those cookbooks and get cooking!  Use the linky tool at the end of this post to submit your entry/entries - simply scroll down to where it says "You are next ... Click here to enter", and then follow the instructions.  The linky will be open for one week.

Lastly, if you would like to use the Cookbook Sundays badge in your post, simply copy the code in the box beside the badge below and paste it into your post.  Feel free to also use it in your sidebar if you wish.

CookbookSundays

Saturday, February 18, 2012

Clafoutis Provencal & Cookbook Sundays # 11

Clafoutis Provencal 1

My goodness where did the last week go to?  It seems to have vanished in a flash, and here we are at Saturday evening again and time for another Cookbook Sundays.  If you've been delving into your cookbooks lately, I'd love you to share your post with me and my friends who are trying to get those cookbooks down off the bookshelves and onto the kitchen bench.  Keep reading for full details on how to participate.

In the meantime ... what did I conjure up from my cookbooks this week?  In actual fact my recipe this week comes from "The French Women Don't Get Fat Cookbook".  This book is not in my collection, and is probably not the kind of book that I would buy.  But I was at the library the other day, and it was out on display.  Don't really know what made me pick it up, but the book immediately fell open at this recipe and I knew that I just had to make it.

The French Women Don't Get Fat Cookbook

Now, one glimpse at my photos, and you won't need me to tell you that this dish is not going to win any beauty contests.  It's brown food, people, and not even Lord Lichfield could have made this look good.  Still, for all its wallflower looks, this dish delivers on flavour.

In the introduction to this recipe, the author says, "Clafoutis usually refers to a dessert preparation, but in Provence it can be a savory yet still rich dish with cheese, eggs, and bread."  The sweetness of peppers in this dish, with the pungency of garlic, the salty brininess of black olives, the earthy herbaceousness (probably not a real word, but you know what I mean) of basil, and the nutty, tangy Parmesan makes a great combination.  If I had a disappointment in this dish it was probably the aubergine.  Now I love aubergine - it's one of my favourite vegetables - but in this dish it somehow didn't shine and didn't do anything to enhance the dish.  I would definitely make this dish again, but I think I would use red peppers instead of yellow - I think red have just a bit more sweetness and more flavour, also the bright colour I think would look a bit more appealing.  Other changes I would make ... I think some slow roasted tomatoes would be great in here, for both colour and flavour, and I feel inclined to swap the aubergines out for some courgette - again I think the colour and flavour would be better here.  But, hey, really you could put just about anything in here.  You could even take this in a totally different direction using some Italian sausage or chorizo, with sweet potato or pumpkin, some spinach and blue cheese ... mmmmm, think I just might have to try that.

A funny thing ...  The recipe stated that it would serve 4 and I have to say that when I got it out of the oven, my first thought was "Well that's obviously why French women don't get fat - this would barely feed two".  I was wrong - I served this as a main meal with a light green salad, and it would easily give 3-4 servings.  I think this dish would really shine served for a late summer lunch, followed by a long siesta.

Clafoutis Provencal 2

Clafoutis Provencal Recipe
Adapted from recipe by Mireille Guiliano from
Serves 3 to 4
Vegetarian
Click here for a printable copy of this recipe

2-3 tablespoons olive oil
1x medium aubergine, cut into 1 cm (1/2 in) dice
1x yellow pepper, deseeded & cut into 1 cm (1/2 in) dice
flaky sea salt & freshly ground black pepper

1x slice of bread, crusts removed
2x garlic cloves, peeled
1 cup ricotta
3x large free-range eggs
2 tablespoons fresh basil, roughly chopped
1/2 cup black olives, stones removed and halved
3/4 cup freshly grated Parmesan

fresh basil to garnish

Preheat your oven to 180 degrees C (350 degrees F).

Grease a 20 cm (8 in) square baking dish with butter and set aside.

Heat the olive oil in pan set over medium heat, and saute the yellow pepper and aubergine until softened and just starting to caramelise.  Season with flaky sea salt and freshly ground black pepper.  Set aside to cool.

Put bread, garlic, eggs and ricotta into a food processor, and process until smooth.  Remove to a bowl;  add the basil, olives, Parmesan, and the cooled aubergine and pepper mixture;  season with more flaky sea salt and black pepper;  and mix everything together gently.

Pour the mixture into the prepared baking dish and put into the hot oven.  Bake for 30-35 minutes until lightly golden on top.  Take care not to overcook.

Remove from the oven and serve warm, garnished with extra basil.  A crisp green salad makes a good accompaniment.

Now read on to learn more about Cookbook Sundays.

Cookbook Sundays Badge 

If you're anything like me you have dozens of cookbooks gathering dust on your bookshelves, some of which have never even been cooked from.  Sure I spent hours browsing through them when I first bought them, marking all the recipes I was going to make with little post-it notes, and yet still those books languish in the bookcase and never make it to the kitchen.  There are others from which I have made but one recipe which was such a resounding success that I've made it over and over again, and yet somehow I've never made anything else from that book.  Sound a bit familiar?!

Take comfort - you are not alone, and now Cookbook Sundays is your opportunity to change that.  Every Sunday I'm going to share with you a recipe that I haven't made before from one of my ever expanding collection of cookbooks.  And, because I know that if you have read this far then you are guilty of this too, I'm inviting you to join in with me.  Each week my Cookbook Sundays post will have a linky for you to share something you've cooked from one of your cookbooks.

The rules for joining in are simple:
  1. Your post must state the author and the title of the book your recipe has come from.
  2. Your post must mention Cookbook Sundays and link back to this post.  Including the Cookbook Sundays badge is optional, but always appreciated.
  3. You may submit as many entries as you like, and you may use the same cookbook as many times as you like.  Old posts are also welcome.
  4. Lastly,  remember that what goes around, comes around - one of the reasons you are participating in this is because you want people to read your posts, so do the right thing and go and visit a few of the other participants - you can even "Like" your favourites. 
Now, go and dust off those cookbooks and get cooking!  Use the linky tool at the end of this post to submit your entry/entries - simply scroll down to where it says "You are next ... Click here to enter", and then follow the instructions.  The linky will be open for one week.

Lastly, if you would like to use the Cookbook Sundays badge in your post, simply copy the code in the box beside the badge below and paste it into your post.  Feel free to also use it in your sidebar if you wish.

CookbookSundays

Friday, February 17, 2012

Nectarine & Plum Sponge Cake

Nectarine & Plum Sponge Cake 1

I'm sure you all recognise this scenario.  Trays of beautiful stone fruit at the supermarket, luring you beguilingly with their rosy-tinged skins.  Overwhelmed with desire for these seductive beauties, you fill a bag and scurry home in anticipation of that first tangy bite, which you take standing at the kitchen sink to catch all the juices that will be running down your chin and your arms.  You raise that delicate orb to your lips, close your eyes and sink in your teeth, and .... blech ... your eyes spring open with the disappointment of floury, flabby flesh, tough skin, and complete absence of any flavour.  I don't know why I keep buying stone fruit, as I am so often deeply disappointed.  I know that in reality the only way to experience a beautiful peach is picked straight from the tree at perfect ripeness, but still somehow I live in hope and am lured in time and again.  This summer, the fruit seems to have been even more disappointing than usual.

Fortunately, such disappointing fruit can be redeemed by cooking it.  I have made big batches of fruit roasted in the oven with a liberal sprinkling of vanilla sugar and a good dousing of my "44" - this makes a great dessert served with good vanilla ice cream or mascarpone, or is also beautiful for breakfast with some Greek style yoghurt and a sprinkling of nuts.  I've made crumbles and cakes.  Even adding a few bright, zingy flavours like chilli, lime and coriander to make a salsa can offer some vague redemption for otherwise lack-lustre fruit.

This week I made a Nectarine & Plum Sponge Cake to salvage some less than perfect fruit taking up real estate in my fruit bowl.  The recipe comes from Julie Biuso's book Sweet Feast.  This is Julie's latest book, and is a selection of her favourite dessert recipes.  This is the fourth book by Julie Biuso that I've now added to my cookbook collection, and like all the others this one does not disappoint.  Everything is beautifully photographed, and the recipes are clear, easy to follow, and, most importantly, reliable.  The book is divided into sections - cakes and sponges, tarts and pies, special occasions, comfort, chocolate, and festive - and at the end of each section is a really useful "cooking class" offering technical advice and hints.

Sweet Feast

This recipe comes from the cakes and sponges section of the book, and although the original recipe was for little individual nectarine sponge cakes, I chose to incorporate some plums as well and made one large cake instead of individual ones.

Nectarine & Plum Sponge Cake 2

Nectarine & Plum Sponge Cake
Adapted from recipe by Julie Biuso
Serves 8-10
Click here for a printable copy of this recipe

200g (7 oz) standard flour
3 teaspoons baking powder

2x large nectarines
2 or 3 plums

2 tablespoons caster sugar
1-1/2 teaspoons ground cinnamon

2 large free-range eggs, room temperature
225g (8 oz) caster sugar
125g (4-1/2 oz) butter
170ml (3/4 cup) milk

icing sugar for dusting

Preheat your oven to 200 degrees C (390 degrees F), regular bake.

Grease and line the base and sides of a 23cm loose-bottomed or springform cake tin.

Sift the flour and baking powder together and set aside.

Remove the stones from the fruit and cut the flesh into slices.  Set aside.

In a small bowl, mix the 2 tablespoons of caster sugar and cinnamon together, to make a spice sugar.  Set aside.

Put the butter and milk into a small saucepan, heating gently until the butter has melted.

Meanwhile, break the eggs into a bowl and, using an electric mixer, beat for about 1 minute, then continue to beat constantly as you add the caster sugar one tablespoon at a time.  Keep beating, until the mixture is very pale and thick - the mixture will form ribbons when you lift the beaters from the mixture, and it will have almost a mousse-like quality.

Sift half the flour and baking powder mixture over the egg mixture and gently fold in with a large metal spoon.  Add the rest of the flour mixture and fold in.  The mixture will be quite thick.

Bring the milk and butter up to a quick boil and pour it, still bubbling, over the cake batter, stirring continuously.  Mix until fairly smooth, but don't worry about any small lumps.

Pour the batter into the prepared cake tin.  Arrange the sliced fruit over the top of the batter, and sprinkle with the spiced sugar.

Bake for 30-35 minutes until golden on top and a skewer inserted into the centre of the cake comes out clean.  Cool in the tin on a wire rack for 10 minutes, before removing from the tin and allowing to cool completely on the rack.

Dust with icing sugar and serve with yoghurt or mascarpone.

I loved this cake - it was deliciously moist, and I love the fruity tanginess when you bite into a piece of the nectarine or plum.  This is a good sized cake, which makes it ideal for serving a crowd - it offers 8 generous servings, and could probably easily stretch to 10 or 12 if serving as part of a larger meal.  It kept well for several days, and I actually thought it was better on day 2 than the day it was made.  It was great for breakfast too.  What? ... toast and jam/cake and fruit ... same/same, no different, as far as I'm concerned.  End of story.

I hope you'll give this a cake a try - I'm sharing it this week at Cookbook Sundays, where my friends are delving into their cookbook collections and sharing some of their recipes.  Do stop by to see what they're cooking - you might even feel inspired to link up a recipe from one of your own cookbooks.

CookbookSundays

I am also sharing this post with Sweet New Zealand, a monthly blog event created by the very lovely Alessandra Zecchini, and which this month is hosted by the equally lovely and incredibly talented Shirleen at Sugar & Spice and All Things Nice. This is an opportunity for all Kiwi bloggers (whether you are living in New Zealand or overseas), as well as for non-Kiwi bloggers living in New Zealand, to connect and share some of those sweet treats from your kitchen.  So, head on over to Shirleen's and share something sweet.
Sweet New Zealand Badge                 Gallery of Favorites

I'm also sharing this post at Foodie Fridays hosted by Designs by Gollum, and at Gallery of Favourites hosted by April at The 21st Century Housewife.

Sunday, February 12, 2012

Fried Zucchini, Pea & Quinoa Salad for Cookbook Sundays

Fried Zucchini, Pea & Quinoa Salad 2

What do you do when life gives you zucchini?  Anyone who has ever grown a zucchini or courgette plant knows just how prolifically these things can produce.  I have just one plant in my garden, and I'm picking two to three of these wee babies every day.

Zucchini

The joy of growing them oneself is being able to pick them when they are little bigger than your index finger, often with the flower still attached.  This, in my view, is when they are at their absolute best - the skin is glossy and crisp, and the flesh delicate and creamy.  I've sliced them thinly with a mandoline and eaten them raw in all manner of salads.  I've grilled them.  I've grated them and turned them into Kolokithokeftedes - the courgette fritters, spiked with mint and dill, and served with garlicky tzatziki that I enjoyed so often on my Greek island holidays.  I've used them, shredded, in a raw pasta sauce with fresh tomatoes, garlic and basil - one of my favourite ways to enjoy pasta in the summer.  I've stuffed the flowers and served them with a cherry tomato dressing - one of my favourite Mario Batali recipes which I promise to share with you shortly.  And, I've enjoyed both the flesh and the flowers in a delicate frittata, made for me by the lovely Sasasunakku when she came to stay - I hope she comes again.  (Digressing slightly, trust me when I tell you that Sasa is one of the best house guests I've ever had.  So if she ever suggests coming to visit you in your corner of the world, open the door as wide as you can - you won't be disappointed.)

The recipe I want to share with you today was inspired by a Pasta and Fried Zucchini Salad from one of my favourite cookbooks - Plenty by Yotam Ottolenghi.

Plenty

The original recipe combined fried zucchini with edamame, pasta and buffalo mozzarella.  However, lacking both edamame and buffalo mozzarella, and not wanting to venture out to the supermarket, I used some frozen peas and feta - both of which I had on hand.  I also swapped the pasta out for some quinoa, since I was in the mood for something a little lighter.  I cook quinoa up in big batches, and then store it in smaller quantities, in snaplock bags, in the freezer - it thaws pretty quickly, and is great to have on hand for a quick meal.  I do this too with things like cooked chickpeas, beans and rice.

Fried Zucchini, Pea & Quinoa Salad 1

Fried Zucchini, Pea & Quinoa Salad
Adapted from recipe by Yotam Ottolenghi
from Plenty
Serves 2
Vegetarian
Click here for a printable copy of this recipe

2-3 tablespoons olive oil
4 small (or 2 medium zucchini), cut into .5cm (1/4 inch) thick slices
1 tablespoon red wine vinegar
1/2 cup frozen peas
1-1/4 cups fresh basil leaves, coarsely chopped
1/4 cup olive oil
flaky sea salt
freshly ground black pepper
1-1/2 cups cooked quinoa
grated zest of 1 lemon
1 tablespoon capers
100g (3-1/2 oz) feta, crumbled

Bring a small pot of water to a boil.  Salt the water liberally, add the peas and blanch for just a couple of minutes.  Drain, refresh in cold water, drain again and set aside to dry.

Meanwhile, heat 2-3 tablespoons olive oil in saute pan over medium-high heat.  Fry the zucchini slices until golden brown on both sides - take care not to overcrowd them, so cook in batches if necessary.  Once cooked remove from pan and drain in a colander.  Put the drained zucchini into a small bowl, add the red wine vinegar, stir, and set aside.

In a food processor, blitz up half the basil with the olive oil, salt and pepper, until you have a smooth sauce.

Put the cooked quinoa into a serving bowl.  Add the zucchini and their juices, the peas, lemon zest, capers, basil sauce and feta.  Toss everything together gently, taste and add more salt and pepper as necessary.  Stir through the rest of the basil and serve.

I served this with some roasted shrimp on the side.  My favourite new way to prepare shrimp or prawns - toss the shrimp with olive oil, minced garlic, salt, pepper and smoky paprika;  spread in a single layer in an ovenproof dish;  bake in a preheated 180 degree C (350 degree F) for about 8 minutes, until the shrimp are pink and firm to the touch.

I hope you'll give this salad a try - the quinoa is healthy, nutritious, and has a lovely nutty flavour which marries well with the fried zucchini and feta.  A glass of pinot gris on the side and you have the perfect summer meal.

CookbookSundays

This dish is my contribution this week to Cookbook Sundays, where my friends are delving into their cookbook collections and sharing some of their recipes.  Do stop by to see what they're cooking - you might even feel inspired to link up a recipe from one of your own cookbooks.


SouperSundays

Saturday, February 11, 2012

Cookbook Sundays # 10


Cookbook Sundays Badge 

If you're anything like me you have dozens of cookbooks gathering dust on your bookshelves, some of which have never even been cooked from.  Sure I spent hours browsing through them when I first bought them, marking all the recipes I was going to make with little post-it notes, and yet still those books languish in the bookcase and never make it to the kitchen.  There are others from which I have made but one recipe which was such a resounding success that I've made it over and over again, and yet somehow I've never made anything else from that book.  Sound a bit familiar?!

Take comfort - you are not alone, and now Cookbook Sundays is your opportunity to change that.  Every Sunday I'm going to share with you a recipe that I haven't made before from one of my ever expanding collection of cookbooks.  And, because I know that if you have read this far then you are guilty of this too, I'm inviting you to join in with me.  Each week my Cookbook Sundays post will have a linky for you to share something you've cooked from one of your cookbooks.

The rules for joining in are simple:
  1. Your post must state the author and the title of the book your recipe has come from.
  2. Your post must mention Cookbook Sundays and link back to this post.  Including the Cookbook Sundays badge is optional, but always appreciated.
  3. You may submit as many entries as you like, and you may use the same cookbook as many times as you like.  Old posts are also welcome.
  4. Lastly,  remember that what goes around, comes around - one of the reasons you are participating in this is because you want people to read your posts, so do the right thing and go and visit a few of the other participants - you can even "Like" your favourites. 
Now, go and dust off those cookbooks and get cooking!  Use the linky tool at the end of this post to submit your entry/entries - simply scroll down to where it says "You are next ... Click here to enter", and then follow the instructions.  The linky will be open for one week.

Lastly, if you would like to use the Cookbook Sundays badge in your post, simply copy the code in the box beside the badge below and paste it into your post.  Feel free to also use it in your sidebar if you wish.

CookbookSundays

Tuesday, February 7, 2012

Roasted Red Pepper Soup with Olives, Lemon & Yoghurt

Roasted Red Pepper Soup 1

If you've been visiting here for a while, then you know that I'm not much of a soupy person - now and again is fine, but not something I go in for on a regular basis.  However, this recipe for red pepper soup was one of the first things I bookmarked when I bought Tessa Kiros' book, Falling Cloudberries.

Falling Cloudberries: A World of Family Recipes

I was so captivated by the incredible colour, I longed for this soup every time I opened the book - have you noticed the way some books just seem to fall open at a certain page nearly every time you open it?  Anyway, now that peppers are in plentiful supply (and you don't need a mortgage to buy them), the time seemed right to give this a try.

It's also our Pot Luck week at I Heart Cooking Clubs, and soup seems like a good dish to bring for a Pot Luck.  That actually got me thinking - you can see from the picture that this is finished off with a dollop of yoghurt, some chopped black olives, fresh basil, and some freshly grated lemon zest.  A couple of years ago, I did a cooking class in Barcelona at which we made a chilled tomato soup.  We also made a walnut and basil pesto which accompanied the soup.  The soup was then presented in small shot glasses, with a wee dollop of the pesto on top, and finished off with some freshly grated Idiazabal cheese (a Spanish sheep milk cheese - I've never come across it here, but it tastes rather like a smokey pecorino).  Anyway, as I say, that got me thinking that if you were serving this soup for a crowd or as part of a multi-course meal, I think it would be lovely served in some small glasses (or interesting cups) with the toppings delicately arranged on top.  Tessa suggests other possible toppings - rosemary, cream, a drizzle of chilli oil or truffle oil, maybe even a couple of grilled prawns.  I think also a dollop of creme fraiche or mascarpone could be a nice alternative to the yoghurt.  This could also be nice for a gathering served in small glasses, with all the toppings set out on the table in individual dishes for your guests to "dress" their soup according to their tastes.

Whatever ... no matter how you serve this soup you're going to love it.  The colour is sublime, the texture thick and velvety, and the flavour bold and robust.  I hope you will try it.

I did make a few minor adjustments to the recipe.  Firstly, Tessa suggests cutting the peppers in half and then grilling them - I chose to leave the peppers whole and roasted them.  This enabled me to retain a lot of the juice which comes out of the peppers, and which juice I then substituted for some of the liquid in the recipe.  Secondly, the recipe calls for four ripe tomatoes or a tin of tomatoes - I happened to have a couple of tomatoes sitting round in my fruit bowl so I used those as well as the tin of tomatoes.  Also, having all the juice that came out of the peppers, plus the extra tomatoes, and being a little bit suspicious of the quantity of water asked for (especially after last week's chicken curry), I cut the water back quite a bit, and found the amount of water I used was just perfect.

Roasted Red Pepper Soup 2

Roasted Red Pepper Soup with Olives, Lemon & Yoghurt
Adapted from recipe by Tessa Kiros
Serves 4
Vegetarian
Click here for a printable copy of this recipe

4x red peppers
2 tablespoons olive oil
2x garlic cloves, finely sliced
2x shallots, finely sliced
2x ripe tomatoes
400g (14 oz) tin tomatoes
flaky sea salt & freshly ground black pepper

To serve:
plain Greek-style yoghurt
black olives, remove pits and finely chop
freshly grated lemon zest
fresh basil leaves, finely shredded
extra virgin olive oil

Preheat the oven to 180 degrees C (350 degrees F).  Place peppers in a shallow baking dish, and roast in the preheated oven, turning from time to time, until the skin has blackened in places on all sides, and the peppers are slightly soft.  Remove from the oven and put the peppers into a plastic bag.  Set aside for about 10 minutes to sweat - this will enable the skins to slide off easily.  When cool enough to handle, peel the skins off the peppers and discard, at the same time removing and discarding the seeds and core.  Work over a bowl so that you catch all the juice that comes out of the peppers.  Tear the flesh of the peppers up into largish pieces and set aside.

Using the large holes of a box grater, grate the flesh of the fresh tomatoes, then discard the skin - much easier than peeling and chopping.  Roughly chop the tinned tomatoes (tip - in my experience, it is always better to buy tinned whole tomatoes and chop them, than buying tinned chopped tomatoes).

Heat the olive oil in a large pan, over moderate heat.  Add the garlic and shallots, and saute for a couple of minutes until the shallots have softened and the garlic is fragrant.  Add both the grated fresh tomatoes and the tinned tomatoes, and cook until it begins to bubble.  Add the chunks of roasted peppers and all the juice that came from the peppers (straining the juice as you do so if there are any errant seeds you want to get rid of).   Season liberally with flaky sea salt and pepper.  Fill the empty tomato tin with warm water, swirl it around a little to loosen any tomato juice that might be clinging to the sides of the tin, and then pour into the soup pan.  Bring up to the boil, then reduce the heat, cover the pan, and simmer for about 30 minutes.

Remove pan from the heat and puree the soup (a stick blender is ideal here if you have one).  The soup should be quite thick, but just add a little more water if it seems too thick.  Alternatively, if it's not thick enough, return to the heat and simmer uncovered for a little while longer.

Check and adjust the seasoning, then serve topped with a dollop of yoghurt and sprinkled with chopped black olives, lemon zest, and basil.  Finish if desired with a drizzle of extra virgin olive oil or infused oil of your choice.

CookbookSundays

This dish is my contribution this week to Cookbook Sundays, where my friends are delving into their cookbook collections and sharing some of their recipes.  Do stop by to see what they're cooking - you might even feel inspired to link up a recipe from one of your own cookbooks.

I'm also sharing this dish at this week's Pot Luck for Tessa Kiros.  If you would like to get to know Tessa a little better, then do go and visit my friends at I Heart Cooking Clubs and see what they've all cooked up ...

IHCC Tessa Kiros Button

... or check out Falling Cloudberries and many of Tessa's other great titles available from Amazon or Fishpond NZ.


SouperSundays     


Saturday, February 4, 2012

Cookbook Sundays # 9


Cookbook Sundays Badge 

If you're anything like me you have dozens of cookbooks gathering dust on your bookshelves, some of which have never even been cooked from.  Sure I spent hours browsing through them when I first bought them, marking all the recipes I was going to make with little post-it notes, and yet still those books languish in the bookcase and never make it to the kitchen.  There are others from which I have made but one recipe which was such a resounding success that I've made it over and over again, and yet somehow I've never made anything else from that book.  Sound a bit familiar?!

Take comfort - you are not alone, and now Cookbook Sundays is your opportunity to change that.  Every Sunday I'm going to share with you a recipe that I haven't made before from one of my ever expanding collection of cookbooks.  And, because I know that if you have read this far then you are guilty of this too, I'm inviting you to join in with me.  Each week my Cookbook Sundays post will have a linky for you to share something you've cooked from one of your cookbooks.

The rules for joining in are simple:
  1. Your post must state the author and the title of the book your recipe has come from.
  2. Your post must mention Cookbook Sundays and link back to this post.  Including the Cookbook Sundays badge is optional, but always appreciated.
  3. You may submit as many entries as you like, and you may use the same cookbook as many times as you like.  Old posts are also welcome.
  4. Lastly,  remember that what goes around, comes around - one of the reasons you are participating in this is because you want people to read your posts, so do the right thing and go and visit a few of the other participants - you can even "Like" your favourites. 
Now, go and dust off those cookbooks and get cooking!  Use the linky tool at the end of this post to submit your entry/entries - simply scroll down to where it says "You are next ... Click here to enter", and then follow the instructions.  The linky will be open for one week.

Lastly, if you would like to use the Cookbook Sundays badge in your post, simply copy the code in the box beside the badge below and paste it into your post.  Feel free to also use it in your sidebar if you wish.

CookbookSundays

Chicken, Coconut & Cashew Nut Curry

Chicken, Coconut & Cashew Nut Curry 1

It was bound to happen sooner or later - a Tessa Kiros recipe that left me feeling a little disappointed.

Our theme this week at I Heart Cooking Clubs, where we are spending six months cooking the recipes of Tessa Kiros, was "Some Like it Hot ... and Spicy!" - an opportunity to heat things up with a bit of chilli, or introduce some warming spices to a heart-warming dessert or sweet treat.

I toyed with the idea of making Tessa's Cinnamon & Cardamom Buns, a recipe which has been on my radar ever since Kim made them right back in week one, and Natashya made them last week.  But in the end Tessa's recipe for Chicken, Coconut & Cashew Nut Curry, which I'd had bookmarked ever since I bought the book Falling Cloudberries, seemed like just the thing for a quick, flavourful, mid-week dinner.


Falling Cloudberries: A World of Family Recipes

To be honest, I wish I'd stuck with the buns, since both Kim and Natashya raved about them, and I find myself falling a long way short of being able to rave about this recipe.  Now don't get me wrong - it wasn't terrible or objectionable - but when you are used to eating and making a lot of Indian food, as I am, it just fell rather short.  Despite the variety of spices in here, the flavours were somehow not fully rounded out and felt a little unbalanced, and the gravy failed to thicken and emulsify as it should have.

I think, however, the recipe is not beyond redemption.  I would make this again, but there are a number of modifications that I would make which I think would improve it considerably.  Below I have recorded the recipe from the book, as that is what I made, and then at the end I have included my notes for what I would do to improve this.  I'm going to make my improved version next week, so I'll be sure to let you know how that goes.

Chicken, Coconut & Cashew Nut Curry 2

Don't you love the way I managed to capture my own reflection in the bowl - try cloning that out!!

Chicken, Coconut & Cashew Nut Curry
Recipe by Tessa Kiros from
Serves 3-4

1 teaspoon ground coriander
1 teaspoon ground cumin
pinch freshly grated nutmeg
1/2 teaspoon ground cardamom
4 cloves
1 bay leaf
1 heaped tablespoon garam masala
pinch freshly ground black pepper
3 tablespoons vegetable oil
1.25 kg (2lb 12oz) chicken thighs, skinned, boned & flesh diced
(use bone-in thighs for better flavour)
2 onions, finely diced
salt
45g (1-1/2 oz) dessicated coconut
70g (2-1/2 oz) roasted, unsalted cashews
1 cup plain yoghurt

Dry roast the coriander, cumin, nutmeg, cardamom, cloves, bay leaf and garam masala and black pepper in a non-stick pan set over high heat.  Stir-fry until fragrant - just a couple of minutes, then remove from the pan and set aside.

Heat the oil in a large saucepan, and brown the chicken and onions (you may have to do this in batches).  Add the spices, stirring until fragrant, and making sure all the chicken and onions are well coated with the spice mix.  Season generously with the salt.  Add the coconut and 2 cups water, bring to the boil.

Reduce the heat, cover the pan, and simmer for about 30 minutes, stirring from time to time.  Cut the cashew nuts in half, add to the pan and cook for a further 10 minutes.  (Tessa suggests adding more water, if it looks as though it needs it - I think that's unlikely, if anything I found it too watery)

Lastly, stir in the yoghurt.  Simmer for another minute or two without allowing it to come to a boil.  Serve with steamed, buttered, basmati rice.

My recommended changes:
  1. Replace ground spices with whole spices
  2. I would suggest replacing the nutmeg with a cinnamon stick, and substituting the ground pepper with half a dozen dried red chillies.
  3. Cut the onion back to just one, but add a dozen garlic cloves and a knob of ginger, to round out the flavour a bit more.
  4. Increase the amount of coconut - probably about double, and increase the amount of cashew nuts - again probably at least double.
  5. Dry roast the wholes spices, along with the coconut, ginger and garlic over low heat for about 5 minutes, and then add about a third of the cashews and the onion, and continue to roast for maybe another 10-15 minutes.  Allow to cool completely, and then grind up in a blender with some water until you have a smooth, fine paste.  This should extract maximum flavour and help to get a thick, emulsified gravy.
  6. Then heat oil in a large pot, and fry this spice paste for around 10 minutes, before seasoning with salt, add the chicken, and fry for a few minutes making sure chicken is well coated with spice mixture.
  7. Add water, and simmer for about 10 minutes before adding the rest of the cashew nuts, and continue simmering until the chicken is cooked through.
  8. I would leave the yoghurt out, but maybe add some lemon juice and grated lemon zest to the rice.
As I mentioned earlier, I'm going to try out these changes next week, so I'll let you know how it works out, but I feel pretty confident it will deliver I better balanced flavour, and a good, thick gravy.

Chicken, Coconut & Cashew Nut Curry 3

If you would like to get to know Tessa a little better, then do go and visit my friends at I Heart Cooking Clubs and see what they've all cooked up ...

IHCC Tessa Kiros Button

... or check out Falling Cloudberries and many of Tessa's other great titles available from Amazon or Fishpond NZ.


CookbookSundays

I'm also sharing this at Cookbook Sundays, where my friends are delving into their cookbook collections and sharing some of their recipes.  Do stop by to see what they're cooking - you might even feel inspired to link up a recipe from one of your own cookbooks.