Sunday, October 31, 2010

Chargrilled Lemon Herb Squid Salad

Chargrilled Squid Salad 1, cropped

Yes, I know it's now Sunday, but here rather belatedly is my contribution this week to Magazine Mondays.  This just seems to have been the week that got away from me - Monday was Labour Day here in New Zealand, which was an opportunity for us to head out to the beach, enjoy a family picnic, bask in the first really warm rays of spring sunshine, and have a complete day off.  Great stuff, but somehow I've been playing "catch up" ever since.

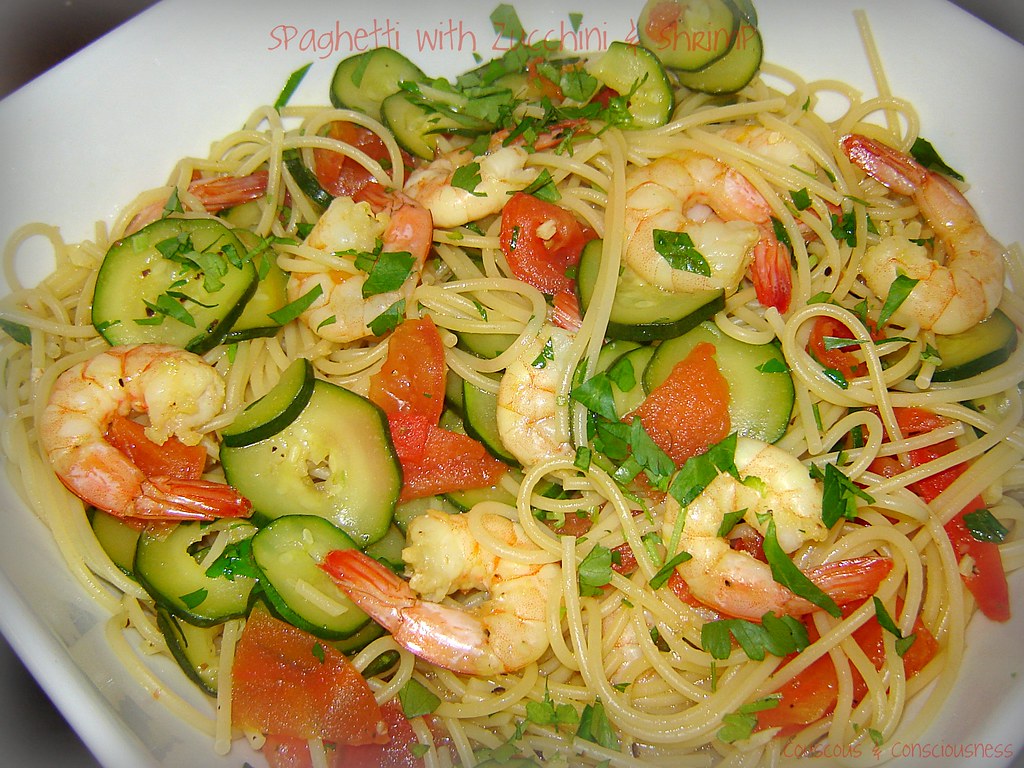
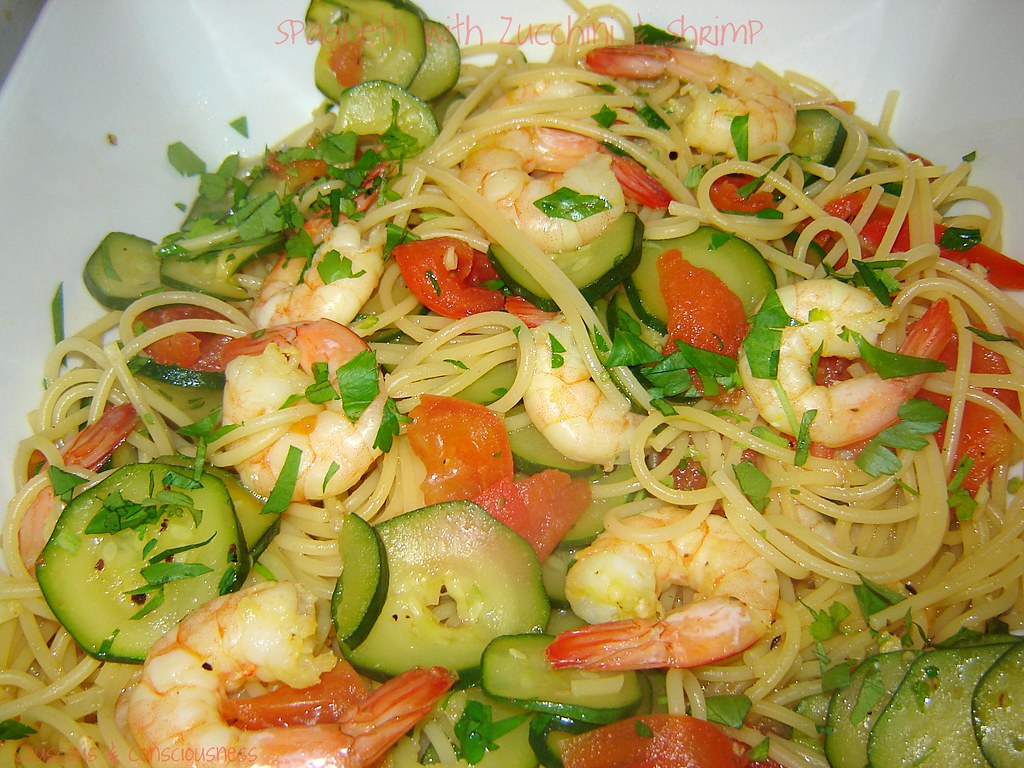
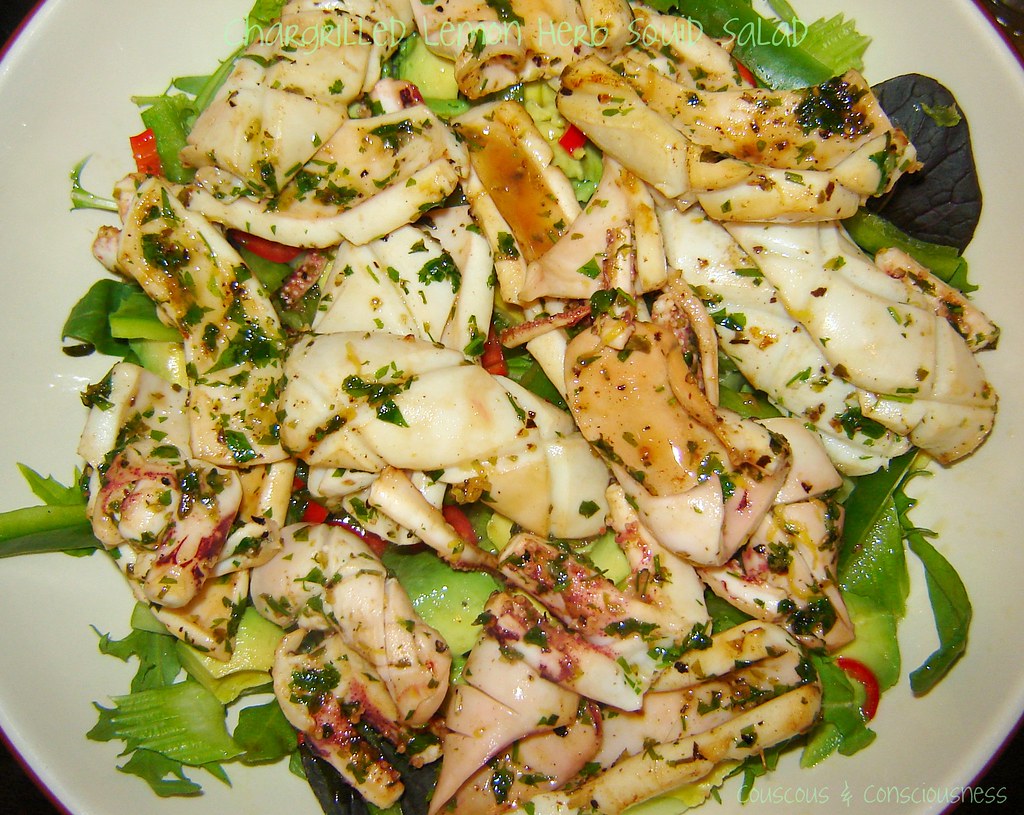
So, in the same spirit as the "Claytons" post I shared with you yesterday, I am once again going to spare you the entertaining preamble and get straight to the recipe.  This recipe comes from the October 2007 issue of ABC Delicious magazine.  This salad is quite simply wonderful - the squid is marinated in a lemony, herby bath before being grilled or barbequed over high heat, then served on top of a fresh, crisp, green salad tossed with a lemony vinaigrette spiked with chilli.  This is the perfect springtime dish - the perfect finish to a day out in the sun, or would also be wonderful for a light lunch.

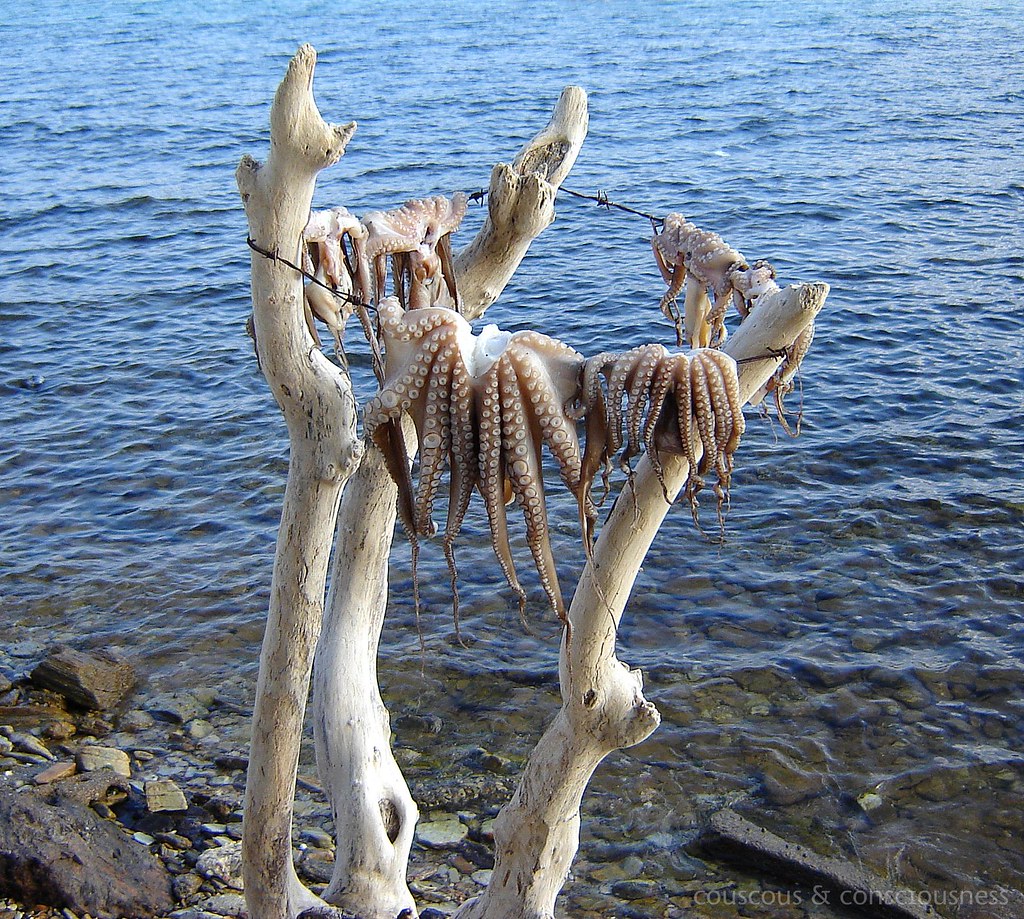
If you're a bit squeamish about buying whole squid and cleaning them yourself, ask your fishmonger to do it for you or buy ready to go squid/calamari tubes.  I had never cleaned them myself before this, but decided to be brave and give it a go - it was actually much easier than I anticipated and was not nearly so "yukky" as I thought it might be.  Wouldn't hesitate to do this again.

Life is so "convenient" these days that it is very easy to be very detached from the source of our food, and it's very easy when you pick up that clean white "tube" at the fishmongers to completely overlook where it came from.  Getting involved in the process of cleaning the squid helped me to have a greater appreciation of what I was actually eating, and respect for that creature that was once swimming around in the ocean.  I'm not opposed to eating animals, but I think it is important to do it with some degree of reverence and appreciation - it is not something we should just take for granted .... ever.

Greece 376, cropped

Chargrilled Lemon Herb Squid Salad Recipe
Adapted from recipe in ABC Delicious Magazine, October 2007
Click here for a printable copy of this recipe

I'm being a bit liberal with quantities here, as this is one of those recipes where nothing needs to be too specific.  You could easily adjust for more or less people, or you may want to vary quantities depending on whether you are serving for lunch or dinner or as part of a multi-course meal or buffet.

Squid:
For each person allow -
1 or 2 whole squid (or cleaned tubes), depending on size
(Also bear in mind that if you are using whole squid, you will also have the benefit of getting the tentacles as well, so you might need a little less than if you were using just the tubes - I would suggest something like 3 whole squid for 2 people)

Marinade (enough for 4 large squid):
1/4 cup olive oil
1 lemon, juice & zest
handful chopped Vietnamese mint (original recipe uses oregano)
handful chopped flat-leaf parsley
salt & pepper

Salad:
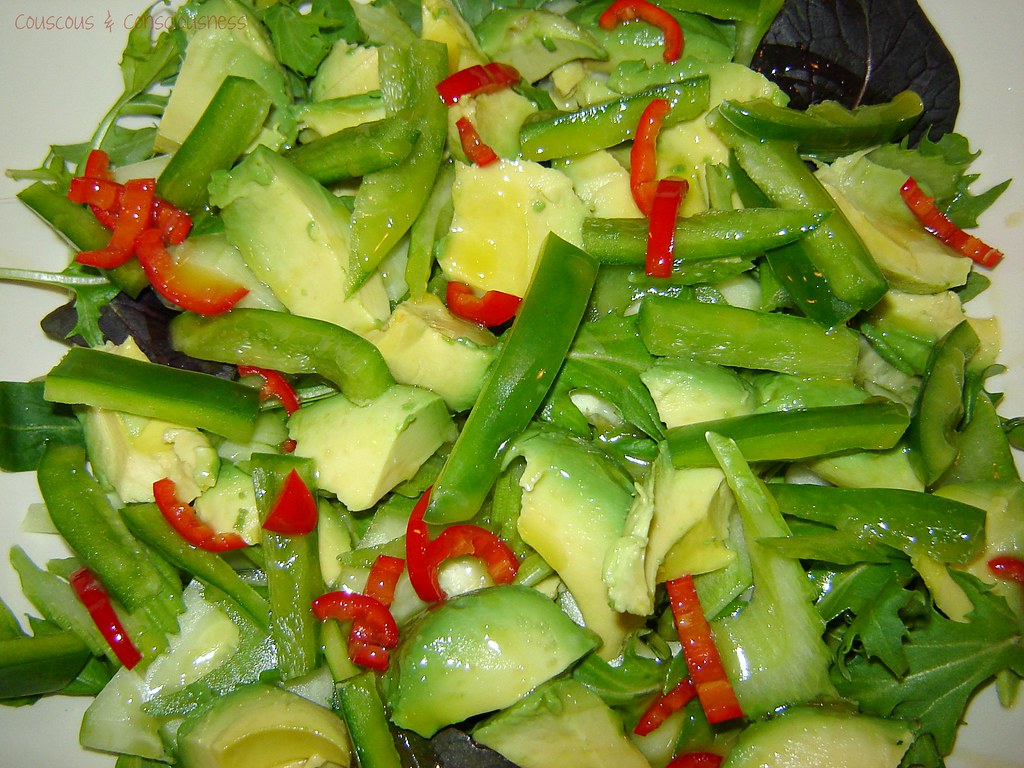
mixed baby salad leaves
cucumber, peel, deseed & slice
avocado, cut into chunks or slices
celery, slice thinly
green capsicum, deseed & slice
(original recipe also used snow pea sprouts, which I didn't have)

Dressing:
1/4 cup olive oil
1-1/2 tablespoons lemon juice
1/2 long red chilli, remove seeds & chop finely
1/2 teaspoon palm sugar (original recipe uses brown sugar)
flaky sea salt

First prepare the squid.  If you decide to have a go at cleaning the squid yourself, you can find a good demonstration on YouTube here:


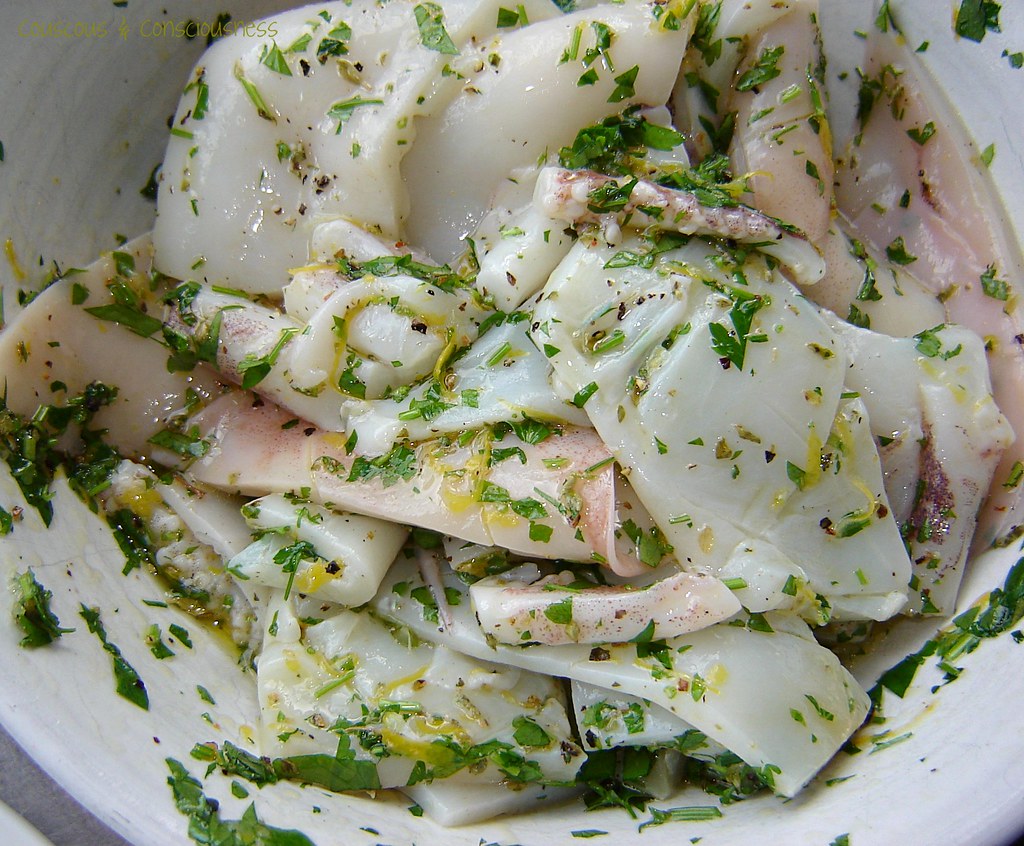
Once cleaned, cut the squid tubes down one long side and open out flat.  With a sharp knife, score (don't cut all the way through) the inside of the squid body in a criss-cross pattern, then cut the whole thing into about 8 pieces (if large), or just into quarters (if small).

Now to the marinade.  In a large bowl, combine the olive oil, lemon juice, freshly grated lemon zest, chopped herbs, and season well with flaky sea salt and freshly ground black pepper.  Add the squid pieces to the bowl and toss well to coat completely with the marinade.  Cover and refrigerate for 3-4 hours.

Chargrilled Squid Salad 5, cropped

Combine all of the salad ingredients in a large bowl.  You will note that I haven't given any specific quantities - feel free to use these in any proportion that appeals to you.  Leave out an ingredient if you don't have it, or add in another ingredient that you might have on hand.  Treat this list as just suggestions - my only real dictum here would be (and this may be just one of my "things") is:  whatever you add in - keep it green!  Please don't make this a home for tomatoes or carrots just because you happen to have a couple lying around.  The only hint of red I approve of here is the little bit of chilli in the dressing.

You could now either divide this salad up onto individual serving plates, or keep it in one big bowl or platter to serve family style.

Next make the dressing by simply combining all the ingredients in a screw-top jar, shake well and taste - adjust seasoning if necessary.

Preheat a barbeque or a grill pan over very high heat.  When hot, add the squid (in small batches), scored-side down.  Cook for just a couple of minutes each side, until chargrilled in appearance, taking care not to overcook or you will end up with "rubber bands".

Chargrilled Squid Salad 4, cropped

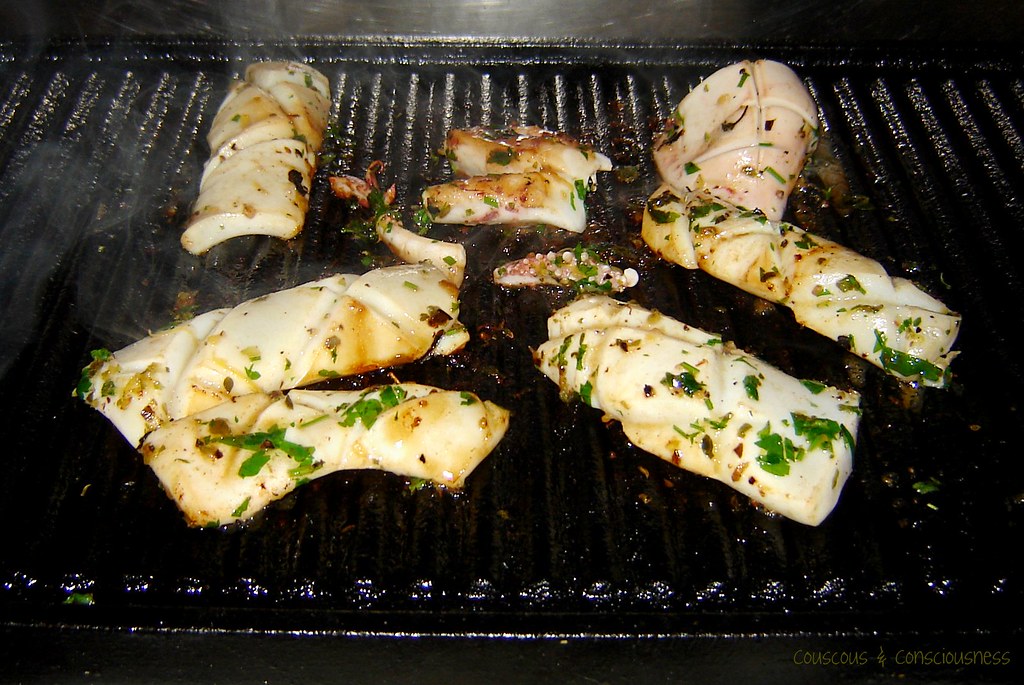
Immediately the squid pieces are cooked, remove from the heat, set aside, and repeat until all pieces are cooked.

Chargrilled Squid Salad 3, cropped

Pour the dressing over the salad, and toss gently to combine.

Chargrilled Squid Salad 2, cropped

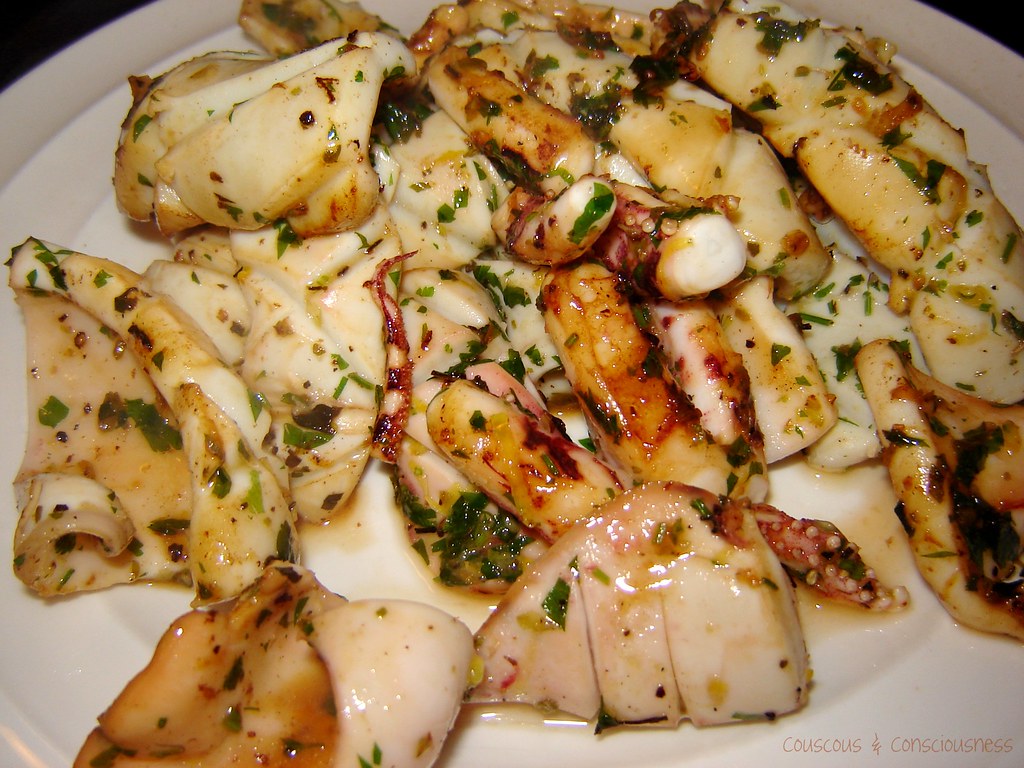
Arrange the squid over the top of the salad and serve while still warm.

I'm submitting this post to Magazine Mondays - mmmm, can't wait to see what else is cooking.  You can find last week's round-up here at ReTorte.


I'm also submitting this post to the Hearth and Soul blog hop, a place where you'll find lots of wonderful people who are passionate about great food and cooking from the heart - do go and have a look at what they're all cooking this week.

Saturday, October 30, 2010

Espresso Caramel Bars & a "Clayton's" Post

Espresso Caramel Bars 2, cropped

Back in the late '70s/early '80s, here in New Zealand, we had a non-alcoholic beverage called Claytons, which at the time was marketed as "the drink you have when you're not having a drink". Pretty soon, the word "Claytons" passed into common usage to describe anything that was considered a poor imitation of, or poor substitute for, the real thing.  So I'm bringing you today a Claytons post - a poor substitute for a witty and engaging post, but I hope you will agree is better than no post at all.

Somehow this has been a very "spare time deprived" week, and I now have a back log of posts to try and churn out over the next couple of days.  So, I'm sorry to deprive you of some interesting dialogue to entertain you with, but in the interests of sharing a great recipe with you, I'm cutting straight to the chase.

This is my weekly post for I Heart Cooking Clubs, where we are cooking along with Giada de Laurentiis, who I'm pleased to see appears to be gaining popularity already with those who were initially not so enthusiastic about sharing this time with Giada.  Our theme for the week was chocolate, which was just the excuse I needed to make these Espresso Caramel Bars that I've had bookmarked for months.  As is so often the case when you keep eyeing up a recipe for months on end, you have high expectations, and of course it very often follows that the higher your expectations the greater your disappointment when you finally get around to making it.  In complete contrast to the norm however, these Espresso Caramel Bars exceeded all my expectations, and I will definitely be making these again.  Let's face it - crispy, biscuit crumb base;  ooey, gooey, slightly chewy, caramel centre;  fudgy, espresso chocolate topping - what's not to love?

Notes: 

We don't have graham crackers here in New Zealand, so I substituted digestive biscuits in the base and, in actual fact, I didn't have quite enough of those so I added a few vanilla wine biscuits in as well.  I imagine you could also make this recipe gluten-free by substituting with some gluten-free biscuits in the base.

Also, the chocolate topping calls for instant espresso powder, which I don't have.  I substituted with a 1/4 cup strong espresso which worked just fine.  I also used dark, bitter chocolate instead of the semisweet called for in the original recipe - I think this could be a bit sickly sweet with semisweet chocolate.

Lastly, I didn't sprinkle the suggested smoked sea salt over the top, because I simply didn't have any, but I can imagine that would be a nice addition.  I did, however, use regular butter instead of unsalted in the base and the caramel, which I think balances out any potential this has for being too sweet.

Espresso Caramel Bars 1, cropped

Espresso Caramel Bars
Click here for a printable copy of this recipe

For the crust:
vegetable cooking spray
170g (6 oz) graham crackers or digestive biscuits
1/4 cup sugar
170g (1-1/2 sticks) butter, melted

For the caramel:
1/2 cup cream
113g (1 stick) butter, room temperature
1-1/2 cups brown sugar
1 tablespoon water

For the topping:
2 cups semisweet (or dark) chocolate chips
1/2 cup cream
1-3/4 teaspoons instant espresso powder or 1/4 cup strong espresso
1 teaspoon smoked sea salt, optional

Preheat oven to 175 degrees C (350 degrees F).  Spray the base of a 23 cm (9 inch) round springform tin with cooking spray, line with baking parchment, then spray the paper and sides of the tin.

Break the biscuits into the bowl of a food processor, add the sugar, and process both together until you achieve the appearance of fine breadcrumbs.  Add the melted butter, and continue to process until the mixture forms into clumps.  Tip the mixture into the prepared baking tin, and using your fingers spread it out and press gently into an even layer.  Bake in the preheated oven for 10 to 12 minutes or until the crust is just golden.  Remove and cool for 15 minutes.

Meanwhile, combine all of the ingredients for the caramel in a medium-sized, heavy-bottomed pan.  Set over medium heat and stir until the mixture is smooth.  Bring the mixture up to a boil and then, without stirring, cook until the mixture reaches 240 degrees F (use a candy thermometer) - about 7 minutes.  Very carefully pour the hot caramel over the still warm crust.  Cool for 20 minutes, then freeze until firm - about 10 minutes.

Now to the topping.  Combine the chocolate and cream in a small bowl, set over a pan of simmering water, and stir until the chocolate has melted and the mixture is smooth.  At this stage add either the espresso powder or liquid espresso, stirring to combine well.  Remove the baking tin from the freezer, and pour the chocolate over the top of the caramel, smoothing with a spatula.  Sprinkle the smoked sea salt over the top if you're using it, and refrigerate for 1 hour or until firm.

Remove from the fridge, and allow about 30 minutes for everything to come to room temperature.  Run a slightly wet, warm knife around the sides of the tin, between the tin and the chocolate layer, and then release the side of the tin.  Lift out of the base, remove the paper, and cut into bars or squares.  Store in an airtight container.

Espresso Caramel Bars 3, cropped

Interested in getting to know Giada a bit better?  Then do go and visit my friends at I Heart Cooking Clubs and see what they've all been cooking up ....

IHCC

.... or check out Giada's Kitchen and many of her other titles, available from Amazon, Book Depository UK and Fishpond NZ

Giada's Kitchen: New Italian Favorites    Giada at Home: Family Recipes from Italy and California    Everyday Italian: 125 Simple and Delicious Recipes

Sunday, October 24, 2010

Spaghetti with Zucchini & Shrimp - Pasta alle Zucchine con Gamberi

Spaghetti with Zucchini & Shrimp 1, edited

Looking for a contribution this week for Cookbook Sundays, I decided to dip into Giuliano Bugialli's "Foods of Tuscany" cookbook.  This is actually a beautiful book, one that was gifted to me some 15 years ago, and which has not been used nearly enough.  The book is a wonderful collection of old Tuscan family recipes - many are well-know favourites, and many more unusual and less widely known dishes.  The book also incorporates beautiful photos, and much interesting narrative about the cultural and cooking traditions of the Tuscan region.  I was surprised how much dust this book had gathered on my shelf, and I had forgotten just what a treasure it is - it was a thrill to revisit it and I've bookmarked several dishes to make over the coming weeks.

The recipe I want to share with you today is spaghetti served with zucchini and shrimp which are cooked in a saffron-infused broth.  The brightness of lemon, the earthiness of saffron, the warmth of garlic, and the fresh herbaceousness of parsley combine perfectly to deliver a dish which is delicate and light (nothing overpowers the delicateness of the shrimp or the zucchini);  the spaghetti, zucchini and shrimp are all in textural harmony with each other;  and even served family-style in a big bowl, this dish still has an air of elegence and luxuriousness to it.  Add to this the fact that this dish literally takes just moments to put together, and you have an absolute winner in my opinion.

Spaghetti with Zucchini and Shrimp
Adapted from Giuliano Bugialli's
 Serves 2
Click here for a printable copy of this recipe

2 small zucchini, sliced into thin discs
250g peeled shrimp
1 lemon, washed
1 clove garlic, minced
2 tablespoons olive oil
pinch of saffron
1 cup chicken stock
flaky sea salt
freshly ground black pepper
250g spaghetti
1 large tomato, very ripe
flat-leaf parsley, coarsely chopped

Put the shrimp into a bowl of cold water, and add a generous pinch of flaky sea salt.  Cut the lemon in half, squeeze out the juice, and then put both the juice and the squeezed lemon halves into the bowl with the shrimps.  Set aside to soak for 30 minutes.

Heat the chicken stock until very warm (but need not be boiling), and add the saffron strands to the hot stock to infuse.

Set a large pan of water over high heat and bring up to the boil.  Once the water comes up to a boil, salt the water liberally, add the spaghetti and cook until al dente.

Remove seeds from the tomato, and cut the flesh into small squares.  Set aside.

Heat olive oil in a skillet set over low heat and, once warm, add the garlic and saute gently for about 2 minutes, taking care not to burn it.

Add the zucchini to the pan, raise the heat to high, season with flaky sea salt and freshly ground pepper, and saute for about 30 seconds.  Add all of the chicken stock and saffron to the pan, cover and cook for 2 minutes more.

Now remove the shrimp from their "lemon bath" and add them, along with the tomato, to the skillet.  Mix well and cook for a couple of minutes until the shrimp turn pink and are just cooked through.

Drain the spaghetti, add it to the skillet, sprinkle in a handful of chopped parsley, and mix everything together gently but thoroughly.  Serve immediately.

Spaghetti with Zucchini & Shrimp 2, edited

I'm submitting this post to Cookbook Sundays, hosted by the lovely Brenda at Brenda's Canadian Kitchen.  She's worth a visit any day of the week, but why not head over there right now and see who else has dusted off their cookbooks - you'll almost certainly find some great recipes, and maybe you'll discover a new book you'd like to add to your collection.

cookbook sundays

Interested in adding a copy of "Foods of Tuscany" to your collection - this book was published back in 1992, and does appear to be unavailable most places I looked, but Amazon seem to have both new and secondhand copies available - just click the link below.

Thursday, October 21, 2010

Grilled Asparagus & Rock Melon Salad - Quick & Easy # 6

Asparagus & Rock Melon Salad1, cropped

This week at I Heart Cook Clubs we are having one of our monthly Pot Lucks, and of course we continue to cook with Giada de Laurentiis.  What to contribute was a real "no brainer" for me - it's spring here in New Zealand, so it just had to be asparagus in some form or another (which you already know is my most favourite vegetable), and for a quick mid-week meal this salad really appealed.  This was truly the work of moments, and utterly delicious.  My only disappointment was my melon, which was a little under-ripe and a bit lacking in flavour, which was to be expected really as it is still a bit early in the season for melon.  This is a little sad, as the flavour combination of the asparagus with rock melon (you might call it honeydew where you live) is great, and I can imagine that with a beautifully ripe, juicy, fragrant melon this would be divine.  I'm definitely going to try this again in December when we will still have a bit of asparagus around, but will hopefully have better rock melon about as well ... "asparagus Gods" willing this would be a great addition to a southern hemisphere Christmas meal.

You don't need to be precise about quantities for this.  I'm going to give you the quantities I used to make a meal for one person, and of course you could increase any of the quantities to make it a meal for more, or maybe you could serve this as part of a buffet or multi-course meal.  (You can find the original recipe here.)

Grilled Asparagus & Rock Melon Salad
Adapted from a recipe by
For vegetarian option omit prosciutto/bacon

6-8 asparagus stalks
olive oil for grilling
2 slices prosciutto (or bacon)

2 tablespoons extra virgin olive oil
2 tablespoons lemon juice
flaky sea salt & freshly ground pepper

rock melon, peeled, de-seeded, & cubed
mozzarella or bocconcini, cubed
(I used homemade mizithra, post to follow)

toasted pine nuts
(I used roasted hazelnuts)

Preheat oven to 175 degrees C (350 degrees F).  At the same time set a grill pan over high heat.

Place slices of prosciutto or bacon on a baking pan in a single layer, and bake in the preheated oven until crispy.  Remove and drain on paper towels.

Place the asparagus spears on the preheated grill, drizzle with a little olive oil, tossing to coat, and sprinkle over some flaky sea salt & pepper.  Grill for a few minutes, turning from time to time, until tender, but still a little crispy.  Remove from grill and arrange on a platter.

In a medium-sized bowl, mix the lemon juice with the extra virgin olive oil, salt and pepper, and whisk until well combined.  Add the melon and the mozzarella to the bowl, and toss until everything is well coated with the dressing.

Using a slotted spoon, remove the melon and mozzarella and arrange on top of the asparagus.   Crumble the crispy prosciutto or bacon and nuts over the top, and drizzle any remaining dressing over the top.

Asparagus & Rock Melon Salad 2, edited

Interested in getting to know Giada a bit better?  Then do go and visit my friends at I Heart Cooking Clubs and see what they've all been cooking up ....

IHCC

.... or check out Giada's Kitchen and many of her other titles, available from Amazon, Book Depository UK and Fishpond NZ

Giada's Kitchen: New Italian Favorites    Giada at Home: Family Recipes from Italy and California    Everyday Italian: 125 Simple and Delicious Recipes

Wednesday, October 20, 2010

Fig & Blue Cheese Wontons - Quick & Easy # 5

Fig & Blue Cheese Wontons 2, croppes

Trawling through that magazine pile that I told you about last week, looking for a bit of inspiration for a quick and simple Sunday dinner, I came across a recipe in the Spring 2004 edition of Dish magazine for a "Turkish Flatbread Stuffed with Blue Cheese & Figs".

The filling sounded intriguing, and I happened to have everything required on hand, but I didn't feel up for the effort of making a bread.  I was looking for something altogether more instant.  That's when I remembered the wonton wrappers that were leftover from the Creamy Pea & Egg Ravioli I made earlier in the week ... and thought, why not?

I made eight large wontons by sandwiching a spoonful of filling between two wrappers (really more ravioli style), and found that four of these per person made a great light meal with a simple green salad.  These would be equally great as an appetiser, in which case you might put a smaller amount of filling into one wrapper, folded into a triangle like a traditional wonton.  Alternatively, this filling would be fantastic spread on some good crackers, or even in a sandwich.

I also reduced the amount of filling from the original recipe, since I only had to fill a few wontons, not a whole loaf of bread.

The results were sensational - crispy pastry encasing melting blue cheese, with the soft, sweet figs, and the slightly pungent hit of garlic and black pepper.  For something that packed so much great flavour, and yet could not possibly have been quicker or easier to produce, these were a real winner.  I do hope you try them.

Fig & Blue Cheese Wontons
Inspired by a recipe in the
Spring 2004 edition of Dish magazine
Vegetarian
Makes 8-10 large wontons or 16-20 small wontons

wonton wrappers

100g blue vein cheese
100g cream cheese or mascarpone
1 clove garlic, minced
6 dried figs
freshly ground black pepper

grapeseed oil (or other neutral flavoured oil) to fry
toasted sesame seeds to serve

Soak dried figs in a little hot water for about half an hour to soften and "plump up".  Drain and chop finely.

Pour oil into a large pan to a depth of 2-3cm for deep frying, set over high heat, and allow the oil to heat while you prepare the wontons.

In a small bowl, mash blue cheese till soft, then mix in cream cheese, garlic, chopped figs, and a generous grind of black pepper.

Fig & Blue Cheese Wontons 8, cropped

Lay half of your wonton sheets out on a board, and place spoonfuls of the fig and cheese mixture in the centre of each sheet, leaving a clear border of about 2cm all around.

Fig & Blue Cheese Wontons 6, cropped

Brush the border with a little water, then place another wonton wrapper over the top, as much as possible taking care to push out any "air" around the filling and making sure all the edges are well sealed.

Once the oil is hot, fry the wontons just a couple at a time.  They will only take a few moments, and you will need to turn them over half way through.

Fig & Blue Cheese Wontons 4, edited

As soon as the wontons are golden and crispy on both sides remove to a plate,  lined with a paper towel to absorb any excess grease, and sprinkle immediately with toasted sesame seeds.

Fig & Blue Cheese Wontons 3, edited

I'm submitting this post to Magazine Mondays - mmmm, can't wait to see what else is cooking.

Sunday, October 17, 2010

A Farm Wife's Fresh Pear Tart - Cooking Italy 11

Pear Tart 1, cropped

After a bit of a hiatus, our leader (Angela at Spinach Tiger) has given us a new schedule of assignments and we're back into rattling the pans at the Cooking Italy group.  Our first assignment this week turned out to be A Farm Wife's Fresh Pear Tart from, of course, Marcella Hazan's "Essentials of Classic Italian Cooking" book.

"Uh-oh", I thought (you know how I feel about baking), but buoyed up by a couple of recent successes in the baking department, I was ready to give this a go.  As long as I stuck carefully to the recipe I felt reasonably confident of being able to pull it off.

Then, came the curve-ball.  Angela emailed us all to tell us she had made the cake and found it a bit on the "rubbery" side.  She pointed out that there was no shortening in the recipe and thought that a little bit of melted butter might make a difference.  Oh boy - we were on dangerous ground now - tinkering with the recipe (especially when I don't know what I'm doing) would surely lead me to disaster.  I was nervous about this.

Then a reprieve came.  Another member of our group, Lynne at FrancoFoodie, emailed to say she too had made the cake and had been happy with the texture.  So now I decided to stick to the original recipe for my first attempt - plenty of time to play around with it and experiment another time if this wasn't exactly to my liking.

Marcella recommends using winter Bosc or Anjou pears for this, and even though we are in spring here now there are still a few late season Beurre de Bosc pears hanging around.  I found these pears yesterday at my local organic produce market.

Pear Tart 5, cropped

This recipe is about as simple to make as a cake recipe could possibly be, and the end result ... I really like this - it is even better I think today than it was yesterday.  It is not a flashy, show-off kind of cake that commands your attention before you've even tasted it - it's infinitely more humble.  It's a simple cake, which I can well imagine a "farm wife" making from the limited ingredients she might have had on hand - I can visualise her collecting a couple of eggs from the hen house and picking a few pears from the tree - sugar and butter almost certainly in short supply.  It's not too sweet, and without any butter is not rich.  I found the texture to be quite firm and dense (though not heavy), and although I can see how someone might describe this as "rubbery" it is not the word that I would use.  I keep thinking that I have had something like this before - there is something about it makes me feel very nostalgic - maybe it is just the fact that this really speaks to me of simpler times.  This is not a cake that is going to set your tastebuds alight, but it's honest and simple and I for one wouldn't change a thing.

Pear Tart 2, cropped

Note:  The original recipes suggests 12 cloves as an optional ingredient.  I didn't use cloves at all, as I'm not hugely fond of them.  Both Angela and Lynne used just half a dozen and found that to be plenty.

A Farm Wife's Fresh Pear Tart Recipe
Adapted from Marcella Hazan's
Click here for a printable copy of this recipe

2 eggs
1/4 cup milk
1 cup sugar
salt
1-1/2 cups all purpose flour
900g (2lb) fresh pears
butter
1/2 cup dry breadcrumbs
6-12 cloves (optional)

First preheat the oven to 190 degrees C (375 degrees F).

Next prepare a 23cm (9 inch) round cake tin.  Grease the pan generously with butter, then sprinkle breadcrumbs into the tin, shake them all around to coat all of the base and sides, then turn over and give it a bit of a tap on the bottom to shake out any surplus.

Prepare the pears - peel them, cut them in half lengthwise, scoop out the core, and then cut into thickish slices.  Put them into a mixing bowl and set aside.

I mixed the batter together in the food processor, but you could really pretty easily do this by hand or using a hand-mixer.

Beat together the eggs and milk.  Add the sugar and a pinch of salt and continue beating.  Sift in the flour, and pulse a few times just until a thick batter is formed.

Pour the batter over the pears, and mix until all the pears are well coated, then tip everything into the prepared cake pan.  Using the back of a spoon or spatula, level off the top, and then dot little bits of butter all over the surface.  If using, now stud the surface with the cloves.

Bake for 50 minutes, or until cooked through and golden on top.

Remove from the oven, allow to cool to lukewarm, and then, using a couple of spatulas, loosen it from the bottom of the tin and transfer to a plate.

Pear Tart 4, cropped

Do visit my Cooking Italy page to learn more about the group (maybe you'd even like to join in - you don't have to have a blog to join the group and cook along with everyone else), find links to other members of the group, and links to all the Cooking Italy recipes I've cooked so far.

Essentials of Classic Italian Cooking

I'm also submitting this post to Cookbook Sundays.  Why not go visit and see who else has dusted off their cookbooks - you'll almost certainly find some great recipes, and maybe you'll discover a new book you'd like to add to your collection.

cookbook sundays