Sunday, June 30, 2013

Sweet New Zealand # 23 Round-up

Sweet New Zealand Badge

It has been my privilege to host Sweet New Zealand once again this month - a monthly blog event, created by the lovely Alessandra Zecchini, which offers an opportunity for all Kiwi bloggers (whether you are living in New Zealand or overseas), as well as for non-Kiwi bloggers living in New Zealand, to connect and share some of those sweet treats from your kitchen.  Tomorrow will be my blog's fourth birthday (my goodness, where did those four years go?), and I can think of no better way to celebrate than by sharing with you this round-up of all the absolutely wonderful entries this month.  I have certainly enjoyed discovering and visiting all of your posts.  Thanks to all of you for participating.


First up is an entry from Arfi at HomeMadeS.  Arfi is one of the most delightful, generous-spirited bloggers I know, and even though a busy, hectic, family life makes finding the time for blogging difficult for her, she still found time to share these gorgeous Gluten-Free Raspberry & White Chocolate Friands.  Even though I have never met Arfi, we have tweeted and commented on each others blogs for quite a long time, and whenever something goes wrong in my part of the world, the first person I always hear from (often even before my family) is Arfi, checking in to see if I'm ok.  I dream of one day meeting Arfi, and I would love to sit down and have a cup of tea and one of these friands with her.


Alessandra Zecchini, our founder of this event, never fails to surprise and inspire me with her use of unusual ingredients, often things that we might ignore or discard, like onion flowers, banana flowers or feijoa skins.  When she chose to use infuse feijoa skins into a syrup to make this Feijoa Zest Agar Agar Jelly, it kind of blew my mind.   Doesn't that look beautiful.


Having made the jelly, instead of discarding those feijoa skins, Alessandra made a zest and added it to these gorgeous looking Feijoa Zest Meringues.  How clever is that?  I would have dumped those skins straight down the wastemaster!  Thanks for making me look at them a little differently, Alessandra.


My friend and fellow Nelson blogger, Nicola from Homegrown Kitchen, has a brilliant way with making really healthy, good for you stuff, seem decadent.  Or is it that she takes really decadent treats, and removes all the guilt from them, without removing any of the deliciousness or satisfaction?  No matter which way you look at it these amazing Handmade Three Ingredient Chocolates are the perfect example of a heavenly little treat that I would not feel the least bit guilty about devouring.


Frances at Bake Club was wanting to make a sugar-free, freezable snack for her little one, and these Oaty Muffins with Stevia fit the bill perfectly.  Frances says that because stevia is green, it works best in chocolate based recipes to disguise the colour.  Who needs an excuse for chocolate, I say?!


Alessandra shares more sweet indulgence with us in the form of these Chocolate, Vanilla, Cream & Grappa Desserts.  I love the way that this is set in different layers ... makes for something that looks very "special occasion", and the addition of grappa is the "icing on the cake pudding".  Oh, and don't you just love these gorgeous little glasses?!  Thanks for sharing these Alessandra.


The lovely Lesley at eat, etc ... always brings a smile to my face, and never more so than when she talked about diving straight into the pantry to rustle these up as soon as she got home from work.  Any woman who has no qualms about making and eating dessert before dinner (yes, that's right folks, BEFORE dinner), is a real food hero in my opinion.  These little Soft-Centered Chocolate Puddings strike me as being just perfect for satisfying that winter evening, pre-dinner sugar craving.  I can't wait to try these, and true to Lesley's form I'm going to have one before dinner ... no regrets.


Michelle at Greedybread had me at "fudge"!  Add to that the crunch of pistachios and fragrance of orange blossom ... what's not to love.  Silky smooth texture, this Pistachio & Orange Blossom Fudge looks like everything a good fudge should be.  In fact, Michelle says she could even sell her husband for a piece of this fudge.   I think there could potentially be a lot of husbands for sale once we've all tried this one.


If you were a real Kiwi kid, just the mention of lamingtons will fill you with nostalgia - they certainly do me.  Memories of my brother and I, with newspaper covering every possible surface of the kitchen to catch the mess, up to our elbows in chocolate icing and coconut, rolling and dunking those chunks of sponge cake.  The results were never particularly elegant, but we loved it.  These stunning Raspberry & White Chocolate Ganache Lamingtons, on the other hand, from my very special friend Alli at Pease Pudding, just ooze goregeousness on every level.  I would love to be sitting down having a coffee with Alli and sampling some of her heavenly baking.  For me, living in Nelson makes that somewhat geographically challenging.  But for those of you lucky enough to be living in Auckland, you will be able to enjoy the delights of Alli's kitchen at her Gourmet Gannet pop-up patisserie opening in Waimauku this week.  Do yourself a favour and make the trip out there - I promise you it will be worthwhile.


The lovely Mairi at Toast dared to go where I have thus far feared to tread with these Almond & Orange Blossom Florentines.  Mairi and I share a passion for the food of Yotam Ottolenghi, and this is a recipe she adapted from one of her beloved Ottolenghi books.  These look delicate and gorgeous, crispy and lacy, and with the addition of the orange blossom are tinged with the exotic.  Having allayed my fears of making florentines, I'm now eager to give these a go.


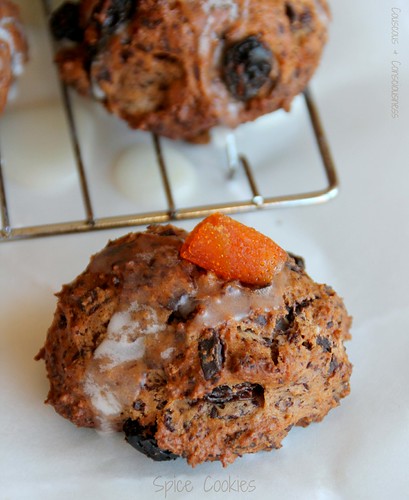
Lastly is my own entry of these Spice Cookies.  Like Mairi, I went the Ottolenghi-route, using a recipe I adapted from his Jerusalem book.  These cookies, a friend told me, "taste just like Xmas".  They are crisp on the outside, and slightly softer on the inside, delicately spiced, with lovely hits of chocolate, raisins, and citrus ... what more can I say?

And now it remains only for me to hand off the baton for next month's Sweet New Zealand to the lovely Nicola at Homegrown Kitchen.  Can't wait to see what you all cook up next month.


Saturday, June 22, 2013

Celeriac, Lentil & Hazelnut Salad

Celeriac, Lentil & Hazelnut Salad 2

Yes, it's that week again.  It's Potluck week at I Heart Cooking Clubs, and that means that we get to choose any recipe we like from any one of the eight IHCC chefs.  That's a pretty impressive line-up which includes our current chef of course, Yotam Ottolenghi, who enjoys the venerable company of Nigella Lawson, Mark Bittman, Giada de Laurentiis, Jamie Oliver, Tessa Kiros, Rick Bayless and Madhur Jaffrey.


With so much wonderful food to choose from, Potluck week is the time I usually like to try my hand at something a bit special, but at the fag end of a tiring week, and feeling a bit under the weather, something simple, comforting and tasty was called for.

This Celeriac, Lentil & Hazelnut Salad, from Yotam Ottolenghi's book Plenty, was perfect.  It was suitably light when I wasn't feeling like anything too heavy.  Lentils always speak to me of comfort and nourishment.  And celeriac ... well, celeriac is one of my favourite winter vegetables, and is pricey enough in these parts to make me feel like I'm having something quite luxurious.  However, for all that it seems expensive, celeriac does go a long way.  I paid $6 for one medium sized celeriac - I used half of it in this salad, which lasted me two days;  I used quarter of it in a pot of soup which is bubbling away as I write, and which will deliver at least 6-8 servings;  and I still have quarter of it left to use in a Celeriac Remoulade later in the week.

I did, as I always seem to do, tinker with the recipe a little.  I used the brown lentils that I had on hand, instead of the Puy lentils Ottolenghi uses in the original recipe.   For a bit of extra colour and flavour, I also added in some of the roasted red peppers I preserved during the summer, and some of those quick pickled lemons I shared with you a couple of weeks ago (which I now can't help adding to just about everything I make).  I also used flat leaf parsley instead of mint, which I think would have been wonderful, but which is seldom available in the middle of the New Zealand winter.

Since I was going to be eating on my own, I halved the original recipe.  That made two large, main meal servings, which I accompanied one night with grilled sausages and then on the second night with pan-roasted salmon.  Delicious with both, and I think it tasted even better the second day.  This dish can easily be made well in advance, but do make sure to dress the lentils as soon as you take them off the heat and drain them so that they really soak up the flavour.

Celeriac, Lentil & Hazelnut Salad 1

Celeriac, Lentil & Hazelnut Salad Recipe
Adapted from a recipe by Yotam Ottolenghi
from Plenty
Vegetarian
Makes 2 generous servings
Click here for a printable copy of this recipe

1/2 cup green or brown lentils
1-1/2 cups water
generous bunch thyme sprigs
1/2 small celeriac, peeled and cut into 1cm (1/3 inch) batons
generous handful hazelnuts
2-3 tablespoons extra virgin olive oil
2 tablespoons red wine vinegar
1x roasted red pepper cut into strips
quick pickled lemons, roughly chopped (to taste)
flaky sea salt & freshly ground black pepper
generous handful flat-leaf parsley, roughly chopped

Put lentils, water and thyme into a smallish pot and bring to a boil.  Reduce the heat and simmer until the lentils are tender but not mushy - about 15 minutes.

Add the celeriac to another pot of boiling salted water, and cook until just tender - about 8 minutes.

Meanwhile, in a shallow pan over medium heat, toast the hazelnuts until golden.  As soon as they are toasted tip the hazelnuts out into a clean tea towel, and rub vigorously to remove the skins.

As soon as the lentils are cooked, drain, and put into a serving bowl.  Immediately, add the olive oil, red wine vinegar, and a liberal sprinkling of sea salt and freshly ground black pepper.

Drain the celeriac and add to the lentils, along with the roasted red peppers, quick pickled lemons, half the hazelnuts and half the parsley.  Toss well, taste and adjust seasonings to your liking.  Sprinkle the rest of the hazelnuts and parley over the top to serve, and finish with an extra drizzle of extra virgin olive oil.

This is delicious served warm or at room temperature.

If you would like to get to know Yotam Ottolenghi a little better, then do go and visit my friends at I Heart Cooking Clubs and see what they've all cooked up ...

IHCC Ottolenghi Leek Badge resized

... or check out Plenty and Ottolenghi's other great titles available from Amazon USA, Amazon UK or Fishpond NZ.

          Plenty: Vibrant Recipes from London's Ottolenghi


I'm also sharing this post this week at See Ya In the Gumbo hosted by the lovely, and often hilarious, Michelle at Ms. enPlace, at Souper (Soup, Salad & Sammies) Sundays hosted by my good friend Deb at Kahakai Kitchen, and at Cook Your Books, hosted by the lovely Joyce at Kitchen Flavours.


See Ya in The Gumbo Badge            Souper Sundays Badge            Cook Your Books Badge

Saturday, June 15, 2013

Sweet Potato Galettes

Sweet Potato Galettes 3

This has been a week of surprises.

First of all I discovered how incredibly easy it is to make your own sour cream.  Simply add the juice of one lemon to one cup of cream.  Stir and you will feel it begin to thicken slightly almost immediately.  Leave out on your kitchen bench for three or four hours, giving it a bit of a stir from time to time.  It will become noticeably thicker during that time.  Now line a sieve with a clean piece of muslin.  Pour the cream into the cloth-lined sieve and set over a small bowl.  Put into the fridge overnight.  The next morning you will be rewarded with beautiful thick, tangy sour cream.

Speaking of rewards, my second surprise this week came in the form of a rolling pin.  Ever since losing my rolling pin in the Christchurch earthquake, I've been making doing with a wine bottle.  Now a wine bottle does a passable job, but it does have its limitations.  For example, you can't use a wine bottle as a substitute meat tenderiser to bash the bejeezus out of a chicken breast, or to smash up a bag of cookies for a cheesecake base.  I am a huge fan of Joseph Joseph kitchen gadgets - I love the range of gorgeously stylish products, that work every bit as well as they look.  I'm so enamoured of the "form meets functionality" of their products, that I have several items in my kitchen cupboards, and have for ages been coveting the adjustable rolling pin.  So it was a wonderful surprise when I was gifted this rolling pin as a reward for my efforts at work.  (For the record, although we sell these products in my workplace, no-one is paying me to tell you this - I'm sharing this with you solely because I absolutely love these products).  Oh, and by the way, for the benefit of my New Zealand readers, you can buy Joseph Joseph products at Stevens Homewares.

Rolling Pin Collage

You'd think that two surprises in one week would be enough.  But no, surprise number three came in the form of these Sweet Potato Galettes from, you guessed it Yotam Ottolenghi.  Of course I should not have been surprised - I know well enough by now, and you will too if you've been visiting here for a while, that Ottolenghi is capable of taking a few seemingly unsurprising ingredients and turning them into a flavour and texture explosion which is so much greater than you might expect.

Sweet Potato Galettes 2

At I Heart Cooking Clubs this week we're sharing A Little Bit of Sunshine with Ottolenghi dishes in sunny hues of orange and yellow.  These gorgeous galettes seemed to fit the bill perfectly.

As usual, I've added a little bit of a personal twist to the recipe.  Flaky puff pastry is smeared with sour cream, which was homemade.  Also, remembering how well the hit of lime worked with sweet potatoes in this recipe, I couldn't resist adding some freshly grated lime zest.  I also subbed in some blue cheese instead of goat's cheese, and replaced pumpkin seeds with walnuts.

The end result is a sensation - full-on flavour, and fantastic contrasting textures.  Crisp, flaky, buttery pastry, smothered in tangy sour cream, given a bit of extra zip with a hit of lime;  softness and sweetness of the potatoes meets creamy, salty blue cheese, and crunchy walnuts;  all topped off with a bit of heat from chilli and garlic and a touch of freshness in the parsley.  Now, who wouldn't find that surprising?

Sweet Potato Galettes Recipe
Adapted from a recipe by Yotam Ottolenghi & Sami Tamimi
Makes 4
Vegetarian
Click here for a printable copy of this recipe

2x medium sweet potatoes
250g puff pastry (I used store bought)
1x free-range egg, lightly beaten
sour cream
grated zest of 1x lime
blue cheese, crumbled
walnuts, coarsely chopped
1x red chilli, finely chopped (remove seeds if desired)
1 tablespoon olive oil
1x clove garlic, finely chopped
handful freshly chopped flat-leaf parsley
flaky sea salt & freshly ground black pepper

Preheat oven to 200 degrees C (400 degrees F).

Bake potatoes in their jackets until they soften, but are still firm in the centre - about 35 minutes.

Meanwhile, roll pastry out on a lightly floured surface to about 2mm (1/16 inch) thick.  Cut into four rectangles, approximately 7cm x 14 cm (3 in x 6 in), and prick them all over with a fork.  Place the pastry rectangles on a parchment-lined baking sheet, and rest in the fridge for about half an hour.

Once sweet potatoes are cool enough to handle, remove skins and cut into 3mm (1/8 in) thick slices.

Remove pastry from the fridge, and brush lightly with the beaten egg.  Place a spoonful of sour cream on each piece of pastry, and spread leaving a small border on all edges.  Sprinkle a little grated lime zest over each one.  Arrange sweet potato slices over the top, keeping the border clear.  Season with flaky sea salt and freshly ground black pepper.  Sprinkle a little blue cheese, walnuts and chilli over the top of each one.

Sweet Potato Galettes 1

Bake in the oven until the pastry is golden and cooked through - about 20 to 25 minutes.

Meanwhile, mix together olive oil, parsley and garlic, and brush pastries with the mixture as soon as they come out of the oven.

Sweet Potato Galettes 4

Serve warm or at room temperature.

Two of these per person, accompanied by a simple salad, make a delicious light meal, or serve one per person as an appetiser.  And if you're lucky enough to be enjoying some real sunshine and summer weather where you live, these would make sensational picnic food.

If you would like to get to know Yotam Ottolenghi a little better, then do go and visit my friends at I Heart Cooking Clubs and see what they've all cooked up ...

IHCC Ottolenghi Leek Badge resized

... or check out Ottolenghi: The Cookbook and Ottolenghi's other great titles available from Amazon USA, Amazon UK or Fishpond NZ.

          Ottolenghi: The Cookbook

I will also be sharing this post at See Ya In the Gumbo hosted by the delightful Michelle at Ms. enPlace.

See Ya in The Gumbo Badge


Monday, June 3, 2013

Quick Pickled Lemons and Fish & Caper Kebabs with Burnt Aubergine

Fish & Caper Kebabs with Quick Pickled Lemons & Burnt Aubergine

New Zealanders as a people are sports-mad in general, and rugby-mad in particular.  It is without doubt our national sport, and it's importance is so deeply embedded in our national psyche, that details of some amazing triumph on the rugby field or, shudder the thought, devastating defeat (heads must surely roll), will often be lead story in our national news broadcast ahead of child kidnappings, murders, parlimentarians in trouble, or earthquakes in China.  We know here what's really important!

At the end of a rugby match, the captains of each team are always interviewed for their comments.  And I can wager, a pound to a pinch of the proverbial, that their statement will always begin with the words, "Well, it was a game of two halves, and full credit to the other team ... blah, blah, blah".

Why, am I telling you all this.  Because this is going to be a post of two halves, with once again full credit to Yotam Ottolenghi.

In the first half of this post, I'm bringing you Ottolenghi's Quick Pickled Lemons.  At I Heart Cooking Clubs, our Monthly Community Recipe for the month of May was preserved lemons, either the traditional method which takes 4-6 weeks of curing, or this quick pickled version, ready in 24 hours.  As I have already posted preserved lemons here before - in fact they were the very first thing I ever posted on this blog - I decided to give the quick pickles a try.  These quick pickles, I have to say, are incredibly moreish and I know that these just became a "refrigerator staple" for me to accompany all manner of things.  I would still urge anyone to have a go at preserved lemons as well.  I always have at least a jar or two in my fridge - they are incredibly easy to make (and very cheap compared to bought ones), and they are invaluable for bring wonderful flavour to stews, casseroles, couscous, salads, and even dressings.  If you do a search of preserved lemons on this blog, you will find a number of recipes in which I've used them.

Quick Pickled Lemons

In the second half of the post, the Quick Pickled Lemons are served up with Fish & Caper Kebabs and Burnt Aubergine, from Ottolenghi's book Jerusalem: A Cookbook.  I'd had this recipe bookmarked for a while, and with out theme this week of "Pattycake, Pattycake" at I Heart Cooking Clubs, this seemed like the perfect opportunity to give these a try.

The fishcakes - light and delicate (no stodgy fishcakes, these babies), with the little hits of briny capers - were an absolute hit around here.   The burnt aubergine accompaniment - sumptuous smokey flavour, enhanced with garlic and herbs - may possibly have been an even bigger hit.  With the pickled lemons on the side, this was a stunning meal.  Apart from a bit of work involved in preparation of the lemon and aubergine, both of which could be done well in advance, this makes a quick and easy meal to put together for a midweek supper - a great dish for entertaining too.

Quick Pickled Lemons
Adapted (slightly) from recipe by Yotam Ottolenghi & Sami Tamimi
Click here for a printable copy of this recipe

1x smallish red chilli, roughly chopped
juice of 1x lemon
3x medium lemons
(halved lengthwise, then sliced widthways as thinly as possible)
35g caster sugar
1 tablespoon coarse sea salt
1x clove garlic, crushed
1 teaspoon smokey paprika
1/4 teaspoon ground cumin
1/2 teaspoon turmeric

Grind the chilli to a rough paste with juice of 1/2 lemon in a mortar and pestle.  Transfer to a large bowl with the juice of the other half of the lemon, and all the remaining ingredients.  Mix everything together well, massaging all the flavourings into the lemons.  Cover the bowl and leave on the bench overnight.  Next day transfer to a clean, sterilised jar and refrigerate.  Will keep for approximately 2 weeks.


Fish & Caper Kebabs with Burnt Aubergine Recipe
Adapted, slightly, from recipe by Yotam Ottolenghi & Sami Tamimi
Click here for a printable copy of this recipe

Burnt Aubergine
3x medium aubergine
1/4 cup natural, unsweetened yoghurt
1x garlic clove, roughly chopped
generous handful flat-leaf parsley leaves
flaky sea salt
freshly ground black pepper

Fish Kebabs
430g white fish, skinned & boned (I used tarakihi)
1 cup panko breadcrumbs
1 medium free-range egg, lightly beaten
2 tablespoons capers
generous handful flat-leaf parsley, roughly chopped
grated zest of 1x lemon
1 tablespoon lemon juice
3/4 teaspoon ground cumin
1/2 teaspoon turmeric
flaky sea salt
freshly ground black pepper

sunflower oil for frying

Begin by burning the aubergines.  Cut a few long slashes through the skin of each one,  and put onto the grill of a hot barbeque.  Turn regularly and cook until the skin is black and flaky, and the flesh is soft - about 15- 20 minutes. (* See note below)

Remove the aubergines from the heat and leave until cool enough to handle.  Cut in half lengthwise, scoop out the soft flesh in long strips and discard the blackened skin.  Put the flesh into a sieve set over a bowl for any water to drain out of the flesh while you prepare the fish kebabs.

Cut the fish into very thin slices, and then into very tiny dice,  Put the diced fish into a bowl.  Add the breadcrumbs, egg, capers, herbs, lemon zest and juice, and spices.  Season generously with flaky sea salt and pepper.  Mix everything together well, and using your hands shape into small patties - you should get 10-12 patties depending on the size you make them.  Place the patties in a single layer on a plate or tray, cover and refrigerate for about half an hour to firm up.

Meanwhile finish off the burnt aubergine.  Put the drained aubergine flesh into the bowl of a food processor, along with the garlic, parsley, and yoghurt.  Add a generous pinch of flaky sea salt and a good grind of black pepper.  Pulse in the food processor a few times, just until everything is roughly chopped and combined.  Make sure that you keep a bit of texture - you don't want a smooth paste.  Set aside.

Set a frying pan over medium-high heat, and cover the base with a thin layer of oil.  Cook the kebabs in batches, until golden all over and cooked through - only a couple of minutes on each side.  They are very delicate, so do take care putting them into the pan and turning them.

Serve hot, with a generous dollop of the burnt aubergine on the side and a small amount of the quick pickled lemons.

*Note:  Ottolenghi offers a method for burning the aubergines of lining the base of a gas hob with tin foil and then blackening them directly in the flame. This smacks to me of "mess" and also having to stand over the flame and keep moving the aubergines around.  His alternative suggestion is doing them in the oven under a hot grill. My method of choice is doing them on the barbeque - altogether less mess and less fuss, and works perfectly.  You do want to make sure first of all that you make a few long slashes through the skin in each one - helps to prevent any possibility that they might explode!!

If you would like to get to know Yotam Ottolenghi a little better, then do go and visit my friends at I Heart Cooking Clubs and see what they've all cooked up ...

IHCC Ottolenghi Leek Badge resized

... or check out Jerusalem and Ottolenghi's other great titles available from Amazon USA, Amazon UK or Fishpond NZ.

          Jerusalem 

I'm also sharing this post this week at See Ya In the Gumbo hosted by the lovely, and very amusing, Michelle at Ms. enPlace.


See Ya in The Gumbo Badge

Sunday, June 2, 2013

Sweet New Zealand # 23


Sweet New Zealand Badge


Amazingly, we are now into the 23rd month of the Sweet New Zealand monthly blog event, created by the very lovely Alessandra Zecchini, and it is my pleasure to be hosting the event this month. This is an opportunity for all Kiwi bloggers (whether you are living in New Zealand or overseas), as well as for non-Kiwi bloggers living in New Zealand, to connect and share some of those sweet treats from your kitchen. You can find a round-up of all of last month's drool-worthy sweet treats here at After Taste - Bridget did a great job and I want to try everything!  This is a really fun way for us all to get to know each other, and I hope you will all join in for another month.  If you're new to this event, the rules are simple:

1.   This event is open to all bloggers living in New Zealand (even if you are not a Kiwi), as well as all Kiwi bloggers living and blogging overseas.

2.   You can enter anything sweet: cakes, biscuits, slices, desserts, even drinks, and you may submit as many entries as you like, including old posts if you like.

3.   Your entry must contain the phrase Sweet New Zealand, the Sweet New Zealand badge (choose your own size), a link to the host, and to this post - so if you are submitting an older post remember to update it accordingly.

4.   To make submitting your entry really, really easy I have included a linky tool at the end of this post.  The linky will be open until 28 June and I will do a round-up of all entries on 30 June.  To use the linky tool, simply scroll down to where it says "You are next ... Click here to enter", and then follow the instructions.  If you prefer you can email your entry to me by 28 June, providing your name, your blog name and URL, your post URL, and a photo.  Please email to yoga(dot)tapas(at)gmail(dot)com.

And that's it - no more rules!  Have fun and I look forward to seeing all your sweet entries.

Friday, May 31, 2013

Spice Cookies

Spice Cookies 2

This month at Tasting Jerusalem, we're sampling Ottolenghi's baked goods.  Having recently made (and adored) Ottolenghi's Plum & Oat Bars, I had no hesitation dipping into more of his sweet treats.  Jerusalem: A Cookbook has some positively sensational sweets and desserts, but I figured these Spice Cookies would make a great wee treat to take into the shop for my work friends to enjoy.

We're also dipping into Something Sweet from Ottolenghi at I Heart Cooking Clubs this week, so this post is doing double duty.

In the introduction to this recipe, Ottolenghi says, "These are very loosely inspired by duvshanyot (round iced cookies, made with honey and spices, typically for Rosh Hashana), or pfeffernusse.  They are actually more closely related to an Italian spice cookie and are hugely popular on the sweet counter at Ottolenghi over Easter and Christmas."  In fact, when I shared these at work, the first reaction I got was, "these taste like Christmas".

The cookies are crisp on the outside, and slightly softer on the inside, delicately spiced, with lovely hits of chocolate, raisins, and citrus.

I made a few minor changes to the recipe, mostly just to suit what I had on hand.  I used raisins soaked in an orange liqueur, rather than the currants and brandy called for in the original recipe - I think cranberries would be a nice alternative too.  I added in some cardamom, just because I love it, and left out ground allspice which I didn't have.  Also, because I failed to observe baking rule 1.01, I failed to read the recipe through before I started, and then discovered in the midst of everything that I had little more than a tablespoon of butter on hand, instead of the 1/2 cup required by the recipe.  I wasn't going to run out to the supermarket at that stage, so a few tablespoons of yoghurt to the rescue, and things worked out fine.  I can't say what difference the butter would have made to these cookies, but I certainly didn't feel as though the absence was discernible.  Also, the original recipe only asked for 1/2 an egg - as there is no world in which I would measure out 1/2 an egg (and then be left wondering what to do with the other 1/2), I put in the whole egg.  I also thought this might compensate for the lack of butter.  Lastly, I topped them off with some of my homemade Seville Orange Spoon Sweets, instead of the chopped candied peel called for in the original recipe.

I hope you give these a try.  I have to say that I'm not normally a huge cookie lover - given the choice I would usually opt for a piece of slice, or even cake.  These were, however, delicious cookies.  They were easy to make and the house smelled amazing while they were baking.  I would definitely make these again.

Spice Cookies 1


Spice Cookies Recipe
Adapted from recipe by Yotam Ottolenghi & Sami Tamimi
Click here for a printable copy of this recipe

125g (4 oz) raisins
2 tablespoons orange liqueur (I used "44")
240g (8 oz) plain flour
1/2 tablespoon cocoa powder
1/2 teaspoon baking powder
1/4 teaspoon baking soda
1/2 teaspoon cinnamon
1/2 teaspoon ground cardamom
1/2 teaspoon ground ginger
1/2 teaspoon grated nutmeg
1/4 teaspoon salt
150g (5 oz) dark chocolate, finely chopped (I used Whittaker's Dark Ghana)
35g (1 oz) room-temperature butter
3 heaped tablespoons natural yoghurt
125g (4 oz) caster sugar
1 teaspoon vanilla paste (I used Heilala)
grated zest of 1/2 lemon
grated zest of 1/2 orange
1x medium free-range egg
1 tablespoon diced candied citrus peel

Glaze:
3 tablespoons lemon juice
160g (6 oz) icing sugar

Preheat oven to 190 degrees C (375 degrees F).

Soak the raisins in the liqueur for 10 minutes.

Meanwhile, sift together the flour, cocoa, baking powder, baking soda, spices and salt.   Add the chopped chocolate, and mix well.

Cream together the butter and sugar, using an electric beater, just until well combined.  Then add the yoghurt, vanilla paste, and citrus zest. Continue beating for about a minute, then add the egg and beat for a further minute.

Now add the dry ingredients and the raisins, along with their soaking liqueur.  Mix until everything comes together - you might need to use your hands.

Roll spoonfuls of the dough into round balls and place them on baking sheets lined with baking paper, about 2cm (3/4 in) apart. (* See note below)

Bake the cookies in the preheated oven, until the outsides have firmed but the centre is still a little soft - about 15-20 minutes.  Remove from the oven, cool on the baking trays for 5 minutes, then transfer to a cooling rack set over a sheet of parchment paper.

While the cookies are still warm, whisk the glaze ingredients into a thin, smooth icing, and then drizzle a tablespoon of icing over each cookie - it will drip away, leaving a very thin glaze on the cookies.  Finish with a little of the candied peel on top of each one.

Store in an airtight container.

*Note:  The recipe did say at this stage to rest the cookies in the fridge for an hour before baking.  I didn't notice this until after I'd put the cookies in the oven, and I don't think they suffered adversely for this omission.

I am sharing this post at Tasting Jerusalem, a virtual cooking community exploring the vibrant flavors and cuisine of the Middle East through the lens of “Jerusalem: A Cookbook” by Ottolenghi and Tamimi published by Ten Speed Press. You can follow along and cook with us by subscribing to omgyummy.com, following the hashtag #TastingJrslm on Twitter and Instagram, and liking our Facebook page.

If you would like to get to know Yotam Ottolenghi a little better, then do go and visit my friends at I Heart Cooking Clubs and see what they've all cooked up ...

IHCC Ottolenghi Leek Badge resized

... or check out Jerusalem and Ottolenghi's other great titles available from Amazon USA, Amazon UK or Fishpond NZ.

          Jerusalem

I will also be submitting this post to Sweet New Zealand.  Inspired by Alessandra Zecchini, Sweet New Zealand is an event for all Kiwi bloggers (whether living at home or abroad), or all foreign bloggers living in New Zealand, to link up their sweet treats.  During the month of June, I will be hosting Sweet New Zealand right here at Couscous & Consciousness.

Sweet New Zealand Badge A

And, just because I really like to spread the love around, I'm also sharing this post this week at See Ya In the Gumbo hosted by the lovely, and very amusing, Michelle at Ms. enPlace.


See Ya in The Gumbo Badge


Saturday, May 25, 2013

Pasta with Sardines

Pasta with Sardines 4

This week is Pot Luck week at I Heart Cooking Clubs, and this means that we get carte blanche to choose any recipe we like either from our current chef, who as I'm sure you know by now, happens to be the incredibly inspiring Yotam Ottolenghi, or any one of the seven other chefs we have previously featured at IHCC.

I actually had an Ottolenghi dish picked out weeks ago that I was going to make for this week's challenge, but somehow that didn't come to pass and I decided that today was the day to get this post out of draft.  This dish is ever so slightly adapted from a Mark Bitman recipe, and is one of my favourite pasta dishes.  Mark Bitman was actually the featured chef when I first joined the IHCC community, and I loved cooking his dishes.  This recipe was one that I made way back then, with all good intentions for publishing it as my "Farewell to Bitman" post.  Somehow, that didn't happen, and although I've made this dish several times since, the post has continued to languish in draft.  Time for that to change.

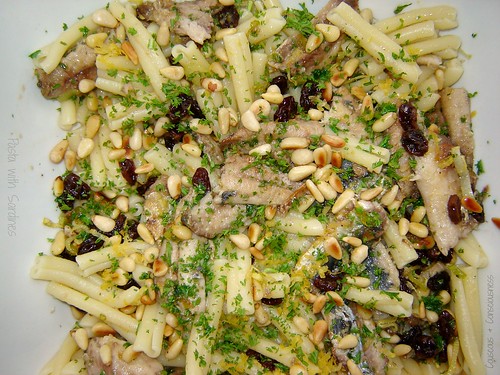
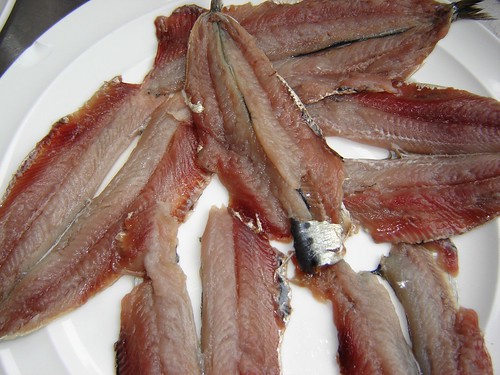
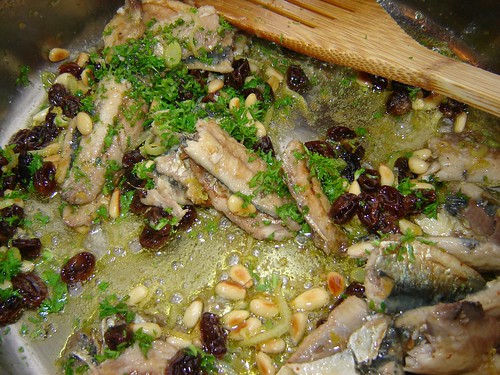
This is one of those great "pantry raid" dishes, perfect for using up a few of those store cupboard ingredients - pasta, raisins (original recipe uses currants, but I prefer raisins), pine nuts and tinned sardines.  On the subject of sardines, I actually prefer to use fresh, and I have included a video from YouTube here which shows just how easy they are to clean - I promise that it is totally worth the little bit of effort if you are able to get them fresh.  However, the original recipe calls for tinned sardines, and they will work perfectly well if you either can't lay your hands on fresh ones or can't be bothered to clean them.


Other changes I like to make to this dish, are replacing onion with fennel - I think the "aniseed" flavour is a great complement to the fish and the raisins, and I also like to add in some chopped preserved lemon for its intensely lemony-salty hit.

This dish is incredibly quick to make - once you've prepared the fish (which is itself the work of moments), the rest of the dish pretty much comes together in the amount of time it takes to boil pasta, making it perfect for a quick, mid-week dinner.

Add to this the fact that, from both an ethical point of view and a healthy one, sardines are a great choice, and you have a win:win dish.  Hope you'll try it.

Pasta with Sardines 5

Pasta with Sardines Recipe
Adapted from a recipe by Mark Bitman from
Makes 2 generous servings
Click here for a printable copy of this recipe

6x fresh sardines
1/4 cup flour
flaky sea salt & freshly ground black pepper
olive oil

250g pasta ( I used De Cecco casareccia)
salt

handful of raisins, soaked in warm water while you prepare the sardines
handful of pine nuts, lightly toasted
olive oil
1x fennel bulb, thinly sliced
1/2 a preserved lemon (discard the flesh, and slice the skin thinly)
grated zest of 1x lemon
large handful fresh parsley leaves, coarsely chopped
freshly ground black pepper

Put a large pot of water over high heat and bring to the boil.

Meanwhile, prepare the sardines as per the video above.  Wash thoroughly and use a paper towel to pat completely dry.

Pasta with Sardines 1

Spread flour, seasoned with flaky sea salt and freshly ground black pepper, on a plate.  Dredge the sardines in the flour, shaking off any excess, and set aside.

Pasta with Sardines 2

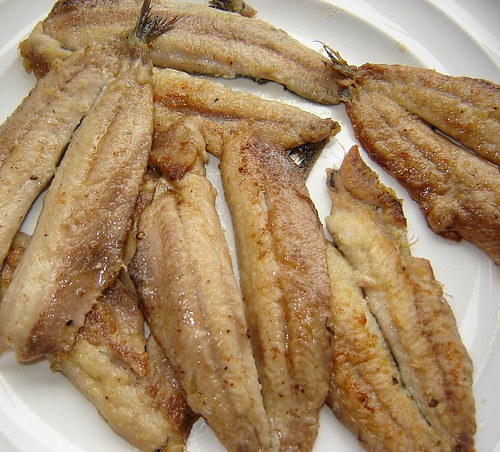
Heat a tablespoon or so of olive oil in a shallow frying pan over medium heat.  As soon as the oil is hot, add the sardines to the pan, and continue to cook until the fish is golden brown and almost cooked through.  Remove from pan to a plate lined with a paper towel to absorb any surplus oil.  Break into slightly bigger than bite-sized pieces.

Now liberally salt the boiling water, and add the pasta to the water.  Cook according to the packet instructions until al dente.

Meanwhile, heat another tablespoon or two of olive oil in a large skillet over medium heat.  When hot, add the sliced fennel and saute until the fennel has softened - about 6 to 8 minutes.  Add the drained raisins, most of the pine nuts, preserved lemon skin, sardines, and a generous grind of black pepper.  (Because the preserved lemon is salty, you may find that you don't need any additional salt.)  Stirring gently, combine everything well, and cook until everything is heated through and fish is cooked through.

Pasta with Sardines 3

Drain the pasta, reserving a cup of the cooking water.  Add the pasta to the pan containing the fish, and add most of the chopped parsely.  Toss carefully to combine and add a little of the reserved pasta water if necessary.  Taste and adjust seasoning to your liking

Transfer to a warm serving bowl, and sprinkle over the remaining pine nuts and parsley, and the grated lemon zest.

Delicious served immediately or at room temperature. 

If you would like to get to know Mark Bitman a little better, then do go and visit my friends at I Heart Cooking Clubs and see what they've all cooked up ...


or check out some of these great Mark Bitman cookbooks:

How to Cook Everything, Completely Revised 10th Anniversary Edition: 2,000 Simple Recipes for Great Food   How to Cook Everything Vegetarian: Simple Meatless Recipes for Great Food   Mark Bittman's Kitchen Express: 404 inspired seasonal dishes you can make in 20 minutes or less

Available from Amazon, Book Depository UK, and Fishpond NZ

I'm also sharing this post this week at See Ya In the Gumbo, hosted by the very lovely Michelle at Ms. enPlace.

See Ya in The Gumbo Badge