Tuesday, September 27, 2011

Apricot, White Chocolate & Cashew Nut Slice for Julia


Apricot, White Chocolate & Cashew Nut Slice

To those Kiwi bloggers who live in Auckland, Zarbo Cafe & Delicatessan will require no introduction whatsoever.  I was first introduced to Zarbo by one of my dearest friends, Julia.  Julia and I saw each other through many trials and tribulations, from the wild and mis-spent days of our twenties, to more "grown-up" times in our forties, including marriage and children (in her case) and marriage and divorce (in mine).  Sadly I lost Julia to her long battle with cancer about four years ago, and it saddens me greatly that now in my fifties (which I happen to think is the best time of my life so far) I cannot share this time with her.  But while she was still alive, Zarbo was "our place" - it was the place we used to frequently meet at and hang out together whenever I was visiting Auckland, and when they published their first cookbook, "Zarbo, Recipes from a New Zealand Deli", Julia was quick to gift me a copy.

Zarbo: Recipes from a New Zealand Deli

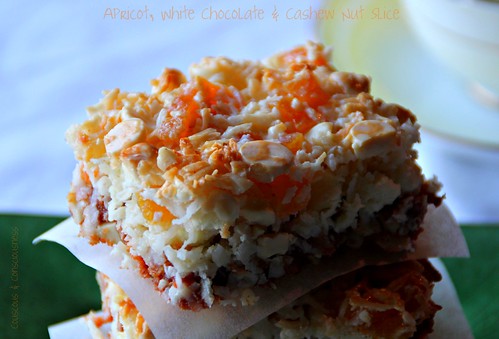
I miss Julia's friendship a lot, and think often about those long afternoons sitting in Zarbo, nattering over a cup of coffee (or two) and a piece of cake or slice.  So today when I was looking for a contribution to this month's Sweet New Zealand blogging event (more about that in a minute), I knew that I would find the perfect little something in my trusty Zarbo book.  The "Hello Rosie" Slice on page 95, was exactly reminiscent of the kind of thing Julia and I would have shared, though I have made a few changes.  The first change was more by accident than intent - because I am an idiot, and didn't read the recipe correctly, my chopped nuts ended up in the base instead of the topping - an accident I didn't discover until the slice was actually in the oven!!  I was worried that the end result would be something altogether too crumbly, but the slice has held together just fine and doesn't appear to have suffered in anyway from my mistake.  Accordingly, that is exactly how I have instructed you here, but if you feel like putting the nuts back into the topping, then go right ahead.  I also made a few substitutions - I have used cashew nuts instead of walnuts, dried apricots instead of sultanas, and white chocolate instead of dark.  I think you could easily experiment with all sorts of different fruit, nut and chocolate combinations in this recipe.  I hope you will feel inspired to have a go and come up with one of your own special combinations to share with someone close to your heart.

Sweet New Zealand Badge

The Sweet New Zealand monthly blog event was created by the very sweet Alessandra Zecchini, and is hosted this month by the equally sweet Alli at Pease Pudding.  This is an opportunity for all Kiwi bloggers (whether you are living in New Zealand or overseas), as well as for non-Kiwi bloggers living in New Zealand, to connect and share some of those sweet treats from your kitchen.  You can find a round-up of last month's special treats on this page of Alessandra's blog, or go and visit this page of Alli's blog to find out how you can join in this month.  Alli will be posting a round-up of entries at the end of the month.  I think I'm only just going to manage to slip in under the wire with this post, but if you feel like joining in and you don't have time to conjure up something new, you are welcome to link up an older post.

Now on with the recipe ...

Apricot, White Chocolate & Cashew Nut Slice Recipe
Adapted from
Vegetarian
Makes 18 bars
Click here for a printable copy of this recipe

For the base:
100g butter, melted
250g malt biscuits, crushed
2 cups raw cashew nuts, roughly chopped

For the topping:
1-1/2 cups white chocolate morsels
1 cup chopped dried apricots
3 cups long strand coconut
500g sweetened condensed milk

Grease a 20cm x 30cm (8 inch x 12 inch) slice tin, line with baking paper, and set aside.

Mix the crushed biscuits, chopped nuts, and melted butter together, and press into the tin.

Mix the chocolate, apricots, coconut and condensed milk together and press over the base.

Bake at 160 degrees C (320 degrees F) for approximately 30 minutes, or until lightly browned on top.  Take care not to overcook as the finished slice should be sticky, chewy and slightly moist.  If you find that the slice is browning too quickly, cover with a piece of baking paper until finished cooking.

Leave until cold before slicing.

Tuesday, September 20, 2011

Blue Cheese, Fig & Walnut Flatbread


Blue Cheese, Fig & Walnut Flatbread 4A

Seven months after our lives were turned upside down by the Christchurch earthquake, we have finally settled into our own home in Nelson.  The last of the boxes (well, all bar two) have been unpacked;  the guest bedrooms have been painted in readiness for anyone who wants to come for a visit;  a new hot-water cylinder has been installed so that a decent shower is now a possibility; paintings have been hung;  and plans are underway for a new kitchen.

We are beginning to feel "at home" in our house and in this new community, and with that my inspiration to find my way back to the heart of my home - the kitchen - has returned.  I have unpacked all my cookbooks and spent hours pouring through them all, enjoying coming back to ones that I haven't opened for a long time, and I'm inspired by the abundance of beautiful fruit and vegetables and great small producers that I find at our local market.

This weekend I picked up some beautiful local cheeses and chorizo at the market, and was inspired by a recipe from Return of the Naked Chef, by Jamie Oliver, to make this Blue Cheese, Fig & Walnut Flatbread to accompany them.  Although it didn't quite start out that way - it was going to be a cheese, chilli and paprika flatbread, but when I went to the pantry looking for dried chillies and paprika, somehow dried figs and walnuts were what jumped into my hands.

This bread was easy to make, has great texture, keeps well, and the filling turns this into a great "stand alone" bread.  Hope you'll give it a try.

Blue Cheese, Fig & Walnut Flatbread Recipe
Adapted from recipe by Jamie Oliver
(Makes 2 large loaves)
Vegetarian
Click here for a printable copy of this recipe

For the bread:
3 teaspoons dried yeast
1 tablespoon honey
625ml (1-1/4 pints) tepid water
1kg (2.2 lbs) high grade flour
2 teaspoons salt
extra flour for dusting

For the filling:
6 dried figs
200g (7 oz) blue cheese
1 cup walnuts

Dissolve yeast and honey in half of the tepid water, and set aside until a thick foam forms on top of the water.

Put the flour and salt into a large bowl, making a well in the centre.  Pour the frothy yeast mixture into the centre and then, using your hand, stir in a circular motion, gradually drawing more flour into the centre until all of the yeasty liquid has been absorbed.  Pour in the remaining tepid water and continue mixing until all the flour has been incorporated and you have a nice moist dough - use more liquid if necessary.

Dust a board or bench top with some extra flour, turn your dough ball out and knead vigorously for about 8 minutes. 

Flour your hands well, and sprinkle a little flour over the top of the dough.  Form into a ball and place on a baking tray lined with parchment paper.  Score the top of the dough with a sharp knife, cover with a clean tea towel, and set aside to prove until the dough has doubled in size.

Meanwhile, prepare the filling.  Soak the figs in a little hot water until soft and plump, then chop coarsely.  Toast the walnuts until golden;  chop coarsely.  Put the chopped figs and walnuts into a small bowl, crumble in the blue cheese, and mix together well.  Set aside.

Blue Cheese, Fig & Walnut Flatbread 7A

Line a baking sheet with parchment paper and set aside.  Preheat your oven to 220 degrees C (425 degrees F).

When the dough has doubled in size, punch the air out of it and knead again for a minute or so.  Cut the dough into four equal sized pieces.  Set three pieces aside and cover with a tea towel, while you work with the first piece.

Roll the first piece of dough out into something vaguely resembling a large oval shape, and about the length of your baking sheet.  Place the rolled out dough onto the lined baking sheet.  Sprinkle half of the fig, walnut and cheese mixture over the top, leaving a 2 cm (1 inch) border. 

Blue Cheese, Fig & Walnut Flatbread 6A

Roll out the second piece of dough to roughly the same size and shape (you don't need to be too precise), and drape this piece of dough over the top.  Press the edges together.  Make three or four deep slashes down the length of the bread, and stretch to open up the slashes exposing the filling.

Blue Cheese, Fig & Walnut Flatbread 5A

Now repeat with the remaining dough and filling.

Set loaves aside to prove for another 20-30 minutes, then bake in the preheated oven for 15 to 20 minutes.  Remove to a wire rack to cool for about 10 minutes.

This would be a great addition to an antipasto platter, or tear into chunks and serve with your favourite soup.

Blue Cheese, Fig & Walnut Flatbread 1A

I'm sharing this post at I Heart Cooking Clubs, where this week we have our final week of cooking with Jamie.  Do go and visit my friends at I Heart Cooking Clubs and see what they've all been cooking up for our farewell to Jamie, and find out who we'll be cooking with for the next six months ....

IHCC

.... and check out Jamies Italy and many of his other great titles, available from Amazon or Fishpond NZ.

Jamie's Italy     Jamie's Kitchen     The Naked Chef