Thursday, July 30, 2009

Corn Fritters Recipe

I'm reposting this recipe, because I rather "red-facedly" have to admit to a bit of an oops in the original recipe. As I mentioned in a recent post, one of the real challenges I've discovered in writing this blog has been actually translating what I cook into an actual recipe that you can recreate. I am more used to "sloshing" and "dashing" rather than measuring ingredients carefully (one of the reasons I am not much of a baker), and very often it doesn't matter - but of course sometimes it does. So after a couple of people mentioned to me recently that they had made these fritters and found the batter to be very thick (just add a bit more milk I told them), I thought I should actually make them myself according to the recipe instructions I had given. Very embarrassed, big lesson learned, why did I not do this in the first place? Follow the instructions I did, and boy was that batter thick - now let me say that this should be quite a stiff batter, but not like that - so what was wrong. I had completely left out the inclusion of milk in the ingredients, and had rather overstated the amount of cornmeal. So please forgive me and read on ... both the recipe below and the printable copy of the recipe have now been amended. I have also added a couple of other notes at the end of the recipe that I think are helpful.


Sunday evening dinner in our house generally tends to fall into one of two categories.

Sometimes it's the day for a roast dinner - usually a free-range chicken with some seasonal vegetables.

More often though, Sunday is the day we go out for a leisurely brunch/lunch, followed by a drive around the Port Hills, and a gelato on the way home. On those occasions, something simple and uncomplicated is called for - maybe just poached eggs on toast (free-range eggs and great bread being absolute essentials for this), or a grilled cheese sandwich (need I say more, again, about the quality of ingredients here).

Also in this quick and easy category is my favourite Sunday stand-by - corn fritters. Actually I think of these as a great fall-back dish any time that I am short of time, energy or inspiration, which can happen pretty much any day of the week! Of course these are best made in the summer when fresh corn is available, but I seem to long for them more in the winter, and I don't hold back from using frozen corn when fresh is out of season. I have on occasion used tinned, but the corn seems to take on a slightly "metallic" taste that I don't particularly like; so, frozen is my preference if fresh is unavailable.

Over the years I've tried numerous recipes for these, tweaking them a bit here and there, and this is what I've ended up with. The starting point was Bill Granger's corn fritters from his book Sydney Food. Then I came across an adaptation of this recipe on The Wednesday Chef blog, and in keeping with that I too like to mix rice flour with the plain flour to lighten the batter up a little. I also replace the liquid with creme fraiche and add some cornmeal for an extra little bit of crunch, an idea borrowed from an Annabelle White recipe. Lastly, my secret confession - I add a tin of creamed corn - yes, really! Now let me just say that creamed corn truly gives me the shudders - I even cringe when I open the tin and smell it. But a good friend put me on to this one and, after trying it out, I had to admit it was surprisingly good. So now it has become an essential ingredient in my corn fritters.

So this is my recipe - a little bit Bill Granger, a little bit Wednesday Chef, a little bit Annabelle White, and a little bit Julia Selwyn.


Corn Fritters Recipe

Click here for a printable copy of this recipe

Vegetarian
(Makes approximately 8 large fritters
or 12-16 smaller ones)


1/2 cup rice flour (refer Source Guide)
1/2 cup plain flour
1 teaspoon baking powder
1/4 teaspoon salt *
1 teaspoon ground coriander
1/2 teaspoon ground cumin
1/4 teaspoon paprika
1 tablespoon cornmeal
2 free-range eggs, lightly beaten
1/2 cup creme fraiche
1/2-3/4 cup milk *
2 cups corn kernels
(if fresh, you will need about 3 cobs)
(if frozen, thaw kernels before use)
410g can of creamed corn
1/4 cup chopped flat-leaf parsley
vegetable oil for frying

* See notes below

Sift rice flour, plain flour, baking powder, salt, coriander, cumin and paprika into a large bowl. Add cornmeal and combine well.

Combine the eggs, creme fraiche, and milk in a separate bowl, then slowly pour the egg mixture into the dry ingredients, whisking as you go. Continue whisking until the batter is smooth.

Add the corn kernels, creamed corn, and parsley. Stir to combine.

Heat oil in a large frying pan over a medium heat, using enough oil to cover the bottom of the pan. When the oil is hot, drop spoonfuls of batter into the pan and cook until golden brown underneath (about 2 to 3 minutes). Turn over and cook the other side (again about 2 minutes). Remove and keep warm while you repeat with the remaining batter, using more oil to cook as necessary.

* Notes: The amount of milk you need here will depend a bit on the size of eggs you use (I like FRENZ brand free range eggs, and I buy their biggest super jumbo sized ones), and also on your corn - if you are using fresh or frozen corn you will need a bit more liquid than if you are using tinned. Buttermilk is particularly nice if you have it, or a tablespoon of lemon juice added with regular milk is a nice option. The amount of salt you need will also depend on the type of corn you are using - since most tinned corn already has salt in it, you might find you need a bit more if using fresh, frozen or tinned that has no added salt. I suggest that you cook just a teaspoon of batter first, then taste for seasoning and adjust as necessary before cooking the rest of your fritters.

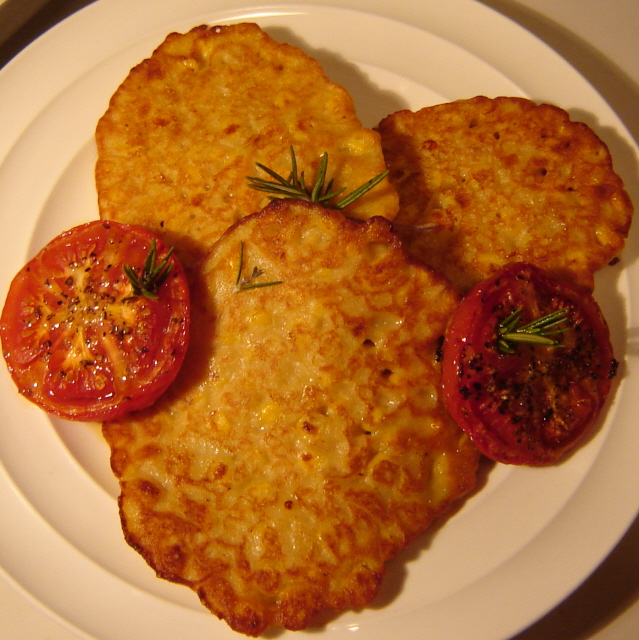
I like to serve these with sweet Thai chilli sauce and Maple Roasted Tomatoes (see below). My partner also likes some crispy bacon and a dollop of sour cream with his.


Maple Roasted Tomatoes Recipe

tomatoes
maple syrup
salt
pepper

Slice tomatoes in half and place cut side up in a shallow baking dish which is just big enough to hold the tomatoes snuggly. Drizzle maple syrup over the top of the tomatoes and season generously with salt and freshly ground pepper. Bake in a slow oven for 45 minutes.

Tuesday, July 21, 2009

Trio of Tamarillo Recipes


I mentioned a couple of weeks ago that I had been enjoying the abundance of fresh tamarillos right now, and experimenting in the kitchen with them. My brain is still whirring with all sorts of possibilities to trial, but if I waited until I had exhausted all of those before posting, tamarillo season would be over before you got to try any of them. So here are three recipes I have made, and loved every bite of – a Spicy Tamarillo Sauce with Smoked Duck Breast, a Tamarillo Sorbet, and a White Chocolate, Tamarillo & Rose Water Ice Cream. I hope you will try them and enjoy them too. I would also love to hear your comments if you have a favourite recipe using tamarillos.


For all of these recipes you need to begin by blanching, peeling and chopping the tamarillos. Make a small cut in the skin of each tamarillo, drop into a bowl of hot water for about 1 minute, then remove. The skin should now slide off easily – if not, return to the hot water for a minute more. Once peeled, you are ready to cut the tamarillos into small pieces - I cut each one into quarters, then each quarter into four slices.


Smoked Duck with Spicy Tamarillo Sauce Recipe


Click here for a printable copy of this recipe


Gluten free

Serves 2


2 smoked duck breasts (refer Source Guide)


Sauce:

(adapted from a recipe by Jan Bilton, Fresh & Fancy Fare)


3 tamarillos

1 cinnamon stick

1 star anise

2 tablespoons sugar

1 tablespoon maple syrup

¾ cup water


Blanch and peel the tamarillos according to the earlier instructions. Slice the tamarillos and place in a small saucepan, along with the spices, sugar, maple syrup, and water. Bring up to the boil, then reduce to a simmer for about 10 minutes or until the fruit is soft. Cover and set aside to cool. Remove the spices, puree using an immersion blender or food processor, and reheat before serving. This can be made several hours or even a couple of days ahead of time.


Heat a skillet over high heat, really no oil required as a fair amount of fat will render out of the duck breast. Score the skin of the duck breasts, and once pan is hot, slide in the duck breasts, skin side down. Cook until the skin is crispy, and then turn over for a couple of minutes more. This will really not take much time at all – since the duck has already been smoked, you are not trying to cook it, simply to crisp up the skin and warm it through.


Serve sliced, with the warmed tamarillo sauce poured over the top.


I also served this with some sautéed brussel sprouts with walnuts, and crispy parmesan parsnips (cut parsnips into wafer thin slices, using a peeler, toss with egg white and parmesan cheese, spread out on a baking sheet, and cook in a hot oven until brown and crisp – about 10-15 minutes).


This sauce also works well with roast duck or venison.


White Chocolate, Tamarillo & Rose Water Ice Cream Recipe


Click here for a printable copy of the complete recipe


Vegetarian, gluten-free

Makes about 1.5 litres


This begins with a good vanilla ice cream base, which I adapted from David Lebovitz’s recipe for vanilla ice cream (you can find his original recipe here) - this is simplicity itself to make, and the end result is rich, creamy and fragrant. Of course, like all things simple, the end result is only as good as the quality of ingredients you use – so do use free range eggs, organic milk and cream if you can get it, and good, fresh vanilla beans (look for ones that are still pliable, not stiff and hard). A tamarillo rose water pulp and chunks of white chocolate are then swirled through the churned ice cream.


Recipe


100g good quality white chocolate, chopped


6 ripe tamarillos (preferably organic)

1½ tablespoons sugar

45ml hot water

1½ teaspoons rose water (refer Source Guide) (optional)


Blanch, peel and chop tamarillos according to earlier instructions. Put all of the chopped fruit into a non-metallic bowl and combine with the remaining ingredients. Cover bowl with cling film and set in the fridge to marinate for at least 24 hours. Don’t be concerned if it seems as though the rose water is very over-powering at this stage. It will completely mellow out by the time it has finished its marinating process, at which stage there will be almost no discernable flavour of the rose water. “Why bother then?” you may wonder. Well, somehow, even though you can’t detect the specific taste of rose water, it seems to really accentuate the floral, slightly perfumed notes of the tamarillos’ flavour.


Vanilla Ice Cream

(adapted from recipe by David Lebovitz)


250ml full-fat milk

pinch of salt

150g sugar

1 vanilla bean (refer Source Guide)

500ml heavy cream

5 large egg yolks

1 teaspoon pure vanilla extract (refer Source Guide)


Combine milk, salt, and sugar in a small saucepan and gently heat. Split the vanilla bean lengthwise, scrape out the seeds, and add the seeds and pod to the milk as its heating. Remove pan from the heat, cover, and leave for about one hour to allow the flavour to infuse.


Next strain the cream into a 2 litre bowl, and then stand that bowl in an ice bath.


Lightly whisk the egg yolks in a separate bowl.


Reheat the milk, and then slowly pour the warmed milk into the egg yolks, whisking constantly.


Return the warmed egg yolks and milk to the saucepan. Then cook over a low heat, stirring constantly, until the custard is thick enough to coat the back of a spoon or spatula.


Strain the custard into the cream, which is standing over its water bath, and keep stirring until the custard is cool. Stir in the vanilla extract, and return the vanilla bean (which was strained out earlier) to the custard.


Completely cover the surface of the custard with a layer of cling fling, and then refrigerate for at least 8 hours, or preferably overnight.


Remove the vanilla bean from the chilled custard, and then churn in your ice cream maker according to the manufacturer's instructions.


While the custard is churning – give the cold, marinated tamarillos a quick blitz with an immersion blender or food processor. I gave this really just a couple of seconds as I wanted to keep plenty of texture rather than ending up with a puree.


Once the ice cream has finished churning, remove from machine. Fold in the white chocolate, and then swirl the tamarillo mixture through the ice cream to get a “ripple” effect. Serve immediately or freeze about 4 hours to firm up a bit more.


Tamarillo Sorbet Recipe


Click here for a printable copy of this recipe


Vegetarian, vegan, gluten-free

Makes about 800-900ml


(adapted from this recipe on Celtnet Recipes)


This recipe begins with a tamarillo rose water pulp, just as in the ice cream recipe. The resulting sorbet is deliciously tart and refreshing, and the colour is such a glorious shade of pink it would bring even Nigella to her knees – the photo doesn’t quite do it justice I feel.


For fruit puree:

4 tamarillos

1 tablespoon sugar

30 ml water

1 teaspoon rosewater (refer Source Guide) (optional)


For sorbet:

1 cup water

1 cup caster sugar


Blanch, peel and chop tamarillos according to earlier instructions. Put all of the chopped fruit into a non-metallic bowl and combine with the remaining puree ingredients. Cover bowl with cling film and set in the fridge to marinate for at least 24 hours. Note, earlier comments with regard to rose water.


Once fruit has marinated, puree using a food processor or immersion blender, and then strain to remove the seeds.


For the sorbet, place the water and sugar in a small saucepan over medium heat until sugar has completely dissolved. Combine with the pureed fruit, and then chill for at least 8 hours, preferably overnight.


Pour into ice cream maker and churn according to manufacturers instructions. If you don’t have an ice cream maker, freeze until firm about 4 hours. Remove from freezer and beat using food processor or blender, and then return to freezer. Repeat once more.


You can find more information and suggestions for using tamarillos here.

Wednesday, July 15, 2009

Things to do with Pomegranate Molasses


It occurred to me after my Ruby Salad post last week that some of you might be wondering what else to do with the jar of pomegranate molasses you just bought to make the dressing. Or perhaps you were even questioning the wisdom of buying a jar just to make a dressing.


Well, let me tell you that once you have a jar of this in your pantry you will not want to be without it. It is now readily available in Mediterranean and Asian specialty stores, as well as some supermarkets (see Source Guide below). It is relatively inexpensive and keeps almost indefinitely. It is thick and syrupy, as you would expect, dark brown in colour, and its tart/sweet flavour is utterly unique. There is no doubt in my mind that once you have tried this you will be hooked. This is one of those wonderful ingredients that adds a real “wow-factor” to the simplest of dishes.


So, apart from salad dressings, what can you do with it? Here are a few simple suggestions.

Make a refreshing drink by mixing 1 teaspoon of pomegranate molasses with lemon juice and sugar; then add water or soda and adjust to your taste. You could also turn this into a cocktail by adding the alcohol of your choice – vodka and rum both work really well with this.


Use to glaze the skin of a chicken or duck breast before cooking – skin will be crispy and a little sour.


Glaze a rack of lamb before cooking, or use to dip barbecued lamb cutlets.


Make a marinade for salmon fillets by combining: 1/4 cup pomegranate molasses, 1/2 cup orange juice, 1/2 cup dry sherry, 2 tablespoons sugar, and 1 clove of garlic, crushed. Marinate up to 4 hours, remove from marinade and bake in a 160oC oven for 10 minutes. While fish is baking pour marinade into a saucepan, and reduce over low heat to about half. Drizzle reduced pomegranate marinade over fish to serve.


Baked fish parcels – place pieces of firm fleshed fish in centre of piece of tinfoil or parchment paper, drizzle over pomegranate molasses, slivers of garlic, sliced lemon, and finely sliced fennel. Complete with a drizzle of extra virgin olive oil, close up parcel, and bake at 180oC till cooked through.


Make a dressing using pomegranate molasses, extra virgin olive oil, lemon juice and salt and freshly ground black pepper, add chopped flat leaf parsley and mint. Use this dressing over any of the following combinations:

* Char-grilled eggplant and courgette, roasted tomatoes and carrots, black olives and feta cheese

* Roasted pumpkin and mushrooms, pumpkin seeds, baby spinach and grilled haloumi (see Source Guide)

* Mesclun leaves, toasted walnuts, sliced apple, raisins and goats cheese


Drizzle pomegranate molasses over a block of cream cheese and serve with crackers.


I also came across this recipe on Epicurious for Oranges with Pomegranate Molasses and Honey, which I haven’t tried yet but which is high on my list of things to try real soon, especially with oranges being in season right now. I just know that this is going to be great.


If you enjoy any of these suggestions, or maybe have a few of your own, please feel free to leave a comment. I would be really pleased to hear your ideas.


* Lastly, even though I mentioned above that pomegranate molasses are now "relatively" easy to find, here in New Zealand (and especially in Christchurch) some things can still be a little hard to find. So I thought it would be useful to add a Source Guide to this site, showing places where I know you can find any of the more unusual ingredients or products that I use. If you know of other places, please leave me a comment and I will be happy to add them to the Source Guide.


Source Guide:

*Pomegranate Molasses

Available in Christchurch from: Mediterranean Food Warehouse (outlets also in Nelson & Wellington)

Elsewhere available from: Sabato

*Haloumi

Also available in Christchurch from Mediterranean Food Warehouse


Wednesday, July 8, 2009

Ruby Salad Recipe


-->
I would love to start my weekends picking up fresh produce and other treats from some of the excellent farmers markets we now have in Christchurch, but teaching my regular Saturday morning yoga class means that markets are pretty much finished before I’ve closed up the school for the day. If I really get my skates on, however, I can often get to the little organic produce market at Vic’s Café & Bakery. That means I can kill several birds with the same stone … stock up on vegetables, as well as excellent coffee and some of Vic's great bread (I love their ciabatta, and their chocolate chip bagels are to die for).

This week at the market I was able to further indulge my current obsession with lemons, some of which were turned into a tangy lemon sorbet (recipe for this will follow in another post). I also got some beautiful tamarillos, which I’m experimenting with at the moment (keep watching this space), and a big bunch of beetroot.

At this time of year I often like to cook up a big tray of roasted winter vegetables that simply must include beetroot. Half of them get devoured hot, straight out of the oven, with a bowl of good pesto or freshly made hummus to dunk the veges into. The rest get saved for the next day, when they are tossed together with some feta, roasted pumpkin seeds, and a simple vinaigrette made with walnut oil and balsamic vinegar.

For this salad, however, I really wanted the beetroot to be the star of the show. I was inspired by the Ruby Salad which I enjoy every year at Casa Luna in Ubud, Bali. In reality this salad bears little resemblance to the Casa Luna version, other than that they both contain beetroot, but I think the name is perfect for this creation, and it conjures up memories of warmth and sunshine. I’ve mixed the beetroot with pink yams and pink grapefruit. Then came some nuts for texture. If I'd had them in the pantry, my favourite roasted hazelnuts that I get from Piko Wholefoods would have gone in - but walnuts was what I had on hand, and as it turned out the slightly smoky taste they take on after toasting complemented the earthiness of the beetroot really well. Pine nuts would also be fine if that's what you have in the cupboard. And lastly I added a crumbling of blue cheese for some salty tang – I used Kapiti Kikorangi Blue, but any blue cheese, gorgonzola or even feta would work just as well. As for the dressing, the pomegranate molasses adds a robustness and tartness that complements the beetroot perfectly. There is no real substitute for pomegranate molasses, but if you don’t have it I would replace the red wine vinegar with a good balsamic vinegar, and add maple syrup instead of the pomegranate molasses.

Ruby Salad Recipe

4 medium-sized beetroot
8 yams
1 pink grapefruit
handful of toasted walnuts, coarsely chopped
blue cheese
extra virgin olive oil
salt & pepper
Dressing:
3 tblspns extra virgin olive oil
1 tblspn red wine vinegar
1 tspn pomegranate molasses
¼ tspn whole-seed mustard
salt & pepper

Preheat oven to 190oC.

Wash & dry yams, toss with olive oil, salt & pepper, and set aside.

Wash & dry beetroot. You could peel them at this stage, but in my opinion food should be “messed with” as little as possible and peeling seems entirely unnecessary. I also like the extra earthiness in taste & texture that comes through from leaving the skins on. Simply remove the tops and tails, and set aside any good leaves. Cut beetroot into chunks, toss in a little olive oil, good sea salt (if you really want to keep the colour theme going here, some pink Himalayan salt would be a nice touch) and freshly ground black pepper. Place beetroot chunks in the centre of a large piece of tinfoil, fold up into a large parcel, and put into preheated oven for 30 minutes.


After 30 minutes, remove beetroot from oven, open out foil parcel (be careful of the steam), toss yams in amongst the beetroot chunks, reseal parcel, and return to oven for a further 15 minutes. At the end of this time both beetroot & yams should be cooked through but still retain some firmness.

While beetroot is cooking, prepare the grapefruit. Remove skin & all white pith from grapefruit. Then slice down in between the membranes to remove the “fillets” of pink flesh. Work over a bowl to catch any juice, and once all the flesh has been removed squeeze as much juice as you can out of the membrane before discarding.

Remove beetroot and yams from the oven and allow to cool slightly.

In a large bowl gently toss together beetroot chunks, yams (cut in half), and pink grapefruit segments. Drizzle over the reserved grapefruit juice. Sprinkle over toasted walnuts, crumbled blue cheese, and reserved beet leaves (if any).

To make dressing simply combine all ingredients in a jar, shake well, check seasoning to taste, and then pour over assembled salad.

Would serve 4 as a side dish, or 2 as a light meal.

I'm sharing this post at Food on Friday:Beetroot hosted by Carole at Carole's Chatter.

Wednesday, July 1, 2009

Preserved Lemons & Aparigraha

Preserved Lemons

The weather here in Christchurch is beyond bleak at present – day after day after day of cold, grey miserable days. Now in my 16th winter in Christchurch, this feels like the worst so far. It did occur to me that this could be an age thing – that maybe each year older I start to feel the cold a little more – but since people half my age are complaining about the cold as well, I can thankfully avoid putting the chill in my bones down to decrepitude just yet. 

One of the joys of winter, however, is an abundance of citrus fruit – particularly lemons. Not that they grow particularly well here in Christchurch, but at least at this time of year we can get New Zealand grown lemons as opposed to Californian.

I grew up in Auckland, where nearly every home had a backyard lemon tree – a city where no-one ever bought lemons! If you didn’t have a lemon tree yourself, at the very least your neighbour did. Lemons were plentiful year round, and if you asked your neighbour for a lemon, you were usually armed with a large brown paper bag (these days more likely a plastic supermarket bag) and told to go help yourself – it being fully expected that you would take as many as the bag would hold, not just the one lemon that you need for tonight’s gin & tonic.

In my family, the lemons came from a magnificent Meyer lemon tree which stood in the centre of Nana’s backyard, and grapefruit came from our own garden. Cartons full of both would get shipped off down to the South Island to Dad’s sisters, and much of that produce would get turned into Aunty Joan’s exceptional marmalade (perhaps I can wangle the recipe out of her for a later post).
So it was a big shock to me when I moved to Christchurch and discovered that here you had to buy lemons!! And for a long time I just couldn’t do it – I refused to buy lemons, which was difficult because I love them and use them a lot – I mean just about any dish can be enhanced with a spritzing of lemon juice or a sprinkling of grated rind – right?  But for a long time I went without, buying only the occasional “essential” lemon, and really resenting it.

Bowl of Lemons A 
The gorgeous green bowl in this photo is by New Zealand artist Christine Boswijck

I’ve long since given up resisting and buy them freely now, but all of a sudden I feel quite obsessed with them. There’s something about the sight of those bright yellow orbs that fills me with joy on these bleak, grey days, and I feel as though I can’t get enough of them. They offer the promise of warmth and sunshine, and I can’t seem to go shopping without buying a bag full of them. So now I am preserving lemons, see directions below (I love the delicious salty tang and texture that these bring to salads, dressings, tagines, couscous, etc), and and have plans for some jars of lemon curd and lemon sorbet on the weekend.

But the thought occurs to me … is the idea of preserving & storing food in conflict with the yogic principle of aparigraha (non-greed, non-grasping, non-hoarding)? The concept of aparigraha is that we should only take or keep that which is necessary, and that hoarding and holding on to a lot of stuff that we don’t “need” suggests we don’t have the faith that we will be able to provide what we require when the need arises. Certainly back in the times of our hunter/gatherer forbears preserving and storing food during times of plenty was essential to survival during times when food supplies were not available. And it is not that long ago that lack of refrigeration and modern transportation made the preserving of food at the very least practical. But today, when we can get pretty much anything we need, any time, is it just hoarding?

Certainly, I think it is infinitely better to be buying produce while it is in season and plentiful, and preserving it to use when it is not, than to be buying out of season produce that has travelled half way round the world to get to our supermarkets. But, nevertheless, if I’m to adhere strictly to this yogic principle, should I be doing without things that have been preserved, dried, frozen or stored for a time when they are not available, and consuming only what is fresh and available right now? I think the raw foodists would agree, but I don’t think I’m ready to make that leap just yet. I can adhere to buying fresh food in season, and as much as possible locally sourced goods, but I just can’t imagine life without dozens of things in my pantry, such as tinned tomatoes, dried beans & pulses, grains, jams, and of course preserved lemons – most of which are very useful, but I’m not sure I can say how necessary they are. It is easier for me to clear out my wardrobe than the pantry, so at the moment my pantry seems the very antithesis of an “aparigrahic” (probably not a real word) place. I have a long way to go, but …

I’ve made a start today by getting rid of that jar of Red Pepper Relish that has been languishing at the back of the pantry for eight years! An item I purchased even though I don’t like relish, but because it looked so pretty! I’ve replaced that relish with the jar of preserved lemons I made today, which I know I will use – I’m okay with that.

Preserved Lemons Recipe

lemons
coarse sea salt
sterilised preserving jars

Clean lemons well, especially giving them a good scrub to remove any waxy coating if you are using store bought lemons.

Cut a small slice from the stalk end so that you can stand the lemon upright on your chopping board. Then make two vertical cuts, at right angles to each other, down through the lemon to about 1cm from the bottom – take care not to cut all the way through. Your lemon should now be in quarters but still attached at the bottom.

Gently squeeze the lemon open and fill the cuts with as much salt as possible. Then push the cuts back together and holding the salt in as best you can put the lemons into the sterlised jar. Squash as many lemons as you can, pushing them in firmly so that they release some of their juice as you do so, and adding more salt between each layer if you're filling a large jar.

No need to add more juice at this stage, as the lemons will continue to release juice during the pickling process. Seal jar and then store in a cool place, shaking every day (to help dissolve and distribute the salt) for a week.  After a week, now top up the jar with extra lemon juice if necessary, then return to a cool, dark place and leave them alone for a month.

Once opened, store in the fridge.
 
To use: Remove and discard the pulpy flesh; rinse and dry the rind, then use as required.