Monday, February 25, 2013

Green Tomato Cake with Maple Mascarpone Frosting

Green Tomato Cake Collage

I was surprised to notice the other day that I've been blogging for a little over three and a half years now - where did that time go?!  Less surprising though, was the realisation that I've learnt a thing or two in that time.  Not to sound big-headed, mind you - I do know that what I don't know still massively surpasses what I do know.  But I have picked up the odd thing along the way.

For example, I now know that if you come up with a great idea for a cake that you just know you're going to want to write a blog post about, then it's not such a good idea to bake your cake in the middle of the night and thus not be able to take a decent photo of said cake.  I also know that having decided to set the cake aside in order to capture a good photo in the morning, you shouldn't let someone cut a big hunk out of the cake for supper!  I also know that trying to hurriedly snap off a good photo at 7.00am, before getting ready for work, is going to be no more successful than capturing a decent photo the night before - not only is the light still poor, but working in haste will render 9 out of 10 photos shaky and out of focus.

All these things I know, and yet somehow I still came to break every single one of those rules in the preparation of this post.  I tell you this for two reasons.  Firstly, so that hopefully you won't make the same foolish mistakes I did;  and secondly, and really more importantly, in the hope that you will not judge this cake harshly on the basis of my mediocre photos.  After all, the idea of a green tomato cake might be a little scary to some of you, and it's really going to take some kind of killer photo to sell it. 

Well, I clearly failed on the "knock-out" photo front, but I'm urging you to look beyond the photos, and give this cake a try, for, scary though this may sound, I can promise you that this cake is a stunner.  Trust me on this.

Green Tomato Cake 1
Pedestal cake plate courtesy of Stevens Homewares, Nelson (see details below)

I stumbled upon this idea after I'd been staking up my abundant tomato crop, and a whole lot of green tomatoes fell off the vines.  I did a bit of a google search on green tomatoes, thinking maybe I would come up with a good chutney recipe, when I stumbled upon this recipe from Paula Deen for a green tomato cake.  That definitely peeked my curiosity, and made me think it would be similar in many ways to a carrot cake.  So then I turned to my Mum's recipe for carrot cake,  tricked it up a little, and added a maple and mascarpone frosting using the mascarpone cheese I made last week.

Green Tomato Cake 2

The result is surprisingly light, definitely lighter than your average carrot cake, and incredibly moist.  I served this to several people without telling them what it was, and no-one picked that it had green tomatoes in it.  In fact, once cooked the green tomato becomes almost like apple in both taste and texture.  This was so good I've had requests for a repeat performance, and trust me when I tell you that does not often happen with my baking.  Personally, I can't wait to give it another try, and I think that next time I might make it into little mini cakes.  Might even get a decent photo next time!!

Green Tomato Cake with Maple Mascarpone Frosting Recipe
Click here for a printable copy of this recipe

250g (9 oz) plain flour
1/2 teaspoon baking soda
1 teaspoon baking powder
1 teaspoon cinnamon
1/2 teaspoon nutmeg
pinch of salt
100ml (3.5 fl oz) sunflower oil
100ml (3.5 fl oz) olive oil
250g (9 oz) soft brown sugar
3x eggs
2x green tomatoes, finely diced
juice of 1/2 a lemon
100g (3.5 oz) toasted walnuts, roughly chopped

For the frosting
2x cups mascarpone cheese
1/4 cup maple syrup
extra toasted walnuts, a generous handful

Preheat oven to 180 degrees C (350 degrees F).  Lightly grease and line a 23cm (9 inch) cake tin.

Sift together flour, baking soda, baking powder, cinnamon, nutmeg, and salt.  Set aside.

In a separate, large bowl, using an electric beater, cream together the oil and sugar.  Add the eggs, one at a time, beating well after adding each one until the egg is fully incorporated.  Add the diced green tomatoes, lemon juice, and walnuts, and stir to combine.

Add the sifted dry ingredients, and gently fold in until everything is well combined.

Tip the mixture into the prepared cake tin, smooth the top, and bake in the preheated oven for 45-50 minutes, or until a skewer inserted into the centre of the cake comes out clean.

Remove from the oven and allow to cool in the tin for 10-15 minutes before turning out onto a wire rack to cool.

Prepare the frosting, by beating together the mascarpone cheese and maple syrup until smooth, then spread over the top and sides of the cooled cake.  Decorate the top with toasted walnuts.


Props courtesy of Stevens Homewares Ltd 

This will be a submission to Sweet New Zealand, inspired by Alessandra Zecchini and hosted this month by Michele at Greedybread.

Sweet New Zealand Badge A

Monday, February 18, 2013

Homemade Mascarpone Cheese

Mascarpone 2

Mascarpone cheese is one of my favourite ingredients to cook with.  Now, admittedly, it doesn't taste particularly exciting on its own, but combined with other flavours it becomes a knock-out.  Mix with a little sugar and scrape in a freshly split vanilla pod, for a fantastic accompaniment to poached stone fruit or pears, or summer berries.  Or use as an ingredient in savoury sauces - I love it stirred into a pan full of sauteed mushrooms for an instant mushroom sauce to go over pasta or polenta, or even a grilled steak if you lean that way.  I even love it mixed with some freshly grated lemon zest and stirred into risotto just before serving.  And of course, where would the classic tiramisu be without it?

For all that, much as I love mascarpone, it's not an ingredient that finds its way into my shopping basket on a regular basis.  The price of mascarpone at the supermarket is ridiculous, and living on a fairly tight budget, as I do, it's something that falls into the "occasional luxury" category rather than a regular stand-by.

But no more.  I have just discovered that not only is mascarpone ridiculously easy to make, but you can make a batch for a fraction of the price of buying it.  I think I can now safely say that mascarpone just pretty much became a staple ingredient in my fridge, and what's more I will never buy store bought again.

My batch of homemade mascarpone cost me $3.49 to make, and yielded 300g.  By comparison, store bought mascarpone averaged out across the board at $8.11 for 300g.  So making mine at home worked out at less than half the price.  And you know what else I like about that?  When I examined most packets of store bought product, the ingredients listed usually showed cream, food acid, thickeners and stablisers.  My homemade version contained just cream and lemon juice - that's it - nothing else - nada!

Now of course, because it is lacking in any preservatives, it won't keep as long as store-bought product - you will need to use it within 4-5 days.  But seriously, you're not making this stuff just to have it sitting around.  So, go and give it a try - find out just how easy this is.  Then eat the lot and make another batch - at this price you can afford to.

Homemade Mascarpone Recipe
Vegetarian
Makes approx 300g (10-1/2 oz)
Click here for a printable copy of this recipe

500ml cream (17 fl oz)
1 tablespoon lemon juice

You will also need:
sieve
thermometer
muslin

Put cream into a small to medium sized, heavy bottom saucepan over medium heat, and heat cream until it reaches a temperature of 88 degrees C (190 degrees F).  Stir regularly to make sure it doesn't catch on the bottom, and don't leave unattended - if it boils over, not only will your mascarpone be ruined, but you will have a nasty mess to clean up.

Once temperature has been reached, add the lemon juice to the pan, and continue to cook for a further 5 minutes.  You will feel the cream start to thicken almost immediately the lemon juice is added.  Try to maintain temperature at 88 degrees C (190 degrees F) throughout, and stir constantly.

Remove pan from the heat and allow to cool for about half an hour.

Line a sieve with four layers of muslin, and place over a bowl.   Pour the cooled cream into the lined sieve, cover with plastic wrap, and put in the fridge for several hours (overnight is ideal) allowing any whey to drain away and the mascarpone to thicken.  I only had about a tablespoon of whey drain off, and my mascarpone thickened up a lot overnight.

Scoop the strained cheese into an airtight container and store in the fridge.  Use within a week.

Make sure you visit again soon to discover how I used my mascarpone in a Maple Mascarpone Frosting for a Green Tomato & Walnut cake - sounds weird I know, but trust me when I tell you it was sublime.  I also used the mascarpone in a roasted tomato and mascarpone sauce for pasta, which I will also share with you shortly.


Sunday, February 10, 2013

Tomato, Basil & Mozzarella Salad

Tomato, Basil & Mozzarella Salad 3

We're all well acquainted with that old line, "When life gives you lemons ....", etc.  Well, right now, life is giving me tomatoes - lots and lots and lots of them.  This is not a complaint, mind.  Having just grown my first ever successful tomato crop, I still get a huge thrill out of harvesting a big bowl of these beauties every day.

Tomato, Basil & Mozzarella Salad 2

Many of them end up in pasta dishes;  roasted with potatoes, black olives, and a piece of snapper;  grilled on the barbeque;  or thickly sliced and sauteed in butter with lots of freshly ground black pepper, then tipped over hot toast and topped with a poached egg.  In the weeks ahead, many will end up as pasta sauce or slow-roasted and stashed in the freezer for use during the winter months to come.

But if you are lucky enough to be able to pick tomatoes, straight from the garden, at the absolutely perfect moment of ripeness and still warm from the sun, then there is no doubt that the best way to enjoy them is very simply - teaming them up with the best quality ingredients you can lay your hands on.  To me that means basil, also picked straight from the garden;  the best extra virgin olive oil you can afford - I used Moon Over Martinborough's Crescent Moon Blend;  and mozzarella, buffalo would be ideal if you can find it and your budget will run to it - if not, have a go at making your own, as I did.

Tomato, Basil & Mozzarella Salad 1

Tomato, Basil & Mozzarella Salad Recipe
(This is really more of a method rather than a recipe - quantities are not critical)
Vegetarian

tomatoes, as many as you like
(use an assortment of colours & sizes, even including green ones)
mozzarella, one large ball
fresh basil leaves, generous handful
flaky sea salt
extra virgin olive oil

Cut tomatoes - some into thick slices, some into wedges, some roughly chopped.  Smaller cherry tomatoes can be just halved or even left whole if they are tiny.  The point is to avoid "uniformity".  Spread tomatoes over a large flat platter.

Cut mozzarella into rough slices, or tear into pieces, as you like, and distribute amongst the tomatoes.

Sprinkle liberally with sea salt.

Roughly tear basil leaves into pieces and strew over the salad.

Lastly, drizzle everything liberally with extra virgin olive oil.

Allow to stand at room temperature for around 30 minutes before serving to allow the flavours to mingle.

Of course you can serve this as an accompaniment to just about anything - simple oven-roasted chicken, steak or fish straight off the barbeque - the possibilities are really limitless.  Personally, I like it best on its own (I can easily make a meal of this), with some good, crusty bread on the side to mop up the juices.

Eating a dish like this always puts a smile on my face.  But so much more than that, it makes my heart smile, and it humbles me.  It reminds me that, no matter how clever we think we can get in the kitchen, we can never improve on nature's simple packaging - the best food of all is that which hasn't been messed with, but which has just been paired with a few other "like-minded" ingredients.  Like a good marriage, they don't compete with each other, they simply bring out the best in each other, and make us feel better for having been in their company.

I'm sharing this post at Gallery of Favourites, hosted by my friend April at The 21st Century Housewife;  at See Ya In the Gumbo, hosted by the lovely Michelle at Ms. enPlace;  at Foodie Friday, hosted by Designs by Gollum; and at My Meatless Mondays hosted by Chaya at My Sweet and Savory.

Gallery of Favourites Badge          See Ya in The Gumbo Badge          Foodie Friday Badge

Tuesday, January 22, 2013

Very Seedy, Very Easy, Wholemeal Bread

Very Seedy, Very Easy, Wholemeal Bread 1

If you happen to be in the mood for a bit of effortless breadmaking, you don't have to look very far to discover that there is a multitude of "no-knead" bread recipes out there, both slow and fast versions - in fact a Google search will yield 2,320,000 results.  This is one of my favourites, and one I make on a fairly regular basis;  however, with an 18 hour rise time, it does require a bit of forward planning.

When, I'm looking for something with a faster turn around time, I often turn to Ruth Pretty's Quick Wholemeal Bread.  I've been making and dabbling with this recipe a lot lately, and I love this variation which is loaded with sunflower, sesame and pumpkin seeds, as well as linseed.  This is so quick to make that on Sunday morning (when I discovered there was no toast in the house for my breakfast), I was able to actually whip us this loaf and scarf down a couple of slices all before racing out the door to work.  Preparation time is no more than 15 minutes;  into a low temp oven to rise while I have a quick shower;  then crank up the heat and, by the time I'm dressed and make-up routine is done, it's ready to come steaming out of the oven.  The hardest part of the whole production is finding enough patience to let this cool a bit before cutting into the loaf!

I know there are many women out there (maybe men too, for all I know), who are so efficient they can vacuum the house, do the washing and hang it out, make school lunches, and cook breakfast, all before heading out the door in the morning ... I am not one of them.  So, I promise you that if I can make a loaf of this bread before work, anyone can.  Go on - put it to the test.

Very Seedy, Very Easy, Wholemeal Bread 2

Very Seedy, Very Easy, Wholemeal Bread Recipe
Adapted from recipe by Ruth Pretty from
Click here for a printable copy of this recipe

1-3/4 cups lukewarm water
2 teaspoons honey
3-1/2 teaspoons active dried yeast
225g (8 oz) wholemeal flour ** (see note below)
225g (8 oz) plain flour ** (see note below)
2 teaspoons flaky sea salt
3x tablespoons sunflower seeds
2x tablespoons sesame seeds
1x tablespoon linseed
2x tablespoons pumpkin seeds, plus extra

Preheat oven to 80 degrees C (175 degrees F), and lightly oil a 21cm (8 inch) x 11cm (4-1/4 inch) loaf tin.

In a small bowl or jug, dissolve the honey in the lukewarm water, and sprinkle in the yeast.  Stir to combine.  Cover bowl with a tea towel and set aside for about 10 minutes or so until the mixture is "spongy" and slightly risen.

In a separate, large bowl, combine the flours, sea salt and seeds.  Make a well in the centre, and pour the yeast mixture into the well.  Using a wooden spoon, mix everything to combine well.

Empty the mixture into the prepared loaf tin, smooth the top, sprinkle with extra pumpkin seeds, and put into the preheated oven for 20 minutes.  Now increase the oven temperature to 210 degrees C (410 degrees F) for a further 30 minutes.  By this stage your loaf should be brown and crusty on top, and sound hollow when tapped.

Remove from oven, turn out of tin, and leave to cool on a cooling rack.

** Note:  Feel free to adjust the proportion of flours here to suit yourself, or experiment with other flours - maybe try including a bit of rye flour or kibbled wheat - just keep the total combined weight of flour to 550g (16 oz).

Very Seedy, Very Easy, Wholemeal Bread 3

This bread keeps fresh enough for sandwiches for at least 3 days, and is excellent toasted with the topping of your choice.  I think you could make endless variations on this loaf - I'm planning to try a rosemary, black olive and parmesan variation, and I think some fruit and nut combinations could be pretty good too.

The Ruth Pretty Cookbook
The Ruth Pretty Cookbook is available in New Zealand from Fishpond

Monday, January 14, 2013

Roasted Apricot Gelato

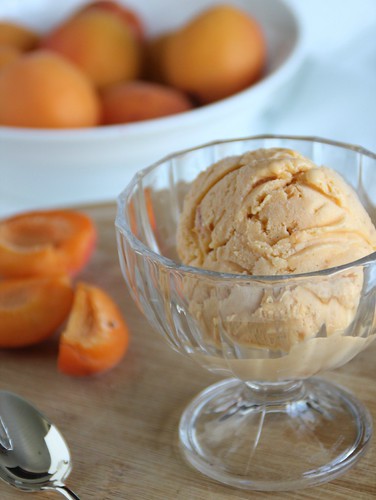
Roasted Apricot Gelato 3

I love this time of year, when the ice cream maker comes out of the cupboard and starts to work overtime, and beautiful summer berries and stone fruit are available in abundance.  Now I make and enjoy homemade ice creams and sorbets all year round, but this is the time when I really want to go to town churning out tubs full of luscious, deep flavoured, fruity gelato.

A bowlful of apricots I had on hand this week were destined for exactly this treatment I decided.  I actually used slightly under-ripe fruit because I wanted that little bit of tartness, but I was also looking for the depth of flavour that comes from fully ripe fruit, so achieved that by roasting the apricots first with a little brown sugar and butter.  The brown sugar and butter more or less turned into caramel, and the apricots really intensified in flavour.  Then it was just a matter of blitzing the roasted apricots to a puree.  This is a really good way of preserving apricots for use in ice cream throughout the year - simply freeze the pureed fruit in a snaplock bag in batches ready to whip out any time you want to make ice cream.  You can also do the same thing with nectarines and peaches.

I hope you'll give this a go - it's pretty darn good.  If you fancy a little extra texture, you could try serving this with crumbled amaretti biscuits sprinkled over the top.  Don't have an ice cream machine - take my advice and invest in one - I promise you it will be worth it.  I shared this with my good friends, Cliff & Clare, who came to stay on the weekend - they were so smitten Cliff was thinking that he would get Clare an ice cream maker for her birthday!

Roasted Apricot Gelato Recipe
Makes approximately 1 litre
Click here for a printable copy of this recipe

6x medium-large fresh apricots
brown sugar
butter

6x large egg yolks, free range
1/2 cup sugar
325 ml (11 fl oz) milk
100 ml (3.5 fl oz) cream
1x vanilla bean

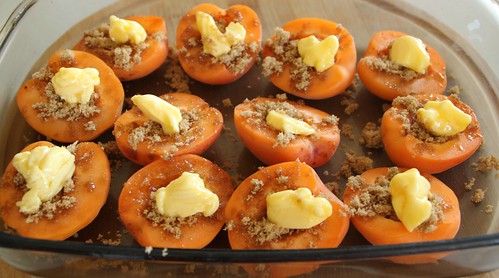
Preheat oven to 180 degrees C (350 degrees F).  Cut apricots in half - remove and discard the stones.  Place apricots cut side up in an ovenproof dish that is just big enough to fit them quite snugly.  Sprinkle each apricot half with a little brown sugar, and top each with a small knob of butter.

Roasted Apricot Gelato 1

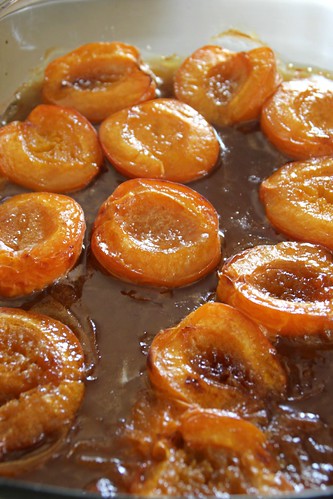
Place in hot oven and roast until the apricots have softened and started to collapse, and the sugar and butter have merged with the oozing fruit juices to become almost the consistency of caramel sauce.

Roasted Apricot Gelato 2

This will take about 30 minutes, and it is helpful to baste the fruit with the juices half way through.  Allow to cool completely then, using a food processor or stick blender, blitz to a puree.

Place egg yolks in a medium bowl with half of the sugar, and whisk until pale.  Set aside.

Put the remaining sugar in a medium sized, heavy bottomed pan, with the milk and cream.  Split the vanilla bean down the middle and scrape out the seeds, adding both the seeds and the bean to the pan with the milk and cream.  Set pan over moderate heat and bring just to a boil.  Remove from heat immediately.

Now, whisking constantly, slowly pour about half of the milk and cream mixture into the egg mixture.  Then return all of this mixture to the remaining milk and cream in the saucepan - keep whisking constantly as you go.

Return pan to a low heat, and stir constantly until the mixture begins to thicken.  A good indication that it's ready is when all the frothy bubbles from the surface disappear.  Also the mixture will coat the back of a spoon, and when you run your finger through the mixture the edges of the mixture will not run back together.

Remove from the heat and immediately strain through a sieve into a clean bowl set over an ice bath.  Keep stirring until the mixture has cooled completely.

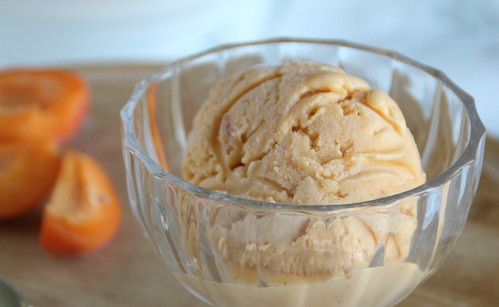
Now stir the cooled apricot puree into the custard, add the vanilla bean which was strained out back into the custard, and refrigerate for 24 hours.  Now remove the vanilla bean (do not throw away), and churn the custard in an ice cream maker according to manufacturer's instructions.  Serve straight away or freeze for several hours to firm up.

Roasted Apricot Gelato 4

What to do with that vanilla bean?  There's plenty of flavour left in that bean so don't discard it.  Rinse thoroughly under cold water, then set on a paper towel on your kitchen window sill until dry.  Then put into your jar of caster sugar to have a constant supply of vanilla flavoured sugar.

This will be my submission to Sweet New Zealand, inspired by Alessandra Zecchini and hosted this month by the lovely Arfi at HomeMadeS.

Sweet New Zealand Badge A

Saturday, January 5, 2013

Sour Chickpeas (Khatte Chhole)

Sour Chickpeas

What with one thing and another over the "stupid season", I haven't managed for the last couple of weeks to join in with my friends at I Heart Cooking Clubs where we are cooking the food of Madhur Jaffrey.  Time now that all the busyness is out of the way to join back in.

Our theme this week is "Appetisers", and it seemed like the perfect time to try this recipe for Sour Chickpeas that I've had earmarked for sometime now.  These sour, spicy chickpeas are classic street snack food found all over northern India.  Madhur says, in her introduction to the recipe, "although Khatte Chhole are generally eaten as a snack in India, I serve them at my lunches and dinners, with vegetables, meats and rice".  I'm inclined to agree.  I enjoyed them as a bit of a snack served with some crisp triangles of toasted pita bread, but I liked them best over rice for a light lunch.

Now, you will have observed already that this dish suffers photographically from the DBFS (dreaded brown food syndrome), but trust me when I tell you that it tastes a lot better than it looks.  There is certainly plenty of spiciness in this dish, and the sourness (although I think initially somewhat foreign to European palates) works really well with the delightful nuttiness of some steamed Basmati rice.

Sour Chickpeas (Khatte Chhole) Recipe
Adapted slightly from recipe by Madhur Jaffrey from
Would serve 4-6 as a snack or accompaniment or
Serves 2-3 as a light meal
Click here for a printable copy of this recipe

2 cups cooked chickpeas
(canned are fine, but if you cook your own save the cooking liquid)
2x shallots, peeled and very finely chopped
salt
1x green chilli, finely chopped (deseed if you like less heat)
1 tablespoon freshly grated ginger
juice of 1x lemon
2 tablespoons vegetable oil
1x large or 2x medium tomatoes, finely chopped
1 tablespoon ground coriander
1 tablespoon ground cumin
1/2 teaspoon turmeric
2 teaspoons garam masala
1/4 teaspoon cayenne pepper

Put one of the chopped shallots in a small bowl, together with the chopped chilli, grated ginger, lemon juice, and 1/2 teaspoon of salt.  Mix together well and set aside.

Now heat oil in a heavy based, deep pan over medium heat.  Once oil has heated, add the remaining chopped shallot to the pan and fry, stirring from time to time, until the shallot becomes fragrant and begins to turn golden brown.  Add the chopped tomato and continue to cook for several minutes, stirring occasionally, until the tomato has "broken down", and has become like a thick sauce.  Add the coriander, cumin and turmeric, and stir to combine everything well.  Add the chickpeas to the pan, and stir to coat well with the spice and sauce mixture.  Now add 400 ml (14 fl oz) of water, or reserved chickpea cooking liquid if you have it.  Add the garam masala, cayenne pepper, and 2 teaspoons of salt.  Stir to combine, and then bring up to the boil.

Reduce heat to a simmer, cover and cook gently for about 20 minutes, stirring occasionally.  Stir in the mixture of shallots, chilli, ginger and lemon juice.  Mix well and remove from heat.

Serve immediately, or cool to luke warm.  (I actually liked it best at room temperature).

If you would like to get to know Madhur a little better, then do go and visit my friends at I Heart Cooking Clubs and see what they've all cooked up ...

IHeartCookingClubsMadhurJaffrey

... or check out Madhur Jaffrey's Indian Cooking and many of Madhur's other great titles available from Amazon USA, Amazon UK or Fishpond NZ.

          Madhur Jaffrey's Indian Cookery

I'm sharing this post at See Ya In the Gumbo hosted by the lovely Michelle at Ms. enPlace; at Gallery of Favourites hosted by the equally lovely April at The 21st Century Housewife and Alea at Premeditated Leftovers;  and at My Meatless Mondays hosted by Chaya at My Sweet and Savory.

See Ya in The Gumbo Badge              Gallery of Favourites Badge

Wednesday, January 2, 2013

Watermelon & Feta Salad with Preserved Lemon Dressing

Watermelon & Feta Salad 1

Happy New Year everyone.  I love this time of year.  Of course, it's summer here in New Zealand, and what's not to love about that?  But, I also love that sense of new beginnings that accompany the season, and I can tell you, after the year that was last year, a new beginning is definitely called for.

I love too the profusion of summer produce, and can't get enough of fresh salads and light and healthy vegetable dishes right now.  This watermelon and feta salad, with its tangy preserved lemon dressing is one of my favourite salads, and one which I make many times over summer.  Its freshness and lightness is the perfect antidote after a couple of weeks of Christmas excesses, and it makes a great accompaniment for summer barbeques - though I'm happy to eat it as a meal on its own.

You don’t have to be fussy about quantities for this.  Just use a nice, large flat platter and just make as much as you need to satisfy however many mouths you are trying to feed.  Feel like ringing the changes - try using green olives instead of black (as I have done in these photos), or maybe a mixture of both;  chunks of avocado or toasted pine nuts make a nice addition;  some roasted shrimp are another nice addition if you want to make this into something a little more substantial.

Watermelon & Feta Salad 2

Watermelon & Feta Salad with Preserved Lemon Dressing Recipe
A rough guide for 4 people would be
Click here for a printable copy of this recipe

watermelon (probably half a medium-sized melon)
2x lemons
block of feta
couple of handfuls of black olives (I like Kalamata olives)
1/2 preserved lemon
1/3 cup olive oil
drizzle of honey
salt & pepper

Heat a chargrill pan over very high heat.  Cut one lemon in half, and when pan is hot place lemon cut side down in the pan.  Cook until the cut surface of the lemon has taken on caramelised grill marks and the juice is beginning to flow.  Remove from pan and set aside.

Remove rind from watermelon and cut into large chunks - please yourself whether you choose to flick out the seeds or not.  Arrange watermelon chunks over large flat platter.

Sprinkle black olives evenly over the watermelon.

Now grate the zest of half of the remaining lemon and reserve.

Next prepare the dressing.  Place preserved lemon, olive oil, juice of the remaining lemon and a small drizzle of honey into a small blender and blitz until smooth and creamy.  Taste and season as necessary - note you may not need to add salt as the preserved lemon will be salty, but you may want to add some pepper and you may want to adjust the sweetness.

Place the feta in one large slab on top of the watermelon.  Drizzle the whole thing with the preserved lemon dressing, and sprinkle lemon zest over the top.  Serve with the chargrilled lemon halves on the side.

Fantastic served with a glass of chilled ouzo!

I'm sharing this post at Gallery of Favourites, hosted by my friend April at The 21st Century Housewife;  at See Ya In the Gumbo, hosted by the lovely Michelle at Ms. enPlace;  at Foodie Friday, hosted by Designs by Gollum; and at My Meatless Mondays hosted by Chaya at My Sweet and Savory

Gallery of Favourites Badge          See Ya in The Gumbo Badge          Foodie Friday Badge