Monday, March 12, 2012

Prawns Saganaki, Pita Bread & other Mezedes

Greek Feast 1

Today I'm taking you on a trip to the Greek islands, and treating your taste buds to, not just one, but four recipes.  You see, at I Heart Cooking Clubs this week, where we are down to our last few weeks of cooking with Tessa Kiros, our theme this week was Mezedes - the Greek tradition of shared foods.  So I thought it was time to break out my copy of Food from Many Greek Kitchens - one of Tessa' books I have been enjoying enormously, but which I have not yet introduced you to.  Which, also makes this a great opportunity to share this post at Cookbook Sundays, a weekly event I host here at Couscous & Consciousness, in order to get some of those unused cookbooks down off the shelves and into the kitchen.

Food from Many Greek Kitchens

This is a wonderful book - the recipes, as is typical of Greek food, are simple and uncomplicated.  The photographs are stunning - for those of you who have ever been to Greece, this book will stir up so many memories;  for those of you who haven't, this will get you dreaming and planning your first Greek island holiday.

Anyway, as I mentioned, our theme was Mezedes and well ... you can't exactly just have one meze now, can you?  So I decided to go all out and came up with my version of a Greek feast - Prawns with Feta & Tomato, Peppers Stuffed with Feta, Roasted Lemon Potatoes, Pita Bread and a Greek Salad.

Greek Salad

Traditionally, mezedes are served as small plates to be shared as the starter or appetiser to a meal, and the dishes offered here would probably be enough for 4-6 people if they were served as the appetiser to a larger meal.  But two of us ate this as our main meal, and had plenty of leftovers for the next day.  Every one of these dishes were wonderful, and the meal was greeted with the response, "Wow, that very first mouthful transported me right back to Paros".

I would recommend all of these dishes - every single one of them will get made again in my house - and I highly recommend the book.  The pita bread I had been wanting to make ever since Michele raved about it, and it did not disappoint - the breads were soft and fluffy, with just the right amount of "chew".  In fact, if I had to choose a highlight of the dishes I made for this meal, it would probably be the pita breads, not least because it was a revelation to discover how easy it was to make them, and how good the results.  The feta stuffed peppers were beyond easy to make, could easily be prepared in advance, and in fact could even be cooked in advance as they would be just as good served at room temperature as hot.  The saltiness of the feta and the sweetness of the roasted peppers marry together well for a wonderful flavour combination.  The roasted lemon potatoes are to die for if you're a potato lover, and I think this just became the go-to potato dish at my place.  As for the prawns - what's not to love about the simple combination of prawns, tomatoes and garlic?  I think that next time I would bake this in the oven though to intensify the flavour a little rather than cooking on the stove top.

Greek Feast 2

Prawns with Feta & Tomato Recipe
(Garides Saganaki)
Adapted from a recipe by Tessa Kiros from
Serves 4

3 tablespoons olive oil
3 cloves garlic, finely chopped
400g (14 oz) tin tomatoes, chopped
3 tablespoons flat-leaf parsley, chopped
flaky sea salt & freshly ground black pepper
300g raw, peeled prawns or shrimps
100g feta, crumbled

 Heat the olive oil in medium saucepan over low to medium heat.  Add the garlic and saute until it is just fragrant.  Immediately, add the chopped tomatoes with their juice, half the parsley and season liberally with flaky sea salt and freshly ground black pepper.  Bring up to the boil, then cover the pan and simmer for about 10 minutes.  Remove the lid, and simmer for a further 5 minutes or so to reduce and thicken the sauce a little.

Add the prawns to the pan and stir gently to make sure all the prawns are covered in the sauce.  Simmer for about 3 to 4 minutes until the prawns are just beginning to turn pink.  Add the crumbled feta to the pan, shake pan gently to distribute feta through the sauce and prawns;  cover and cook for about 5 minutes until the feta is just starting to soften, shaking the pan from time to time.

Grind some more black pepper over the top, and sprinkle the rest of the parsley over the top to serve.

Prawns Saganaki 1

Pita Bread

Pita Bread Recipe
Adapted from a recipe by Tessa Kiros from
Food from Many Greek Kitchens
Makes 8 pita breads
Vegetarian

2 teaspoons dried active yeast
1 teaspoon honey
3 tablespoons warm water
450g (1 lb) plain flour
1 heaped teaspoon salt
6 tablespoons olive oil
200ml (7 fl oz) water

Put the 3 tablespoons of warm water in a small jug or glass.  Add the honey and sprinkle the yeast over the top.  Stir to dissolve, and then set aside for the yeast to activate.  You will know it's ready when it is frothy on top.

Put the flour and salt into a large bowl.  Make a well in the centre, and pour in the activated yeast mixture, the olive oil and the water.  Mix with a wooden spoon until the dough forms into a rough clump.  Remove from the bowl and, using your hands, knead for 8 to 10 minutes until the dough is soft and springy.  Note, the dough will be sticky to begin with, but avoid adding more flour or flouring your work surface, but simply flour your hands ever so lightly from time to time if the dough is clinging to your hands.

Lightly oil a clean bowl, add the dough ball to the bowl, cover with cling film and then a heavy cloth, and leave in a warm place to prove.  It will take about 1-1/2 to 2 hours and the dough should almost double in size.

Preheat your oven to 200 degrees C (400 degrees F).

Knock the dough down, knead lightly for a minute or two, and then divide into 8 equal sized pieces.  Using your hands, flatten each piece into a flat disc and leave for about 5 minutes for the dough to relax.

Using a rolling pin, roll each disc out into a rough circle, about 2mm (1/16th in) thick.  Brush lightly with olive oil and put onto unfloured baking trays (I got three to a tray). Bake one tray at a time until the breads are just firmed (about 5 minutes), then turn them over and bake for a further 3 minutes.  The breads will finish cooking when reheated just before serving, so they should be a little under-done at this point.

Remove from the oven and immediately stack the breads one on top of each other and wrap in a clean tea towel to keep them soft.

To serve, brush each side of the bread with a little olive oil, and add to a chargrill pan over high heat until warmed on both sides.

Feta Stuffed Peppers 1

Peppers Stuffed with Feta Recipe
(Piperies Yemistes Me Feta)
Adapted from a recipe by Tessa Kiros from
Food from Many Greek Kitchens
Serves 2
Vegetarian

4x small sweet peppers
(look for the long, narrow, thin-fleshed ones - not capsicums)
100g feta
1 tablespoon olive oil
dried oregano

Cut the tops off the peppers and carefully remove the seeds, taking care to keep the peppers intact.

Crumble the feta, and stuff quite firmly into the peppers.  Replace the tops.

Feta Stuffed Peppers 2

Heat the olive oil in a small frying pan.  Saute the peppers over high heat, turning from time to time, until the peppers have softened and browned and blistered on the outside, and the feta has started to soften.

Sprinkle a little dried oregano over the top to serve.

Roasted Lemon Potatoes 1

Roasted Lemon Potatoes
(Patates Fournou Lemonates)
Adapted from a recipe by Tessa Kiros from
Food from Many Greek Kitchens
Serves 3
Vegetarian

600g (1-1/2 lbs) potatoes, peeled & rinsed
juice of 1/2 lemon
olive oil
flaky sea salt & freshly ground black pepper
dried oregano
1 cup water

Preheat your oven to 180 degrees C (350 degrees F).

Halve the potatoes lengthwise, and cut each half into 3 wedges.  Put potatoes in a single layer into an ovenproof dish.  Pour over the lemon juice, and drizzle liberally with olive oil.  Season generously with flaky sea salt and freshly ground black pepper, and sprinkle over the oregano.  Toss the potatoes to ensure they are all well coated with everything.  Pour the water down the sides of the dish, and give the dish a gentle shuffle.

Roasted Lemon Potatoes 2

Roast for about 1-1/2 hours, turning and basting every 20 minutes, until the potatoes are tender and golden, and there is still a little sauce left in the dish.

Serve hot, adding more salt and pepper to taste.

I do hope you'll give some of these dishes a try - I'm sure you won't be disappointed.

If you would like to get to know Tessa a little better, then do go and visit my friends at I Heart Cooking Clubs and see what they've all cooked up ...

IHCC Tessa Kiros Button

... or check out Food From Many Greek Kitchens and many of Tessa's other great titles available from Amazon or Fishpond NZ.


I hope you'll give these mezedes a try - I'm sharing them this week at Cookbook Sundays, where my friends are delving into their cookbook collections and sharing some of their recipes.  Do stop by to see what they're cooking - you might even feel inspired to link up a recipe from one of your own cookbooks.

CookbookSundays

Saturday, March 10, 2012

Cookbook Sundays # 14


Cookbook Sundays Badge 

If you're anything like me you have dozens of cookbooks gathering dust on your bookshelves, some of which have never even been cooked from.  Sure I spent hours browsing through them when I first bought them, marking all the recipes I was going to make with little post-it notes, and yet still those books languish in the bookcase and never make it to the kitchen.  There are others from which I have made but one recipe which was such a resounding success that I've made it over and over again, and yet somehow I've never made anything else from that book.  Sound a bit familiar?!

Take comfort - you are not alone, and now Cookbook Sundays is your opportunity to change that.  Every Sunday I'm going to share with you a recipe that I haven't made before from one of my ever expanding collection of cookbooks.  And, because I know that if you have read this far then you are guilty of this too, I'm inviting you to join in with me.  Each week my Cookbook Sundays post will have a linky for you to share something you've cooked from one of your cookbooks.

The rules for joining in are simple:
  1. Your post must state the author and the title of the book your recipe has come from.
  2. Your post must mention Cookbook Sundays and link back to this post.  Including the Cookbook Sundays badge is optional, but always appreciated.
  3. You may submit as many entries as you like, and you may use the same cookbook as many times as you like.  Old posts are also welcome.
  4. Lastly,  remember that what goes around, comes around - one of the reasons you are participating in this is because you want people to read your posts, so do the right thing and go and visit a few of the other participants - you can even "Like" your favourites. 
Now, go and dust off those cookbooks and get cooking!  Use the linky tool at the end of this post to submit your entry/entries - simply scroll down to where it says "You are next ... Click here to enter", and then follow the instructions.  The linky will be open for one week.

Lastly, if you would like to use the Cookbook Sundays badge in your post, simply copy the code in the box beside the badge below and paste it into your post.  Feel free to also use it in your sidebar if you wish.

CookbookSundays

Sunday, March 4, 2012

Little Blood Orange Cakes


Little Blood Orange Cakes 3

I have rules when it comes to buying fruit.  Vegetables too, if it comes to that.  As much as possible I like to buy produce that is grown locally, and therefore in season, for a number of reasons.  Firstly, fruit and vegetables which have been harvested as close as possible to ripeness and which have traveled the shortest possible distance to get to your table tastes better.  It's a no-brainer really.  I mean, let's face it, you know that you feel like c**p after spending 14 hours on a long-haul flight to the other side of the world, so why for a moment would you think that something as delicate as a strawberry flown all the way from Chile in the middle of our winter is going to cope with long-haul air travel any better than you do?  Secondly, avoiding out of season produce imported from the other side of the world is one way of making a small difference to my carbon footprint.  Admittedly, however, I am not fanatical about this.  I do buy imported specialty goods from time to time - cheeses, olives and olive oils, for example - but I do try not to overdo it on the imports.  And, lastly, I like to give as much support as I possibly can to local producers.

So you won't find me buying peaches, strawberries or tomatoes in the middle of winter.  And you won't find me buying lemons in January.  In short, if something grows here in New Zealand I won't buy an out of season import.  I do, however, make an exception of buying imported fruit on rare occasions when it is fruit which doesn't grow here - pineapple, bananas, papaya, mango, for example - and even though I know that here, far from where they have grown, they are not truly at their best, there is nothing quite like indulging in some tropical fruit for the occasional special treat.

With that in mind, I was faced with a bit of a dilemna this week.  At I Heart Cooking Clubs, where we are cooking with Tessa Kiros, our theme for the week was "Fight Scurvy - Eat More Citrus" - a theme I normally would have been super-excited about, except that it's so definitely not citrus season here in New Zealand right now.  I definitely wasn't about to rush out and buy up bags of lemons or oranges imported from the US.  So, just as I was wondering if I might be able to adapt something to perhaps use some of my homemade marmalade, I came across bags of blood oranges on special at the supermarket.  Now blood oranges are one of my favourite fruits, and since we don't grow them here (as far as I know) I don't feel too bad about buying imported ones.

As I've done so often over the last few months, I turned to Tessa's book, Falling Cloudberries: A World of Family Recipes, which I think by now has actually become the most used cookbook in my collection.

Falling Cloudberries: A World of Family Recipes

From there it was a breeze to turn Tessa's Little Lemon Cakes into Little Blood Orange Cakes.

Little Blood Orange Cakes 2

These little cakes are utterly, utterly delicious.  They are light, beautifully moist, and the delicate, slightly "perfumed" flavour of the blood orange makes them seem ever so slightly exotic.  These are pretty much perfect any time of day, but I think would be especially good for dessert on those occasions when you are looking for something that is not too rich or heavy.  A dollop of creme fraiche or Greek-style yoghurt would be a good addition on the side.

Tessa suggests making these in individual 3/4 cup ramekins, or a single 20cm (8 inch) cake tin.  I definitely wanted individual cakes here, but my ramekins weren't quite big enough - note to self, get some bigger ramekins.  As it turned out, Texas sized muffin tins worked perfectly.

Little Blood Orange Cakes 1

Little Blood Orange Cakes
Adapted from recipe by Tessa Kiros
Makes 4
Click here for a printable copy of this recipe

100g (3-1/2 oz) butter, room-temperature
100g (3-1/2 oz) caster sugar
1 large, free-range egg, separated
1 teaspoon vanilla extract
100g all purpose flour
1 teaspoon baking powder
1 blood orange, grated zest and juice
60ml (1/4 cup) milk

For icing:
1-1/2 tablespoons blood orange juice
50g (1-3/4 oz) icing sugar

Preheat oven to 180 degrees C (350 degrees F).

Lightly grease and flour the base and sides of four 3/4 cup ramekins, or Texas muffin tins.

Cream the butter and sugar, until light and fluffy.  Add the egg yolk and vanilla, and beat well.

Add the sifted flour and baking powder, together with the grated zest of the blood orange.  Fold in with a metal spoon, just until combined.

Add the milk and blood orange juice, and stir well until fully incorporated.

Using clean beaters, beat the egg white in a small bowl until white and fluffy and holds soft peaks.  Add one large spoonful of the egg white to the cake mixture, and mix well to loosen the cake batter.  Add the rest of the egg white, and fold in gently using a large metal spoon.

Divide mixture evenly between ramekins or muffin moulds.  Put into the preheated oven and bake for about 30 minutes - until the cakes are golden, and a skewer inserted into the centre comes out clean.

Remove from oven and place ramekins or tin on a wire rack to cool completely.  Run a knife around the sides of the cakes to loosen and remove from their moulds.

Make the icing by whisking the icing sugar and blood orange juice together until smooth, adding more of either to achieve the consistency you want.  (I kept mine fairly runny as I wanted more of a glaze than a thick icing.)

Put the cooled cakes onto a plate, make a few holes in the top of each cake with a skewer, and dribble the icing over the top.  I topped mine off with a garnish of the Seville Orange Spoon Sweets I made a few months ago.

If you would like to get to know Tessa a little better, then do go and visit my friends at I Heart Cooking Clubs and see what they've all cooked up ...

IHCC Tessa Kiros Button

... or check out Falling Cloudberries and many of Tessa's other great titles available from Amazon or Fishpond NZ.


I hope you'll give these wonderful little cakes a try - I'm sharing them this week at Cookbook Sundays, where my friends are delving into their cookbook collections and sharing some of their recipes.  Do stop by to see what they're cooking - you might even feel inspired to link up a recipe from one of your own cookbooks.

CookbookSundays

I am also sharing this post with Sweet New Zealand, a monthly blog event created by the very lovely Alessandra Zecchini, and which this month is hosted by the equally lovely and incredibly talented Emma at My Darling Lemon Thyme. This is an opportunity for all Kiwi bloggers (whether you are living in New Zealand or overseas), as well as for non-Kiwi bloggers living in New Zealand, to connect and share some of those sweet treats from your kitchen.  So, head on over to Emma's and share something sweet.
Sweet New Zealand Badge

Saturday, March 3, 2012

Plum & Chocolate Clafoutis & Cookbook Sundays #13


Plum & Chocolate Clafoutis 3

Perhaps it's an age thing, but I swear these days a week goes by in a heart beat.  I don't know where this last week vanished to, but somewhere in the midst of it summer turned to autumn virtually overnight, leaving many of us shivering on chilly mornings and wondering if we in fact even had a summer.  So, with Cookbook Sundays upon us once again (keep reading for more details), I thought I would share with you a recipe from Donna Hay's book "Seasons".

Seasons

I know this is not the first recipe I've shared with you from this book (see also Grilled Fig, Haloumi & Pomegranate Salad and Lemony Peach Cake), but I hadn't made anything from the autumn section of the book until now, and since I'd been given a big bag of beautiful blood red plums, the Plum and Chocolate Clafoutis seemed like a perfect choice.

Plum & Chocolate Clafoutis 2

These made a beautiful dessert for evenings which have a definite nip in the air - sweet, luscious plums, nestled in chocolatey batter, with an extra chocolate hit from the chunks of chocolate - I used Whittaker's Berry & Biscuit to which I think I have become totally addicted.  This also makes a fairly light dessert and leftovers, should you happen to have them, reheat well in the microwave for just 30-40 seconds, or are equally good cold for breakfast.

These are the work of moments to make;  they could easily be prepared in advance and then simply baked off just before serving.  I prepared these in individual dishes, but this could just as easily be made in a single larger dish.  You could substitute any manner of fruit in this dish - cherries, apricots, pears would all be good alternatives.  I hope you'll give it a try.

Plum & Chocolate Clafoutis 1

Plum & Chocolate Clafoutis Recipe
Adapted (only slightly) from recipe by Donna Hay
from "Seasons"
Serves 4
Click here for a printable copy of this recipe

50g (1/3 cup) all purpose flour
25g (1/4 cup) cocoa
75g (1/3 cup) caster sugar
3x eggs
250ml (1 cup) cream
1 teaspoon vanilla extract
150g (1 cup) dark chocolate, coarsely chopped
25g (1 oz) butter
6x plums, halved and stoned

Preheat your oven to 180 degrees C (355 degrees F).

Sift the flour, cocoa and caster sugar together into a medium bowl.

Put the eggs, cream and vanilla into a separate bowl, and stir to combine.

Add the egg mixture to the flour mixture, and whisk to combine.  Stir in the chocolate.

Place 4x 1-cup capacity shallow dishes on a baking sheet.  Divide the butter evenly between the dishes and put the dishes into the oven for a couple of minutes until the butter has melted.

Remove dishes from the oven, pour the chocolate batter into the dishes, top with the plums.  Return to the oven and bake for 20-25 minutes, or until the clafoutis are puffed and cooked through.

Now read on to learn more about Cookbook Sundays.

Cookbook Sundays Badge 

If you're anything like me you have dozens of cookbooks gathering dust on your bookshelves, some of which have never even been cooked from.  Sure I spent hours browsing through them when I first bought them, marking all the recipes I was going to make with little post-it notes, and yet still those books languish in the bookcase and never make it to the kitchen.  There are others from which I have made but one recipe which was such a resounding success that I've made it over and over again, and yet somehow I've never made anything else from that book.  Sound a bit familiar?!

Take comfort - you are not alone, and now Cookbook Sundays is your opportunity to change that.  Every Sunday I'm going to share with you a recipe that I haven't made before from one of my ever expanding collection of cookbooks.  And, because I know that if you have read this far then you are guilty of this too, I'm inviting you to join in with me.  Each week my Cookbook Sundays post will have a linky for you to share something you've cooked from one of your cookbooks.

The rules for joining in are simple:
  1. Your post must state the author and the title of the book your recipe has come from.
  2. Your post must mention Cookbook Sundays and link back to this post.  Including the Cookbook Sundays badge is optional, but always appreciated.
  3. You may submit as many entries as you like, and you may use the same cookbook as many times as you like.  Old posts are also welcome.
  4. Lastly,  remember that what goes around, comes around - one of the reasons you are participating in this is because you want people to read your posts, so do the right thing and go and visit a few of the other participants - you can even "Like" your favourites. 
Now, go and dust off those cookbooks and get cooking!  Use the linky tool at the end of this post to submit your entry/entries - simply scroll down to where it says "You are next ... Click here to enter", and then follow the instructions.  The linky will be open for one week.

Lastly, if you would like to use the Cookbook Sundays badge in your post, simply copy the code in the box beside the badge below and paste it into your post.  Feel free to also use it in your sidebar if you wish.

CookbookSundays

Saturday, February 25, 2012

Panzanella & Cookbook Sundays # 12


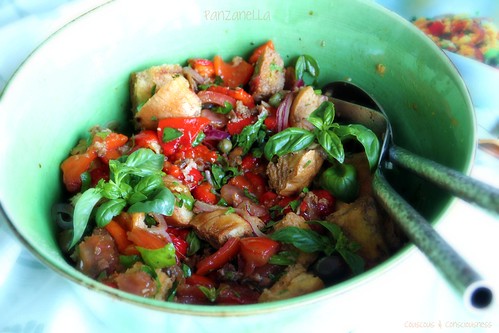
Panzanella

Those of you who have been visiting here for a while, know that I regularly cook along with my friends at I Heart Cooking Clubs, and that for the last five months we have been cooking the food of the lovely Tessa Kiros.  As we choose a different chef to inspire us every six months, we only have one more month to spend with Tessa.  I have been loving delving into her books, and would love to add more of them to my collection;  sadly, budget constraints means an embargo on cookbook buying right now.  Nevertheless, without buying another book I still have more recipes bookmarked in my existing collection than I will be able to cook in the remaining month.  I could happily spend another six months with Tessa.

Anyways, our theme this week is "Lighten Up!"  All my friends in the northern hemisphere, approaching the tail end of a long winter of carb-loading and casseroles, are getting in the mood for spring and some lighter fare.  Being at the fag end of summer, as we are here in the southern hemisphere, we have salad produce not just in abundance, but at their very best, so this week's theme was right up my alley (which is not always the case).

With tomatoes and peppers in great supply right now, and reasonably priced to boot, I decided to go with an adaptation of Tessa's Panzanella from her book Twelve: A Tuscan Cook Book, and as this is a book I haven't used before this will also be my contribution this week to Cookbook Sundays.  If you've been delving into your cookbooks lately, I'd love you to share your post with me and my friends who are trying to get those cookbooks down off the bookshelves and onto the kitchen bench.  Keep reading for full details on how to participate.

Twelve: A Tuscan Cook Book

As I so often do, I used Tessa's recipe as inspiration, but made a few tweeks and changes to make it my own.  Now, there are probably panzanella rules, with a strict list of ingredients that are allowed to be included, and I have most likely broken every panzanella rule known to the Tuscan housewife.  Maybe Alessandra can help me out here.  Alessandra is Italian, and is also a fellow Kiwi blogger, and she is the one who calls us on it and keeps us honest when we take liberties with traditional Italian fare - we learn a lot from her and I, for one, am always grateful for her advice - so maybe she can tell me a thing or two about panzanella.  Perhaps to play it safe I will call my version a panzanella-inspired salad.

This is a rustic salad, the basic premise of which is to use up stale, leftover bread - I love dishes which come about in this way.  The bread is soaked to soften it, then it is crumbled through the salad.  In Tessa's recipe she begins by cutting up tomatoes, putting them in a colander, sprinkling with salt, and standing for a while to allow the juice to drain away.  She then goes on to soak the bread in water.  Why, I thought, soak bread in water when you are draining off all that beautiful, flavourful juice from the tomatoes.  "Two birds, one stone" - I drained my tomatoes in a colander set over a bowl containing the bread cubes.  Tessa includes celery in her recipe which I omitted, and I added in a few extras - roasted red peppers (wish I'd used yellow actually, just because the colour contrast would have looked prettier), garlic, capers and black olives.  I'm sure there are plenty of other things you could put in this, though I would say that bread, tomatoes and basil are the critical ingredients and most importantly, do not even contemplate making this with anything less than tomatoes picked at the height of the season - out of season, hothouse tomatoes will absolutely not do for this.

Panzanella Recipe
Inspired by a recipe by Tessa Kiros
Serves 6
Vegetarian

Note:  Quantities are not critical here - simply use this recipe as a guide and adjust quantities and ingredients to suit what you have on hand


day-old bread - I used 2/3 of a loaf of ciabatta bread
perfectly ripe tomatoes - I used 4 large tomatoes
red or yellow peppers - I used 3 red peppers
1/2 red onion, finely sliced
white wine vinegar
salt
clove of garlic, finely chopped
capers - a small handful
black olives - a large handful
flat-leaf parsley - generous handful, roughly chopped
basil leaves - generous handful, roughly torn
extra virgin olive oil
balsamic vinegar
flaky sea salt
freshly ground black pepper

Preheat the oven to 180 degrees C (350 degrees F).  Place peppers in a shallow baking dish, and roast in the preheated oven, turning from time to time, until the skin has blackened in places on all sides, and the peppers are slightly soft.  Remove from the oven and put the peppers into a plastic bag.  Set aside for about 10 minutes to sweat - this will enable the skins to slide off easily.  When cool enough to handle, peel the skins off the peppers and discard, at the same time removing and discarding the seeds and core.  Tear or chop the flesh of the peppers up into largish pieces and set aside.

Cut the bread into largish cubes and put into a large bowl.

Set a strainer over the bowl, cut the tomatoes into quarters and scoop the seeds out into the strainer.  Using the back of a spoon, press as much juice as you can through the strainer and toss the bread well in the juice.  Discard the seeds from the strainer, set the strainer back over the bowl, and put the tomato quarters into the strainer.  Sprinkle with a little flaky sea salt, to draw out a little more juice, and allowing it to drain into the bread.  Leave to stand for about 10 minutes.

Put the onion slices into a small bowl, cover with cold water, sprinkle with a little salt and add a splash of white wine vinegar.  Leave to stand for 10 minutes.

Remove the tomato quarters from the strainer, tear or roughly chop into pieces and add to the bread in the bowl.  Add the chopped garlic, peppers and drained onions, along with the capers, olives, and chopped and torn herbs.  Drizzle liberally with the extra virgin olive oil and balsamic vinegar, and season with flaky sea salt and freshly ground black pepper.

Toss well, taste and adjust seasonings as necessary, and serve. 

If you would like to get to know Tessa a little better, then do go and visit my friends at I Heart Cooking Clubs and see what they've all cooked up ...

IHCC Tessa Kiros Button

... or check out Falling Cloudberries and many of Tessa's other great titles available from Amazon or Fishpond NZ.


Now read on to learn more about Cookbook Sundays.

Cookbook Sundays Badge 

If you're anything like me you have dozens of cookbooks gathering dust on your bookshelves, some of which have never even been cooked from.  Sure I spent hours browsing through them when I first bought them, marking all the recipes I was going to make with little post-it notes, and yet still those books languish in the bookcase and never make it to the kitchen.  There are others from which I have made but one recipe which was such a resounding success that I've made it over and over again, and yet somehow I've never made anything else from that book.  Sound a bit familiar?!

Take comfort - you are not alone, and now Cookbook Sundays is your opportunity to change that.  Every Sunday I'm going to share with you a recipe that I haven't made before from one of my ever expanding collection of cookbooks.  And, because I know that if you have read this far then you are guilty of this too, I'm inviting you to join in with me.  Each week my Cookbook Sundays post will have a linky for you to share something you've cooked from one of your cookbooks.

The rules for joining in are simple:
  1. Your post must state the author and the title of the book your recipe has come from.
  2. Your post must mention Cookbook Sundays and link back to this post.  Including the Cookbook Sundays badge is optional, but always appreciated.
  3. You may submit as many entries as you like, and you may use the same cookbook as many times as you like.  Old posts are also welcome.
  4. Lastly,  remember that what goes around, comes around - one of the reasons you are participating in this is because you want people to read your posts, so do the right thing and go and visit a few of the other participants - you can even "Like" your favourites. 
Now, go and dust off those cookbooks and get cooking!  Use the linky tool at the end of this post to submit your entry/entries - simply scroll down to where it says "You are next ... Click here to enter", and then follow the instructions.  The linky will be open for one week.

Lastly, if you would like to use the Cookbook Sundays badge in your post, simply copy the code in the box beside the badge below and paste it into your post.  Feel free to also use it in your sidebar if you wish.

CookbookSundays

Saturday, February 18, 2012

Clafoutis Provencal & Cookbook Sundays # 11

Clafoutis Provencal 1

My goodness where did the last week go to?  It seems to have vanished in a flash, and here we are at Saturday evening again and time for another Cookbook Sundays.  If you've been delving into your cookbooks lately, I'd love you to share your post with me and my friends who are trying to get those cookbooks down off the bookshelves and onto the kitchen bench.  Keep reading for full details on how to participate.

In the meantime ... what did I conjure up from my cookbooks this week?  In actual fact my recipe this week comes from "The French Women Don't Get Fat Cookbook".  This book is not in my collection, and is probably not the kind of book that I would buy.  But I was at the library the other day, and it was out on display.  Don't really know what made me pick it up, but the book immediately fell open at this recipe and I knew that I just had to make it.

The French Women Don't Get Fat Cookbook

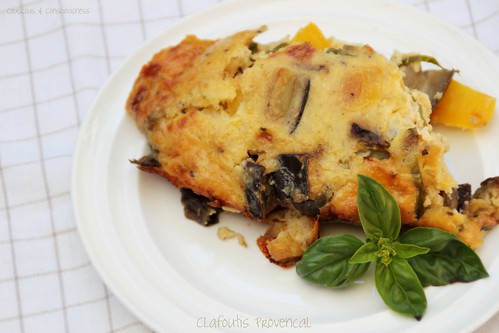
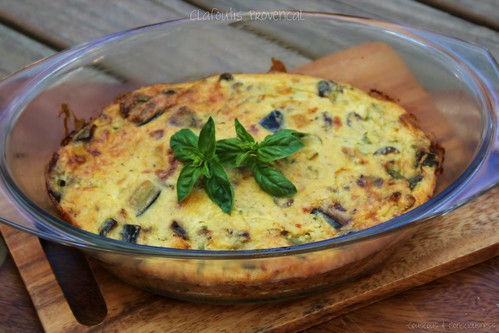
Now, one glimpse at my photos, and you won't need me to tell you that this dish is not going to win any beauty contests.  It's brown food, people, and not even Lord Lichfield could have made this look good.  Still, for all its wallflower looks, this dish delivers on flavour.

In the introduction to this recipe, the author says, "Clafoutis usually refers to a dessert preparation, but in Provence it can be a savory yet still rich dish with cheese, eggs, and bread."  The sweetness of peppers in this dish, with the pungency of garlic, the salty brininess of black olives, the earthy herbaceousness (probably not a real word, but you know what I mean) of basil, and the nutty, tangy Parmesan makes a great combination.  If I had a disappointment in this dish it was probably the aubergine.  Now I love aubergine - it's one of my favourite vegetables - but in this dish it somehow didn't shine and didn't do anything to enhance the dish.  I would definitely make this dish again, but I think I would use red peppers instead of yellow - I think red have just a bit more sweetness and more flavour, also the bright colour I think would look a bit more appealing.  Other changes I would make ... I think some slow roasted tomatoes would be great in here, for both colour and flavour, and I feel inclined to swap the aubergines out for some courgette - again I think the colour and flavour would be better here.  But, hey, really you could put just about anything in here.  You could even take this in a totally different direction using some Italian sausage or chorizo, with sweet potato or pumpkin, some spinach and blue cheese ... mmmmm, think I just might have to try that.

A funny thing ...  The recipe stated that it would serve 4 and I have to say that when I got it out of the oven, my first thought was "Well that's obviously why French women don't get fat - this would barely feed two".  I was wrong - I served this as a main meal with a light green salad, and it would easily give 3-4 servings.  I think this dish would really shine served for a late summer lunch, followed by a long siesta.

Clafoutis Provencal 2

Clafoutis Provencal Recipe
Adapted from recipe by Mireille Guiliano from
Serves 3 to 4
Vegetarian
Click here for a printable copy of this recipe

2-3 tablespoons olive oil
1x medium aubergine, cut into 1 cm (1/2 in) dice
1x yellow pepper, deseeded & cut into 1 cm (1/2 in) dice
flaky sea salt & freshly ground black pepper

1x slice of bread, crusts removed
2x garlic cloves, peeled
1 cup ricotta
3x large free-range eggs
2 tablespoons fresh basil, roughly chopped
1/2 cup black olives, stones removed and halved
3/4 cup freshly grated Parmesan

fresh basil to garnish

Preheat your oven to 180 degrees C (350 degrees F).

Grease a 20 cm (8 in) square baking dish with butter and set aside.

Heat the olive oil in pan set over medium heat, and saute the yellow pepper and aubergine until softened and just starting to caramelise.  Season with flaky sea salt and freshly ground black pepper.  Set aside to cool.

Put bread, garlic, eggs and ricotta into a food processor, and process until smooth.  Remove to a bowl;  add the basil, olives, Parmesan, and the cooled aubergine and pepper mixture;  season with more flaky sea salt and black pepper;  and mix everything together gently.

Pour the mixture into the prepared baking dish and put into the hot oven.  Bake for 30-35 minutes until lightly golden on top.  Take care not to overcook.

Remove from the oven and serve warm, garnished with extra basil.  A crisp green salad makes a good accompaniment.

Now read on to learn more about Cookbook Sundays.

Cookbook Sundays Badge 

If you're anything like me you have dozens of cookbooks gathering dust on your bookshelves, some of which have never even been cooked from.  Sure I spent hours browsing through them when I first bought them, marking all the recipes I was going to make with little post-it notes, and yet still those books languish in the bookcase and never make it to the kitchen.  There are others from which I have made but one recipe which was such a resounding success that I've made it over and over again, and yet somehow I've never made anything else from that book.  Sound a bit familiar?!

Take comfort - you are not alone, and now Cookbook Sundays is your opportunity to change that.  Every Sunday I'm going to share with you a recipe that I haven't made before from one of my ever expanding collection of cookbooks.  And, because I know that if you have read this far then you are guilty of this too, I'm inviting you to join in with me.  Each week my Cookbook Sundays post will have a linky for you to share something you've cooked from one of your cookbooks.

The rules for joining in are simple:
  1. Your post must state the author and the title of the book your recipe has come from.
  2. Your post must mention Cookbook Sundays and link back to this post.  Including the Cookbook Sundays badge is optional, but always appreciated.
  3. You may submit as many entries as you like, and you may use the same cookbook as many times as you like.  Old posts are also welcome.
  4. Lastly,  remember that what goes around, comes around - one of the reasons you are participating in this is because you want people to read your posts, so do the right thing and go and visit a few of the other participants - you can even "Like" your favourites. 
Now, go and dust off those cookbooks and get cooking!  Use the linky tool at the end of this post to submit your entry/entries - simply scroll down to where it says "You are next ... Click here to enter", and then follow the instructions.  The linky will be open for one week.

Lastly, if you would like to use the Cookbook Sundays badge in your post, simply copy the code in the box beside the badge below and paste it into your post.  Feel free to also use it in your sidebar if you wish.

CookbookSundays