Saturday, October 15, 2011

Chicken Shish Tawook with Radish Tzatziki


Chicken Kebabs 2 

When we lived in Christchurch our favourite haunt for Middle Eastern food was Sami's Cafe in Riccarton - always chicken shish tawook for my partner and falafel for me.  You may say that we are creatures of habit, but I like to think that when you find something that seems as close to perfection as you can get, why would you choose anything else?  And believe me when I tell you that Sami's falafel really are perfection - in fact if anyone knows where you can get better I'd like to hear about it.  Not only is the food here great, but Sami himself is an absolute delight - it is so obvious when you watch him working  that he pours so much love and pride into every single souvlaki he prepares - perhaps that's why they taste so good.  Needless to say, whenever we revisit Christchurch these days, a meal at Sami's is always on the agenda.  On one such recent visit Sami gave me a selection of their Sami's Kitchen range of spice blends to trial, and I'm enjoying experimenting with these (see note at the end of this post).  There are four different blends in the range, each one prepared according to recipes that have been handed down through several generations of Sami's family, and all blends are free of gluten, wheat, MSG, and other fillers.

Sami's Shish Tawook 

The first blend that I tried was the Shish Tawook, which I used to marinate some chicken pieces, which were then skewered and barbequed, and served with a peppery radish tzatziki and Chickpea, Feta & Coriander Salad which I shared with you a couple of weeks ago.  This blend of spices includes, garlic, paprika, pimento, nutmeg, cinnamon and thyme, and the resulting kebabs (according to my partner) tasted just like the shish tawook that he enjoys at Sami's.  The chicken once it came out of its marinade-bath was incredibly tender and the end result, although wonderfully flavourful, was not overtly spicy.  It is likely therefore to appeal to a variety of palates, even those that might ordinarily eschew spicy foods or be wary of trying dishes that may be foreign to them.  I think this could also work very well with a variety of seafood, especially shrimp, or as a rub to change up that Sunday evening roast chicken.

Hope you'll give this a try, and keep watching this space as I try out some of the other spice blends.

Chicken Shish Tawook with Radish Tzatziki Recipe
Makes 6 large kebabs
Click here for a printable copy of this recipe

For the marinade:
2-3 tablespoons olive oil
juice of 1/2 lemon
1 garlic clove, finely minced
flaky sea salt

For the kebabs:
500g chicken thighs
6 button mushrooms
1 red pepper, deseeded and cut into 2.5 cm (1 inch) squares
6 bay leaves, fresh

For the tzatziki:
2 cups Greek yoghurt (see note below)
2 cloves garlic, finely minced
2 tablespoons extra virgin olive oil
juice of 1/2 lemon
4-6 medium radish (depending on size), finely grated
handful of fresh mint leaves, finely chopped
flaky sea salt & freshly ground black pepper

Begin with the marinade.  In a medium sized bowl, mix together the spices, olive oil, lemon juice, garlic, and sea salt.

Cut the chicken thighs into 2.5 cm (1 inch) cubes, and add to the marinade.  Mix well until all the chicken pieces are thoroughly coated.  Refrigerate at least 3-4 hours, preferably overnight.

Thread onto skewers as follows:  begin with a piece of red pepper, then 3 or 4 cubes of chicken, mushroom, 3 or 4 more cubes of chicken, another piece of red pepper, and lastly a bay leaf (folded in half).

Barbeque or grill until the chicken is completely cooked through - about 15 minutes.

While the chicken is marinating, prepare the tzatziki.  Put the yoghurt into a bowl;  stir in the garlic, olive oil and lemon, and blend well.  Add the grated radish, fresh mint, a generous pinch of flaky sea salt and freshly ground black pepper.  Mix well, taste and adjust seasoning as necessary.

Note:  If you are lucky enough to live in a place where you can get Greek yoghurt, then use it.  Unfortunately, here in New Zealand, although there are a number of yoghurts on the market now labelled as "Greek-style", they are still not like a true Greek yoghurt.  I find the best way to approximate it is to put the yoghurt into a sieve lined with a paper towel, place the sieve over a bowl, and refrigerate for several hours to allow the whey to drain off.

Chicken Kebabs 1 

Important note:  Although I was given the Sami's Kitchen spice blends to trial, I have in no way been paid to endorse this product.  The opinions given are my own, and you can be sure that if I wasn't happy with the product I would not be telling you about it here.

Monday, October 10, 2011

Cranberry Sorbet Recipe


Cranberry Sorbet

Whenever I buy a new cookbook (and I am totally not going to divulge just how often that might be), I find that there is always a stand-out recipe that really catches my eye - one that screams at me "you have to make this".  It might even be the recipe that convinces me I just have to buy the book.  It will get bookmarked;  every time I take it off the bookshelf I will remind myself that I have to make this recipe;  and yet I will often make dozens of other recipes from the book, but not the very one that had attracted me to the book.  Sound familiar?  Oh, come on, admit it - I just know that I am not the only one who does that.

Anyhow, such was the case when I purchased Tessa Kiros' gorgeous book "Falling Cloudberries", which I told you about last week.  This cranberry sorbet in fact graces the cover of this book, and I knew that I just had to make it, if only because I could not resist the idea of making something of such sublime colour.  And yet, somehow, every time I got the book off the shelf and drooled over the cover photo I ended up making something else.  Until now ... I told you last week that the I Heart Cooking Clubs group is now cooking for the next six months with Tessa Kiros, and since our theme for this week is Pot Luck it seemed like the perfect opportunity to rustle up a little sorbet.

You can use fresh or frozen cranberries for this - I'm guessing for those of you living in the northern hemisphere, you must be getting pretty close to fresh cranberry time, but here in New Zealand I had to settle for frozen ones.  On a whim, I also added a couple of tablespoons of orange flavoured liqueur.

This is an absolute breeze to make, especially with the assistance of an ice cream maker.  The result is very fresh and tart, but I find there is a certain dissonance going on that I really can't get my head around.  Now don't get me wrong - I love tart, bitter, sour flavours, but there is something about the look and colour of this sorbet that makes you think it is going to be really luscious and sweet.  With every spoonful, I find that my eyes are telling my brain that a certain fruity sweetness awaits, and indeed the first notes that my palate registers are sweet, but the finish is decidedly tart, and then my brain just feels all confused.  So, it's not unpleasant - it's actually rather nice - but it is just not what my brain thinks my mouth should be experiencing.  In all, as a dessert, I find this a little unsatisfying - there is just something about the expectation and all that confusion, that makes this not really work for me as a dessert.  However, I'm finding a nice spoonful or two mid-afternoon is an absolute delight, and I imagine it could also work really well as an inter-course palate cleanser.    I would say that this is worth making at least once, if only for the sheer beauty of it, but also I think it's good to surprise your tastebuds every so often with something they aren't expecting.  If you give this a try, I'd love to know what you think.

Cranberry Sorbet Recipe
Adapted from recipe by Tessa Kiros from
Makes approximately 1.25 litres
Vegan
Click here for a printable copy of this recipe

500g (1 lb) cranberries, fresh or frozen
1-1/2 cups (345g) caster sugar
3-1/2 cups water
2 tablespoons orange-flavoured liqueur (optional)

Put the washed cranberries into a pot with the water and sugar.  Stir constantly while you bring up to the boil, reduce heat and simmer for 10 minutes, stirring occasionally, or until the berries are soft.

Puree using an immersion blender, strain, and set aside to cool completely.  Refrigerate overnight.

Next day, add the liqueur (if using), and then process in your ice cream maker according to manufacturer's instructions.

If you would like to get to know Tessa a little better, then do go and visit my friends at I Heart Cooking Clubs and see what they've all cooked up ...

IHCC Tessa Kiros Button

... or check out Falling Cloudberries and many of Tessa's other great titles available from Amazon or Fishpond NZ.


Sweet New Zealand Badge

I am also sharing this post with Sweet New Zealand, a monthly blog event created by the very lovely Alessandra Zecchini, and which it is my pleasure to be hosting this month. This is an opportunity for all Kiwi bloggers (whether you are living in New Zealand or overseas), as well as for non-Kiwi bloggers living in New Zealand, to connect and share some of those sweet treats from your kitchen.  You can find all the details, along with a linky tool to make it really easy to submit your entry right here.

Friday, October 7, 2011

Cauliflower Soup with Spinach Pesto

Cauliflower Soup with Spinach Pesto

I actually made this soup a couple of weeks ago and, like a lot of other potential posts, it has been languishing in draft ever since - I've got to tell you, it wasn't lonely; there's a lot of stuff there in "draftland".  Anyway, even though here in New Zealand we are now well into spring, evenings are still often cool enough to enjoy a good bowl of soup, and I know that those of you in the northern hemisphere will welcome this now that the days are definitely getting cooler and shorter for you.  So I thought I really ought to share this with you now before the opportunity is lost.

A couple of weeks ago I picked up a beautiful cauliflower at my local market, and looking for inspiration I turned to one of my favourite bloggers and cookbook authors, Heidi Swanson.  Heidi doesn't know me, but she is one of those people who inspires me beyond belief.  Her gorgeous blog, 101 Cookbooks, is the first food blog I ever stumbled across and was my inspiration for starting my own blog.  Her photographs are gorgeous;  her recipes healthy, flavourful, interesting, and always reliable.  Of all the blogs I visit, she still sets the benchmark that I aspire to.  Of course I couldn't wait to get my hands on Super Natural Cooking: Five Delicious Ways to Incorporate Whole and Natural Foods into Your Cooking (her first book), and more recently her second book - Super Natural Every Day: Well-loved Recipes from My Natural Foods Kitchen.  On her blog, Heidi has a number of cauliflower recipes, but on a chilly Sunday afternoon it was this recipe for cauliflower soup in Super Natural Cooking that really appealed to me.  I did modify the pesto a little, using toasted sunflower seeds (which I had in the pantry) instead of brazil nuts (which I didn't), and using pecorino instead of parmesan, just because I love it and there are many things in which I prefer it. I also used leeks in the soup instead of onion, such is my preference, but feel free to go either way.
Cauliflower Soup with Spinach Pesto Recipe
Adapted from recipe by Heidi Swanson in
Serves 4
Vegetarian
Click here for a printable copy of this recipe

For the pesto:
1/2 cup toasted sunflower seeds
2 large handfuls baby spinach leaves
4 cloves garlic
1/2 cup freshly grated pecorino cheese (I used a pecorino sardo)
1/2 cup extra virgin olive oil
flaky sea salt

For the soup:
3 tablespoons butter
2 cloves garlic
1 leek
1 teaspoon chilli flakes
1 large potato, peeled and chopped
1 cauliflower, cut into small florets
5 cups vegetable stock
1/3 cup cream
flaky sea salt

To make the pesto, put the sunflower seeds, spinach, garlic and salt into food processor and pulse until the leaves and nuts start to break down. Then leaving the motor running, begin to add the oil in a steady stream until you have a smooth paste. Remove to a bowl, stir in the grated pecorino, taste and add a little more salt if necessary. Set aside.

To make the soup, begin by heating the butter in a large pot over medium-high heat. Add the garlic, leek, and red pepper flakes and saute for a few minutes until the garlic and leek have begun to soften. Add the potato pieces and cauliflower florets, and saute for another 2 or 3 minutes. Pour in the stock, bring to a boil, reduce heat and simmer until the vegetables are tender.

Remove from the heat, and puree using an immersion blender. Stir in the cream and season to taste with the flaky sea salt.

Serve in individual bowls, finished with a big dollop of the pesto.

This soup was deliciously smooth and velvety, and the little kick of heat from the chilli flakes together with the spinach pesto added another dimension to what could potentially be a rather bland dish - such is the genius of Heidi.  This makes a great Sunday night supper, served casually in a big bowl with some crusty bread, but could be equally well received as an elegant starter to a more formal meal.


Monday, October 3, 2011

Chickpea, Feta & Coriander Salad


Chickpea, Feta & Coriander Salad 2


If you've been following this blog for awhile, then you know that one of the places I like to play is at the I Heart Cooking Clubs group.  This group chooses a different chef and cookbook author every six months, and during that time we explore the recipes of that chef according to a variety of themes.  We've just finished cooking for the last six months with renowned British chef, Jamie Oliver, and you can check out all the contributions over that period here.

Now it's time to welcome in a new chef, and this week we begin cooking with the very talented Tessa Kiros.  Tessa was born in London to a Finnish mother and Greek-Cypriot father.  When she was four years old the family moved to South Africa, and when she turned 18 Tessa decided to spread her wings and travel.  During her travels Tessa has explored many different cultures and traditions, and worked in restaurants in Sydney, Athens, Mexico and London.  On a trip to Italy she met her husband, Giovani, and now lives in Tuscany with their two daughters.  Tess has written a number of cookbooks, and I have to say that if you don't have at least one Tessa Kiros cookbook in your collection you are truly missing something.

I picked up a copy of Falling Cloudberries (A World of Family Recipes) about 18 months ago (thanks to some Christmas gift vouchers).  In her introduction to the book, Tessa says:

"These are the recipes I grew up with:  the recipes that have woven their way through the neighbourhoods of my mind, past indifference and into love.  Those that have stayed while others might have fluttered away with a gentle spring breeze.  These are the ones I choose to share;  the ones that special people have taught me and that I have recorded, sometimes over a pot of coffee at my own kitchen table, and sometimes struggling to understand through the barriers of language on a journey somewhere."

There are recipes from Finland, Greece, Cyprus, South Africa, Italy, and many of the other places that have influenced Tessa's cooking style.  The book is beautifully photographed;  the recipes are simple and accessible;  and all the recipes are interwoven with wonderful stories about Tessa's childhood and travels.

Our theme this week, unsurprisingly, is "Welcome Tessa", and I chose to make her Chickpea, Feta & Coriander Salad from the Falling Cloudberries book.  This was incredibly quick and easy to make and, left to marinate for about three hours for all the flavours to infuse, made a great accompaniment to some chicken kebabs and rice.  I did make a couple of minor changes, leaving out red onion and spring onion (since, as you most likely know by now, we don't do onion in our house), but if you feel inclined to include them, then saute one red onion in the oil until cooked through before adding the garlic and chilli, and mix some spring onions in when adding the herbs.

Chickpea, Feta & Coriander Salad
Adapted from recipe by Tessa Kiros in
Serves 6 as a side dish
Vegetarian
Click here for a printable copy of this recipe

400g tin of chickpeas

3 tablespoons olive oil
5 garlic cloves, chopped very finely
1 or 2 red chillies, deseeded and finely chopped

200g feta, cut into small cubes or crumbled
1/2 cup finely chopped fresh coriander (cilantro)
1 cup finely chopped flat-leaf parsley
3-4 tablespoons extra virgin olive oil
juice and zest of 1 lemon

Drain and rinse the chickpeas, put into a bowl and set aside.

Heat the olive oil in a small pan, add the chillies and the garlic and cook briefly - really just until the chilli has softened and the garlic is fragrant.  Take care not to brown the garlic.  Set aside and allow to cool completely.

Add the feta, coriander, parsley, lemon juice and zest to the chickpeas.  Add the cooled garlic and chilli oil, and then extra virgin olive oil.  Mix everything until well combined, taste and season with flaky sea salt and freshly ground pepper as desired.

Set aside to marinate for 2 to 3 hours to allow the flavours to develop fully.  Serve at room temperature.

As mentioned, I served this with chicken, but it would also make a great partner for fish or lamb, or even on its own with some grilled pita bread for a light lunch.  Oh, and by the way, if you are lucky enough to have leftovers, this tastes even better the next day.

If you would like to get to know Tessa a little better, then do go and visit my friends at I Heart Cooking Clubs and see what they've all cooked up ...

IHCC Tessa Kiros Button

... or check out Falling Cloudberries and many of Tessa's other great titles available from Amazon or Fishpond NZ.


Sunday, October 2, 2011

Sweet New Zealand


Sweet New Zealand Badge


We are now into the third month of the Sweet New Zealand monthly blog event, created by the very lovely Alessandra Zecchini, and it is my pleasure to be hosting the event this month. This is an opportunity for all Kiwi bloggers (whether you are living in New Zealand or overseas), as well as for non-Kiwi bloggers living in New Zealand, to connect and share some of those sweet treats from your kitchen. You can find a round-up of August's special treats on this page of Alessandra's blog, or go and visit this page of Pease Pudding's blog to find a round-up of September's sweet treats - I want to try everything!  This is a really fun way for us all to get to know each other, and I hope you will all join in for another month.  If you're new to this event, the rules are simple:

1.   This event is open to all bloggers living in New Zealand (even if you are not a Kiwi), as well as all Kiwi bloggers living and blogging overseas.

2.   You can enter anything sweet: cakes, biscuits, slices, desserts, even drinks, and you may submit as many entries as you like, including old posts if you like.

3.   Your entry must  contain the phrase Sweet New Zealand, the Sweet New Zealand badge (choose your own size), a link to the host, and to this post - so if you are submitting an older post remember to update it accordingly.

4.   To make submitting your entry really, really easy I have included a linky tool at the end of this post.  The linky will be open until 28 October and I will do a round-up of all entries on 31 October.  To use the linky tool, simply scroll down to where it says "You are next ... Click here to enter", and then follow the instructions.  If you prefer you can email your entry to me by 28 October, providing your name, your blog name and URL, your post URL, and a photo.  Please email to yoga dot tapas at gmail dot com.

And that's it - no more rules!  Have fun and I look forward to seeing all your sweet entries.


Tuesday, September 27, 2011

Apricot, White Chocolate & Cashew Nut Slice for Julia


Apricot, White Chocolate & Cashew Nut Slice

To those Kiwi bloggers who live in Auckland, Zarbo Cafe & Delicatessan will require no introduction whatsoever.  I was first introduced to Zarbo by one of my dearest friends, Julia.  Julia and I saw each other through many trials and tribulations, from the wild and mis-spent days of our twenties, to more "grown-up" times in our forties, including marriage and children (in her case) and marriage and divorce (in mine).  Sadly I lost Julia to her long battle with cancer about four years ago, and it saddens me greatly that now in my fifties (which I happen to think is the best time of my life so far) I cannot share this time with her.  But while she was still alive, Zarbo was "our place" - it was the place we used to frequently meet at and hang out together whenever I was visiting Auckland, and when they published their first cookbook, "Zarbo, Recipes from a New Zealand Deli", Julia was quick to gift me a copy.

Zarbo: Recipes from a New Zealand Deli

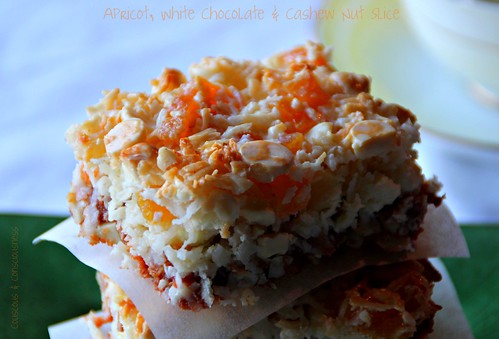
I miss Julia's friendship a lot, and think often about those long afternoons sitting in Zarbo, nattering over a cup of coffee (or two) and a piece of cake or slice.  So today when I was looking for a contribution to this month's Sweet New Zealand blogging event (more about that in a minute), I knew that I would find the perfect little something in my trusty Zarbo book.  The "Hello Rosie" Slice on page 95, was exactly reminiscent of the kind of thing Julia and I would have shared, though I have made a few changes.  The first change was more by accident than intent - because I am an idiot, and didn't read the recipe correctly, my chopped nuts ended up in the base instead of the topping - an accident I didn't discover until the slice was actually in the oven!!  I was worried that the end result would be something altogether too crumbly, but the slice has held together just fine and doesn't appear to have suffered in anyway from my mistake.  Accordingly, that is exactly how I have instructed you here, but if you feel like putting the nuts back into the topping, then go right ahead.  I also made a few substitutions - I have used cashew nuts instead of walnuts, dried apricots instead of sultanas, and white chocolate instead of dark.  I think you could easily experiment with all sorts of different fruit, nut and chocolate combinations in this recipe.  I hope you will feel inspired to have a go and come up with one of your own special combinations to share with someone close to your heart.

Sweet New Zealand Badge

The Sweet New Zealand monthly blog event was created by the very sweet Alessandra Zecchini, and is hosted this month by the equally sweet Alli at Pease Pudding.  This is an opportunity for all Kiwi bloggers (whether you are living in New Zealand or overseas), as well as for non-Kiwi bloggers living in New Zealand, to connect and share some of those sweet treats from your kitchen.  You can find a round-up of last month's special treats on this page of Alessandra's blog, or go and visit this page of Alli's blog to find out how you can join in this month.  Alli will be posting a round-up of entries at the end of the month.  I think I'm only just going to manage to slip in under the wire with this post, but if you feel like joining in and you don't have time to conjure up something new, you are welcome to link up an older post.

Now on with the recipe ...

Apricot, White Chocolate & Cashew Nut Slice Recipe
Adapted from
Vegetarian
Makes 18 bars
Click here for a printable copy of this recipe

For the base:
100g butter, melted
250g malt biscuits, crushed
2 cups raw cashew nuts, roughly chopped

For the topping:
1-1/2 cups white chocolate morsels
1 cup chopped dried apricots
3 cups long strand coconut
500g sweetened condensed milk

Grease a 20cm x 30cm (8 inch x 12 inch) slice tin, line with baking paper, and set aside.

Mix the crushed biscuits, chopped nuts, and melted butter together, and press into the tin.

Mix the chocolate, apricots, coconut and condensed milk together and press over the base.

Bake at 160 degrees C (320 degrees F) for approximately 30 minutes, or until lightly browned on top.  Take care not to overcook as the finished slice should be sticky, chewy and slightly moist.  If you find that the slice is browning too quickly, cover with a piece of baking paper until finished cooking.

Leave until cold before slicing.

Tuesday, September 20, 2011

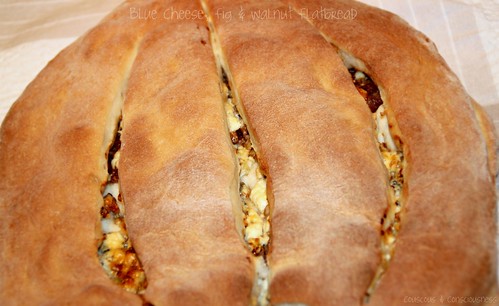
Blue Cheese, Fig & Walnut Flatbread


Blue Cheese, Fig & Walnut Flatbread 4A

Seven months after our lives were turned upside down by the Christchurch earthquake, we have finally settled into our own home in Nelson.  The last of the boxes (well, all bar two) have been unpacked;  the guest bedrooms have been painted in readiness for anyone who wants to come for a visit;  a new hot-water cylinder has been installed so that a decent shower is now a possibility; paintings have been hung;  and plans are underway for a new kitchen.

We are beginning to feel "at home" in our house and in this new community, and with that my inspiration to find my way back to the heart of my home - the kitchen - has returned.  I have unpacked all my cookbooks and spent hours pouring through them all, enjoying coming back to ones that I haven't opened for a long time, and I'm inspired by the abundance of beautiful fruit and vegetables and great small producers that I find at our local market.

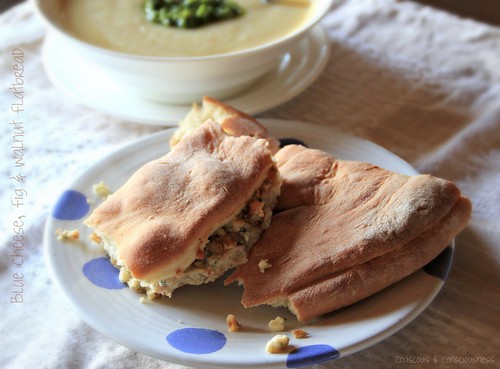
This weekend I picked up some beautiful local cheeses and chorizo at the market, and was inspired by a recipe from Return of the Naked Chef, by Jamie Oliver, to make this Blue Cheese, Fig & Walnut Flatbread to accompany them.  Although it didn't quite start out that way - it was going to be a cheese, chilli and paprika flatbread, but when I went to the pantry looking for dried chillies and paprika, somehow dried figs and walnuts were what jumped into my hands.

This bread was easy to make, has great texture, keeps well, and the filling turns this into a great "stand alone" bread.  Hope you'll give it a try.

Blue Cheese, Fig & Walnut Flatbread Recipe
Adapted from recipe by Jamie Oliver
(Makes 2 large loaves)
Vegetarian
Click here for a printable copy of this recipe

For the bread:
3 teaspoons dried yeast
1 tablespoon honey
625ml (1-1/4 pints) tepid water
1kg (2.2 lbs) high grade flour
2 teaspoons salt
extra flour for dusting

For the filling:
6 dried figs
200g (7 oz) blue cheese
1 cup walnuts

Dissolve yeast and honey in half of the tepid water, and set aside until a thick foam forms on top of the water.

Put the flour and salt into a large bowl, making a well in the centre.  Pour the frothy yeast mixture into the centre and then, using your hand, stir in a circular motion, gradually drawing more flour into the centre until all of the yeasty liquid has been absorbed.  Pour in the remaining tepid water and continue mixing until all the flour has been incorporated and you have a nice moist dough - use more liquid if necessary.

Dust a board or bench top with some extra flour, turn your dough ball out and knead vigorously for about 8 minutes. 

Flour your hands well, and sprinkle a little flour over the top of the dough.  Form into a ball and place on a baking tray lined with parchment paper.  Score the top of the dough with a sharp knife, cover with a clean tea towel, and set aside to prove until the dough has doubled in size.

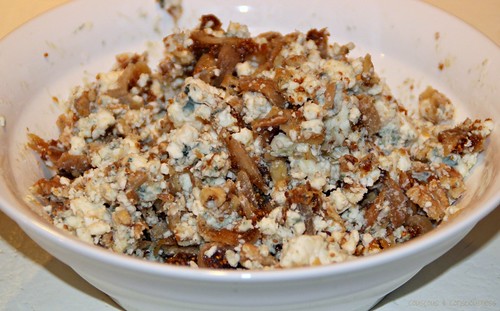
Meanwhile, prepare the filling.  Soak the figs in a little hot water until soft and plump, then chop coarsely.  Toast the walnuts until golden;  chop coarsely.  Put the chopped figs and walnuts into a small bowl, crumble in the blue cheese, and mix together well.  Set aside.

Blue Cheese, Fig & Walnut Flatbread 7A

Line a baking sheet with parchment paper and set aside.  Preheat your oven to 220 degrees C (425 degrees F).

When the dough has doubled in size, punch the air out of it and knead again for a minute or so.  Cut the dough into four equal sized pieces.  Set three pieces aside and cover with a tea towel, while you work with the first piece.

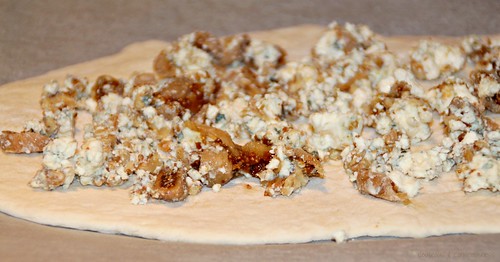
Roll the first piece of dough out into something vaguely resembling a large oval shape, and about the length of your baking sheet.  Place the rolled out dough onto the lined baking sheet.  Sprinkle half of the fig, walnut and cheese mixture over the top, leaving a 2 cm (1 inch) border. 

Blue Cheese, Fig & Walnut Flatbread 6A

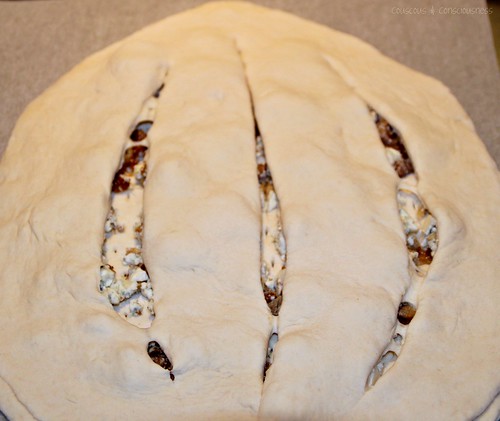
Roll out the second piece of dough to roughly the same size and shape (you don't need to be too precise), and drape this piece of dough over the top.  Press the edges together.  Make three or four deep slashes down the length of the bread, and stretch to open up the slashes exposing the filling.

Blue Cheese, Fig & Walnut Flatbread 5A

Now repeat with the remaining dough and filling.

Set loaves aside to prove for another 20-30 minutes, then bake in the preheated oven for 15 to 20 minutes.  Remove to a wire rack to cool for about 10 minutes.

This would be a great addition to an antipasto platter, or tear into chunks and serve with your favourite soup.

Blue Cheese, Fig & Walnut Flatbread 1A

I'm sharing this post at I Heart Cooking Clubs, where this week we have our final week of cooking with Jamie.  Do go and visit my friends at I Heart Cooking Clubs and see what they've all been cooking up for our farewell to Jamie, and find out who we'll be cooking with for the next six months ....

IHCC

.... and check out Jamies Italy and many of his other great titles, available from Amazon or Fishpond NZ.

Jamie's Italy     Jamie's Kitchen     The Naked Chef